Syncplify Server! Manual

Syncplify Server! Manual

This is the official manual and documentation for Syncplify Server! This document always refers to the most recent (current) version of the software, therefore it is possible that some of the topics covered in it might not be available, or they might be different, in your version of the software if you’re running an older version.

Updates and upgrades are released regularly by Syncplify to fix bugs and add new and useful features to the software. It’s always a good thing to make sure you keep your software up to date at all times.

Note

If you are not planning on reading this entire manual, or if you got here while looking for information on a specific topic, please make sure you familiarize yourself with this introduction first.

Subsections of Syncplify Server! Manual

READ THIS FIRST

Note

If you’re only planning on reading one page out of this whole manual, this is the one page you absolutely need to read. It goes over some of the most important concepts that every Syncplify Server! operator undoubtedly needs to know.

Upgrading from an older version?

Before you upgrade, please, read the following bullet-points very carefully. Version 6.x is a whole new code-base for Syncplify Server!, and even though we’ve done everything we could to maintain backwards compatibility, there are some breaking changes that you must be aware of before you upgrade to it:

  • Windows Users/Groups have been dropped: this is not a Windows-only software anymore; starting with version 6, Syncplify Server! is cross-platform, so all dependiencies that are uniquely tied to a specific operating system had to be removed
  • Your scripts (if any) will be lost: after 8 years of honorable service, we had to say goodbye to our old scripting engine; in the spirit of unifying and uniforming our product suite, all of our softwares will from now on utilize SyncJS as their only built-in scripting language

How to try Syncplify Server!

Anyone can download the evaluation version of Syncplify Server! from our web site. During the initial setup the software will also acquire a time-limited trial license, so you can test it with its full functionalities for a certain amount of time. Once such time expires, if you are satisfied, you can go ahead and buy an unlimited license.

Firewall considerations

Syncplify Server! does not and cannot configure your firewalls; neither your OS built-in firewall, nor your network/edge firewalls. You will have to make sure all firewalls and routers are properly configured, so that your intended audience can reach the server according to your own rules.

Typically (unless you change it in your configuration) Syncplify Server! uses:

  • Port 6443 for the management web UIs (SuperAdmin and Admin)
  • Port 22 for the SSH2/SFTP subsystem
  • Ports 20, 21, 64000-64099 for the FTP and FTPES subsystems
  • Ports 989, 990, 64100-64199 for the FTPS subsystem
  • Port 6444 for the WebClient! component (when available)

If you configure your Virtual SFTP Site to use different ports, you will also have to configure your OS and network routers and firewalls accordingly.

Installation and Setup

This portion of the manual covers the installation and initial configuration (also known as “setup”) of Syncplify Server! on various operating systems and environments.

Subsections of Installation and Setup

Download the installer

The most recent version of Syncplify Server! can always be found on Syncplify’s web site. For your convenience we have created a permalink which is short and easy to remember, and it never changes:

https://syngo.me/download

The software is available for Windows and Linux on both Intel/AMD and ARM platforms. Once you have downloaded the software for your system and platform, you can install it by following the instructions found in the pertinent pages of this section of the manual.

Install on Windows (GUI)

Once you have downloaded the GUI installer for Windows, deploying Syncplify Server! on your machine/VM is a simple, 3-phase, guided process.

Phase 1

Double click on the installer, choose the destination path (or leave the pre-filled one which is almost always the best choice) and let the installer copy all the files to your system. This phase will also automatically adjust your system configuration and create all the necessary Windows Firewall rules.

phase1 phase1

Phase 2

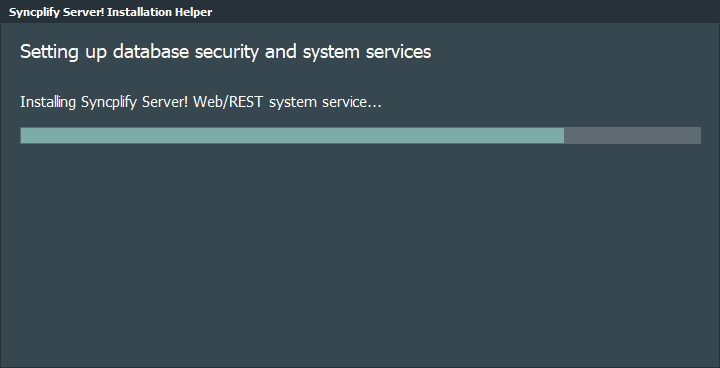
When you click Finish on the last page of the “setup” program, a second program will run automatically; this second and separate program prepares your operating system settings and services for the first run of Syncplify Server! on your machine/VM.

phase2 phase2

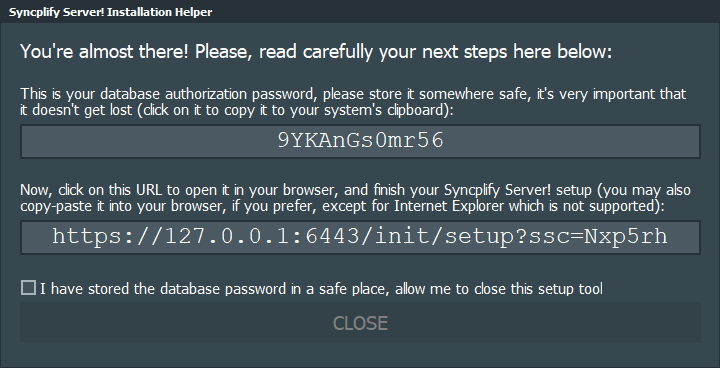
This second program is 100% automatic, and - once done - it will present to you a summary like this (or similar):

phase2 phase2

At this point, simply click on the provided URL to initiate the third and last phase of the software installation, which will occur in your browser.

Warning

You may use almost any browser you like, except for Internet Explorer.

Phase 3

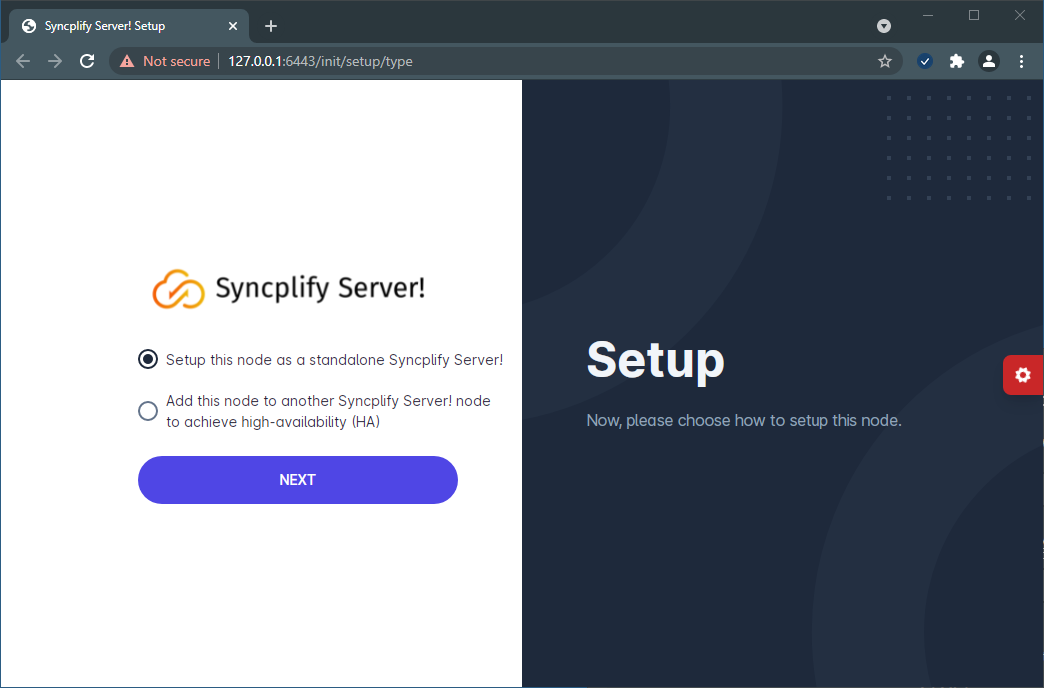
When you click on the link, your default browser opens (make sure it’s not Internet Explorer) and presents you with a brief guided procedure to configure your Syncplify Server! node, and to create your first SuperAdmin profile.

phase3 phase3

Tip

The first time you access our web service it will use a self-signed certificate, and you will be accessing it via its IP address rather than a host name. For these reasons, your browser will display a security warning. No worries, you can safely accept it and move forward, and install a trusted CA-issued certificate at a later time.

A short video walk-through

Install on Linux

To install Syncplify Server! on Linux, we provide a small command-line setup program inside of the downloaded tar.gz package.

Once extracted, the contents of the package will look pretty much like this:

linuxcli linuxcli

At this point, all you need to do is run the setup CLI (remember to sudo if you aren’t root) with the install parameter, and follow the on-screen instructions:

sudo ./ss6-setup install
Note

If you already have Syncplify Server! v6.0+ installed in your system, running the setup CLI (from the more recent version’s package) with the install parameter will automatically update/upgrade your software.

Intuitively, if one day you need to remove the software from your system, you can run the same command (which is now installed in your system’s /usr/bin) using the remove parameter:

sudo ss6-setup remove

General concepts

This section of the manual documents some important general concepts that every Syncplify Server! administrator must become familiar with, in order to be able to effectively manage the software and its configuration.

Tip

It is very important for Syncplify Server! administrators to familiarizes themselves with the information contained in this section of the manual; this is proven to run the software efficiently, save you time on reaching out for help from Syncplify staff, and improve your overall efficiency and effectiveness of the software itself, and its fitness to the purpose it was deployed for.

Subsections of General concepts

Minimum hardware

Regardless of whether you’re running Syncplify Server! on Windows or Linux, on x86 or ARM, the minimum hardware requisites are the same:

  • Storage space: 150 MB
  • RAM: 1 GB
  • CPU: 1 core
Warning

It is extremely important to understand that meeting the minimum hardware (or virtual hardware) requirements, though, does not guarantee that Syncplify Server! will perform well in your scenario. Only YOU can evaluate how many actual system resources are needed to execute the workloads you are going to assign to your server. So, please, read on.

Encryption is very CPU-intensive, so the number of CPU (or vCPU) cores you’ll need to deploy will increase based on the number of concorrent client sessions you expect to have to serve, the protocol handlers (e.g.: SFTP uses more CPU than FTP(E/S) and HTTPS). The amount of memory (RAM) will also increase, though not linearly with the CPU. And the storage space is directly determined by how much data you expect your clients to upload (store) on your server.

Purely as an indication, here’s a few scenarios we have tested in laboratory conditions:

10 concurrent clients, medium on-and-off load

  • Storage space: 150 MB
  • RAM: 1 GB (server process using ~170 MB)
  • CPU: 2 cores (Xeon E5-2640, server process using ~12%)

50 concurrent clients, constant heavy load

  • Storage space: 250 MB
  • RAM: 4 GB (server process using ~440 MB)
  • CPU: 8 cores (Xeon E5-2640, server process using ~24.5%)

500 concurrent clients, intermittent heavy load

  • Storage space: 250 MB
  • RAM: 4 GB (server process using ~970 MB)
  • CPU: 16 cores (Xeon E5-2640, server process using ~41.3%)

1000 concurrent clients, contant heavy load

  • Storage space: 250 MB
  • RAM: 8 GB (server process using ~2.1 GB)
  • CPU: 24 cores (Xeon E5-2640, server process using ~77.4%)

Log levels

There are 5 log levels defined in Syncplify Server! Each lower level includes all the information of all levels above it, and typically adds more information depending on its own definition.

Here’s a brief explanation:

Error

The “Error” log level only logs errors. This log level doesn’t log any information about the server’s and users’ activity, only error conditions. Most administrators do not use this log level simply because it doesn’t log enough information for a typical day-to-day use.

Warning

The “Warning” log level includes Errors and Warnings. Just like the “Error” log level, this log level doesn’t log any information about the server’s and users’ activity, only errors and warning. Although it can be useful to reduce the size of the logs in certain cases, typically administrators prefer to use a log level that actually includes the users’ activity.

Information

The “Information” log level is the standard log level used in Syncplify Server!, it includes all errors, all warnings, and all user activity, but it’s not too cluttered with information that may be distracting. Most Syncplify Server! installations use this log level, which is a good balance between reasonable log size and usefulness of the contained information.

Note

If you are unsure about what log level fits your needs, the “Information” log level is almost always your best choice.

Debug

The “Debug” log level logs a lot of information, therefore it should not be used for extended periods of time, to avoid dumping too much information to the log target. Typically this log level is useful to debug the software, to identify what’s going on when the software is supposedly not behaving as configured. Most of the times this is the best way to identify misconfigurations and other mistakes.

Trace

The “Trace” log level can be considered as a “Debug log level on steroids”. It logs even more information than the Debug level, and it goes so far as to logging most function entry and exit points. This truly is a log level that should only be used by a software developer, or when asked by the Syncplify Support Representatives for support purposes.

BlockList, SafeList, AllowList

Syncplify Server! includes 3 different “lists” that have 3 very distinct purposes. It’s very important that an administrator is familiar with these 3 lists, what they represent, how they work, and how to effectively use them. Here’s a brief yet precise explanation.

First of all, it’s important to understand that all three lists accept:

  • single IP addresses example:192.168.172.23
  • network CIDRs example:192.168.172.0/24

But they serve very different purposes:

BlockList

The BlockList (formerly known as BlackList) is the core of Syncplify’s Protector™ subsystem.

Any connection attempt from a client which IP address is included in the BlockList, or that is part of a network CIDR included in the BlackList, will be rejected.

Syncplify Protector™ automatically (and extremely effectively) identifies all sorts of attacks and hacking attempts, and automatically adds the attackers’ IP addresses to the BlockList.

You can, if you so wish, manually add IP addresses and/or networks to your BlockList, but this is typically not needed, because Protector™ is extremely effective at its job.

SafeList

The SafeList can be thought of as a list of exceptions to the BlackList. Basically, any IP or network present in the SafeList will never be added to the BlockList by Protector™.

If there are IP addresses or network that you want to trust, and you are confident that no attacks can ever come from such sources, you can add them to the SafeList. Protector™ will still check and prevent attacks from those sources, it will reject offending connections, but will not add the client IP address to the BlockList.

AllowList

Warning

This is, typically, the most misunderstood of the three lists, so please read carefully.

If the AllowList is left empty, clients (like FileZilla, WinSCP, etc…) can connect to your server from anywhere. An empty AllowList is basically equivalent to disabling the AllowList. Most administrators run their Syncplify Server! with an empty AllowList.

But if you add even a single item, even just one IP address or network, to the AllowList, then the AllowList becomes active and it becomes restrictive. This means that your Syncplify Server! will only accept incoming connections from IP addresses and networks included in the AllowList. Any attempt to connect to your server from sources that are not in the AllowList will be rejected.

Please, use the AllowList very carefully.

Variables (parametric stuff)

Syncplify Server! supports variables to make several pieces of configuration parametric. These variables are evaluated live at run-time, and substituted to their respiective placeholders, so that the software can adapt its configuration to each ongoing session.

Just one example, to clarify what we’re talking about, is the ability to use a single VFS to create parametric homes for many user accounts, by simply using the account username as a variable parameter. To achieve that, you can simply define a VFS target as (for example) C:\SFTPData\{{username}}, and each user can use the same VFS and have their own individual and isolated home. User john’s files will be stored in C:\SFTPData\john, user jane’s files will be stored in C:\SFTPData\jane, and so on…

Now that the concept is clear, what variables can be used and where exactly?

These variables can be used inside of a VFS target to parametrize its destination based upon the current real-time value of each variable.

Variable Explanation
{{username}} The username (ID) of the currently authenticated user account
{{user_desc}} The description field (free text) of the currently authenticated user account
{{user_home}} The home directory for the LDAP user account (available exclusively for LDAP user/group accounts)
{{sess_custdata}} The first string in the Session.CustomData (provided a script populated this value in a previously executed event-handler)
{{today}} The server-time current date (YYYYMMDD)
{{today_utc}} The UTC-time current date (YYYYMMDD)

These variables can be used to parametrize the following configuration settings:

  • The SFTP software ID
  • The SFTP banner
  • The FTP(E/S) greeting banner
  • The FTP(E/S) login message
  • The FTP(E/S) login failure message
  • The FTP(E/S) logout message
Variable Explanation
{{server_time}} The current server-time (ex: 2006-01-02 15:04:05.999999999 -0700 MST)
{{utc_time}} The current UTC-time (ex: 2006-01-02 15:04:05.999999999)
{{software_name}} Substituted with the words Syncplify Server!
{{process_name}} Substituted with the words Syncplify Server! Worker Service
{{software_ver}} Current software version (ex: 6.0.29)
{{cpu_load}} Current CPU load of the worker process (ex: 0.71%)
{{memory}} Current RAM (memory) used by the worker process (ex: 84 MB)
{{active_sessions}} Current number of active client sessions (ex: 42)

Administration (Web UI)

Every version of Syncplify Server! starting from v4.0, up to and including the current version, features 2 distinct management interfaces (UIs) which serve 2 different and important purposes:

SuperAdmin UI

The SuperAdmin UI is designed to manage a small number of highly critical tasks that affect the software globally, among which:

  • Creating/starting/stopping/deleting virtual sites and their administrators
  • Creating and managing SuperAdmin profile(s)
  • Managing the internal web/REST service configuration and security
  • Backing up and restoring the global software configuration
  • Managing the software license

Admin UI

Each virtual site has its own Admin UI, through which an administrator can perform day-to-day management tasks, like:

  • Keeping an eye on the real-time dashboard
  • Managing the block-list (Protector)
  • Managing virtual file-systems (VFS) and user profiles
  • Configuring all security aspects for all protocols
  • Managing scripts and event handlers
  • Configuring logs and SMTP preferences
  • (etc…)

Subsections of Administration (Web UI)

SuperAdmin UI

The SuperAdmin UI is designed to manage a small number of highly critical tasks that affect the software globally, among which:

  • Creating/starting/stopping/deleting virtual sites and their administrators
  • Creating and managing SuperAdmin profile(s)
  • Managing the internal web/REST service configuration and security
  • Backing up and restoring the global software configuration
  • Managing the software license

Subsections of SuperAdmin UI

Logging into the SuperAdmin UI

You can log into the SuperAdmin UI from anywhere by launching a browser (any browser except Internet Explorer) and pointing it to a URL built in the following manner:

https://your.host.name:your_port/superadmin/

Example

If your host is “demo.syncplify.com”, and you’re using Syncplify Server!’s default administration/management port (6443) then the URL for the SuperAdmin UI will be https://demo.syncplify.com:6443/superadmin/

Managing virtual sites

The main task performed by SuperAdmins is the management of virtual sites.

A virtual site is a fully self-contained instance of the entire SFTP/FTP(E/S) service, running in its own isolated process (a system service) with its own user database, virtual file systems, certificates, security configurations, etc…

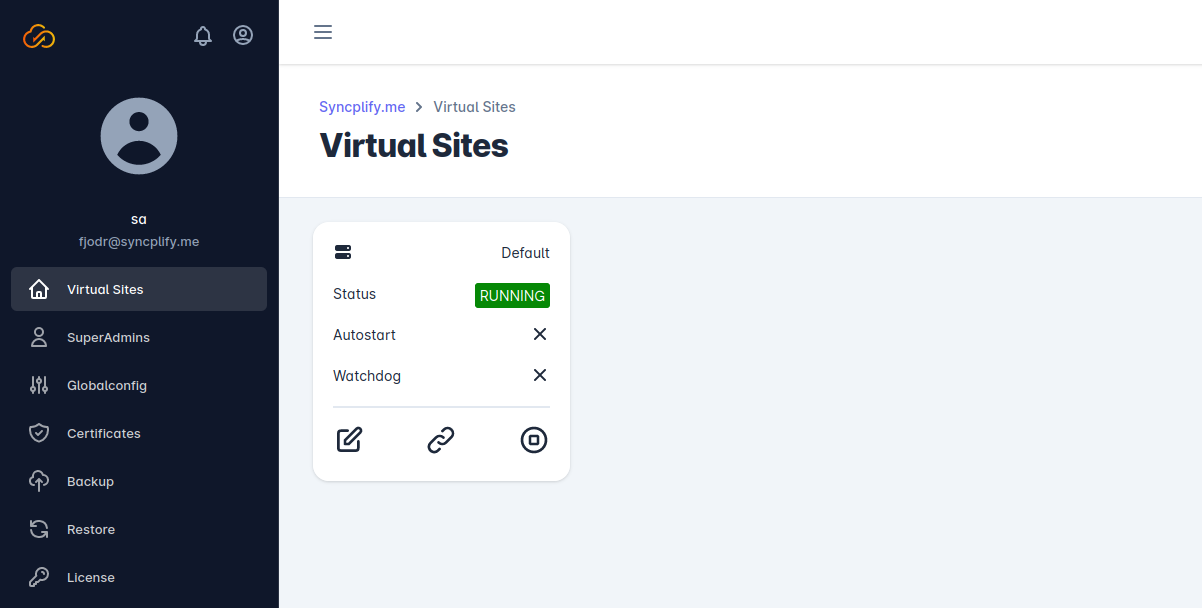
The topmost section of the SuperAdmin UI is, in fact, devoted to management of Virtual Sites.

virtual_sites virtual_sites

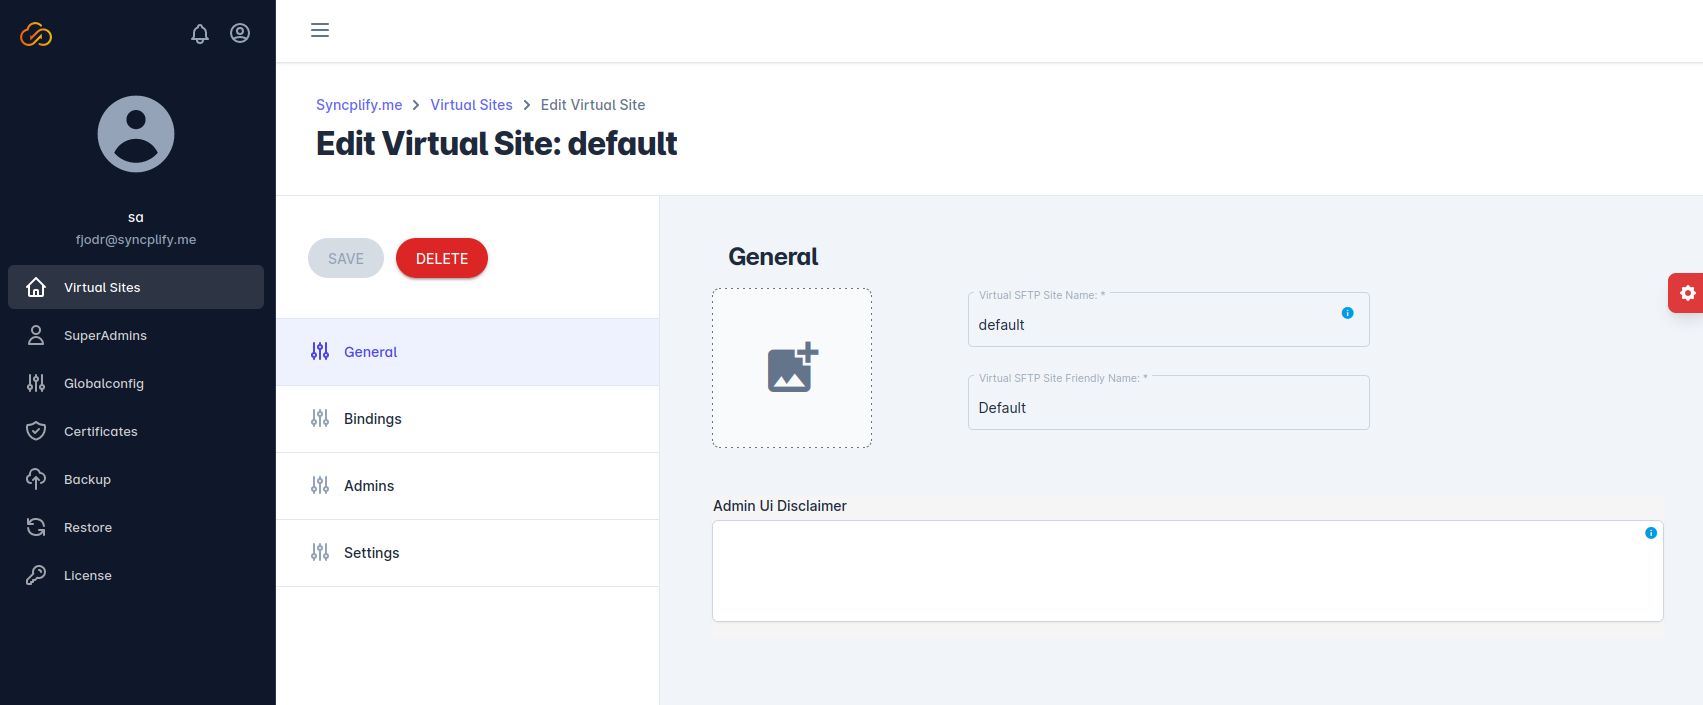
General configuration

This section allows you to configure some general settings for your virtual site including its friendly name, a logo, and an optional disclaimer that will be shown on the site’s Admin UI login page.

virtual_site_general virtual_site_general

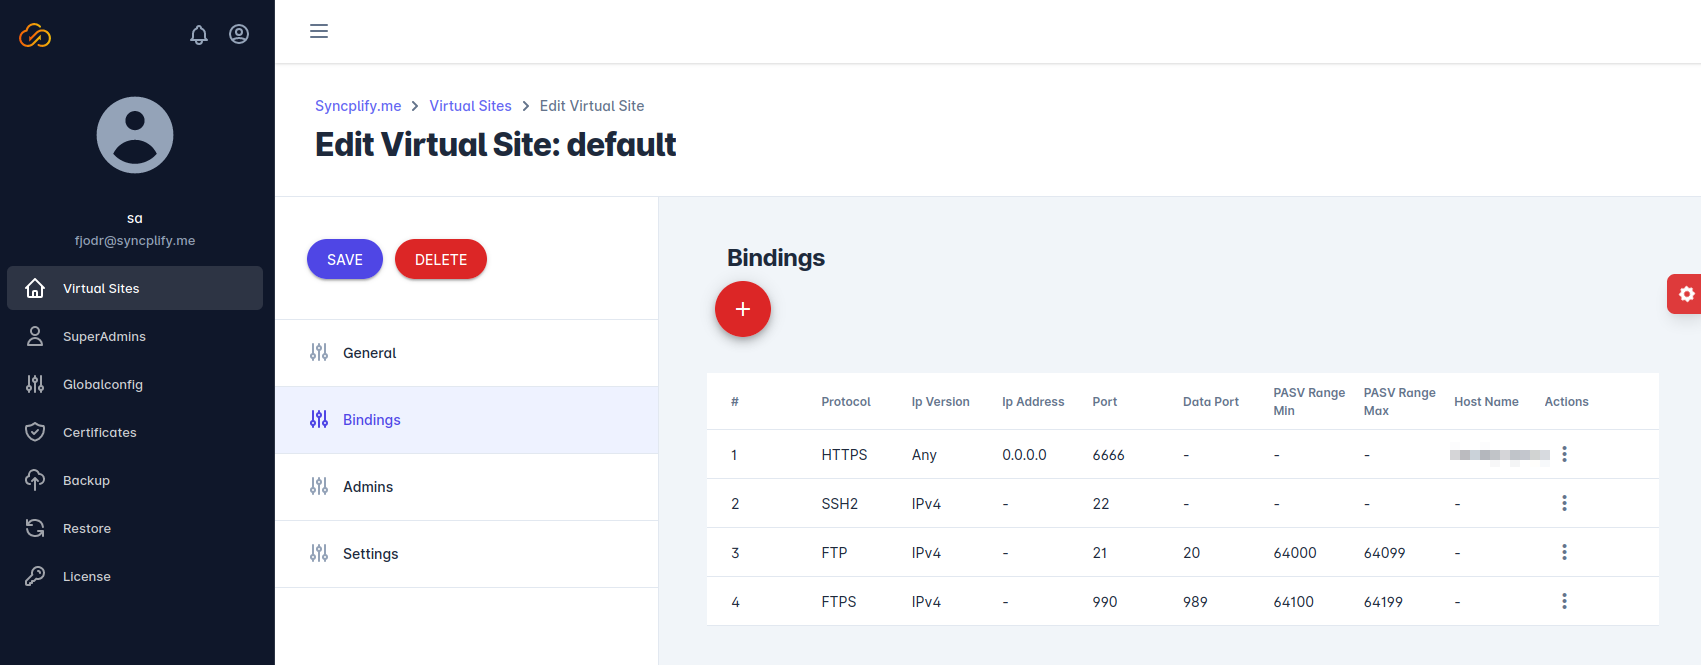
Bindings

This is probably the most important section of a virtual site configuration. It allows a SuperAdmin to specify what IP address(es) and port(s) the various protocol handlers should bind to.

Warning

No two virtual sites can share the same IP:port combination, so please make sure all IP:port pairs across all of your virtual sites are unique. Also, an empty IP address is equivalent to 0.0.0.0 which means binding to all IP addresses available on all network interfaces (NICs).

virtual_site_bindings virtual_site_bindings

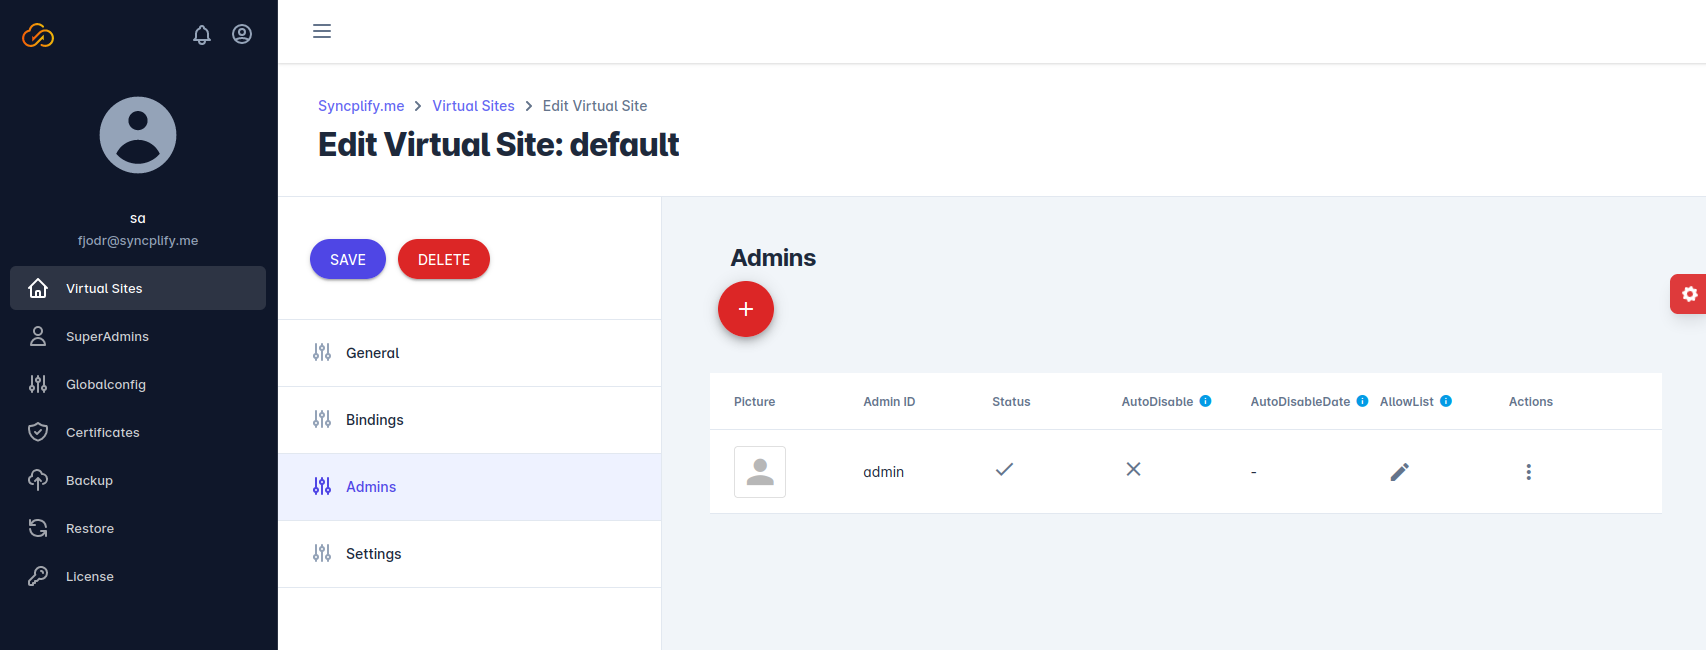
Admins

Intuitively, this is the section where you can create and manage the virtual site’s administrators, to delegate specific administrative tasks to yourself or to others.

virtual_site_admins virtual_site_admins

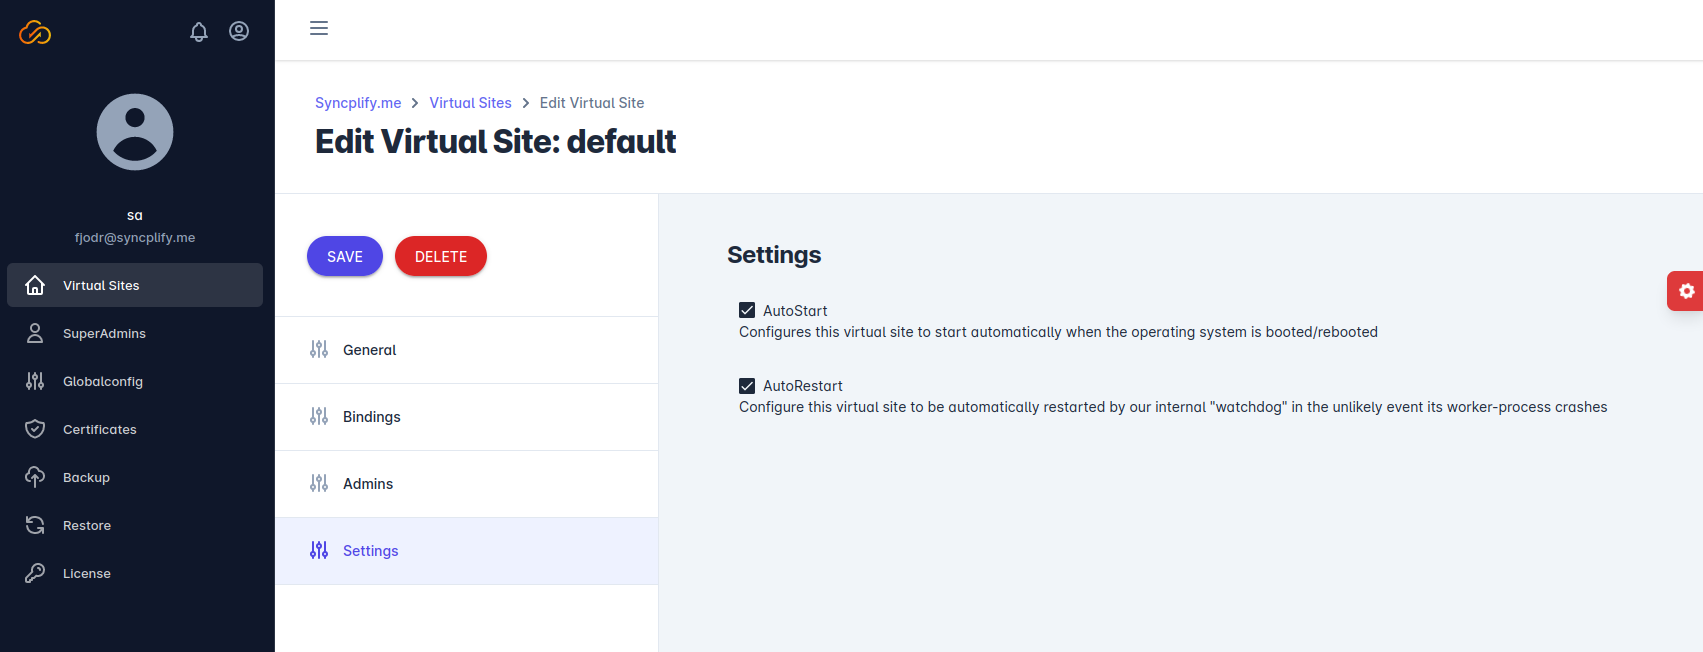
Settings

This section contains service settings; basically, it allows you to specify whether the service should be started on system’s startup (boot) and whether or not it should be automatically restarted in case of crash.

virtual_site_settings virtual_site_settings

Admin UI

Each virtual site has its own Admin UI, through which an administrator can perform day-to-day management tasks, like:

  • Keeping an eye on the real-time dashboard
  • Managing the block-list (Protector)
  • Managing virtual file-systems (VFS) and user profiles
  • Configuring all security aspects for all protocols
  • Managing scripts and event handlers
  • Configuring logs and SMTP preferences
  • (etc…)

Subsections of Admin UI

Logging into the Admin UI

You can log into the Admin UI from anywhere by launching a browser (any browser except Internet Explorer) and pointing it to a URL built in the following manner:

https://your.host.name:your_port/admin/

Example

If your host is “demo.syncplify.com”, and you’re using Syncplify Server!’s default administration/management port (6443) then the URL for the Admin UI will be https://demo.syncplify.com:6443/admin/

The dashboard

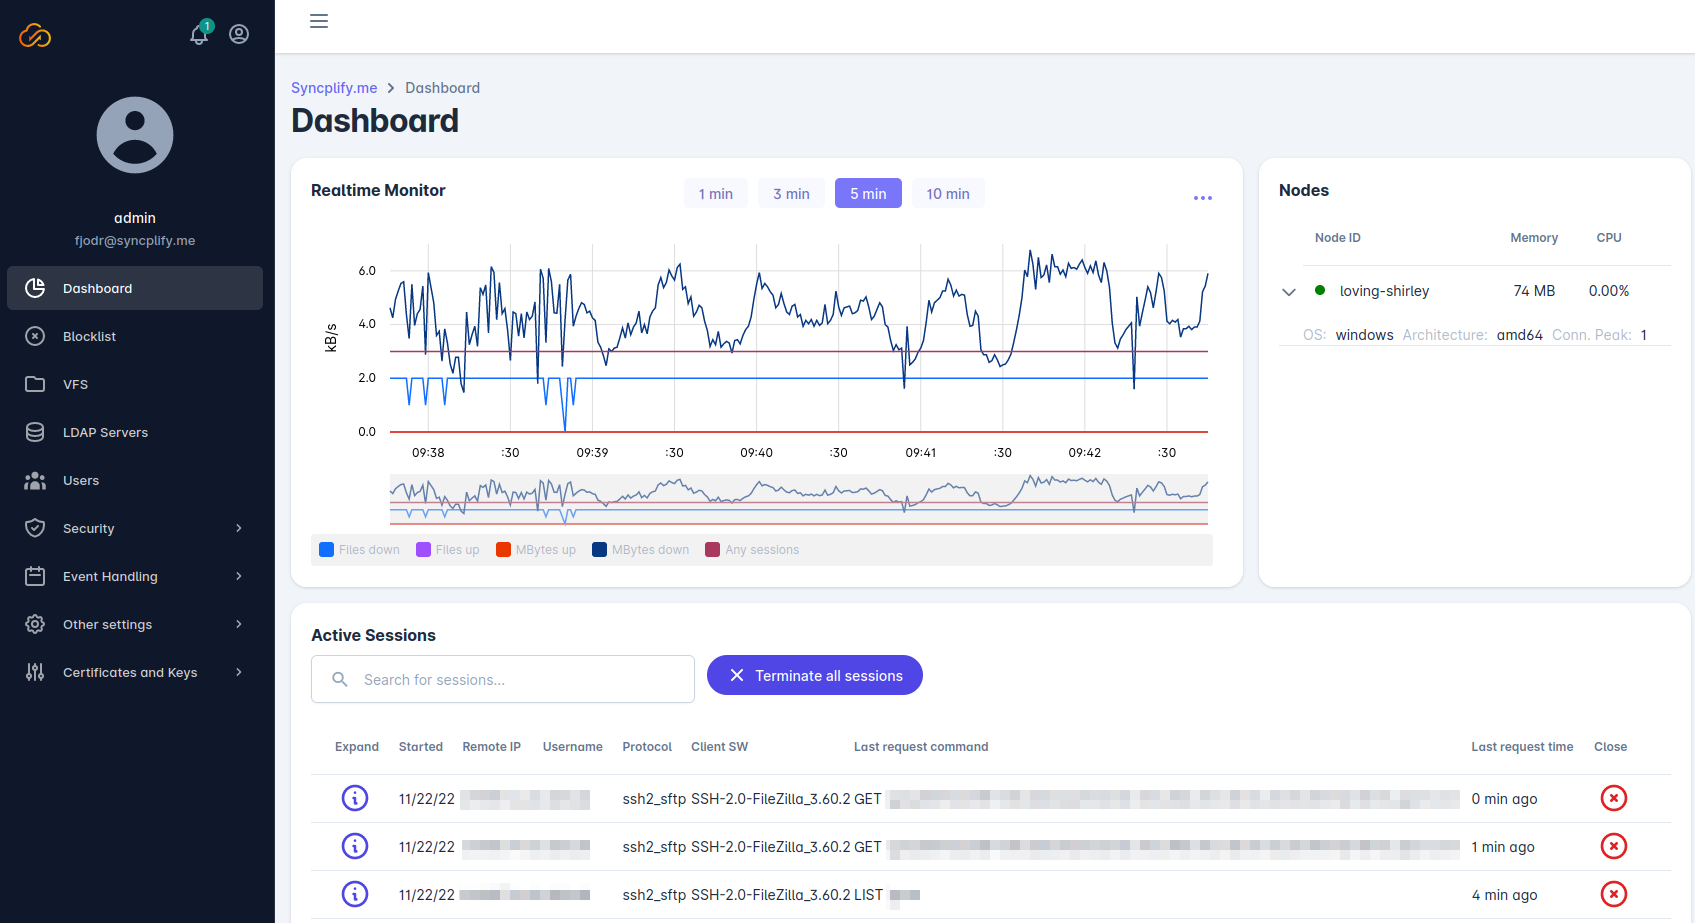
As soon as you log into the Admin UI you’re welcomed by the dashboard, which provides a real-time as well as historical overview of your Syncplify Server!’s operation.

The top part of the dashboard contains a real-time configurable chart, some information about the service status, and a table showing all ongoing client sessions.

dashboard dashboard

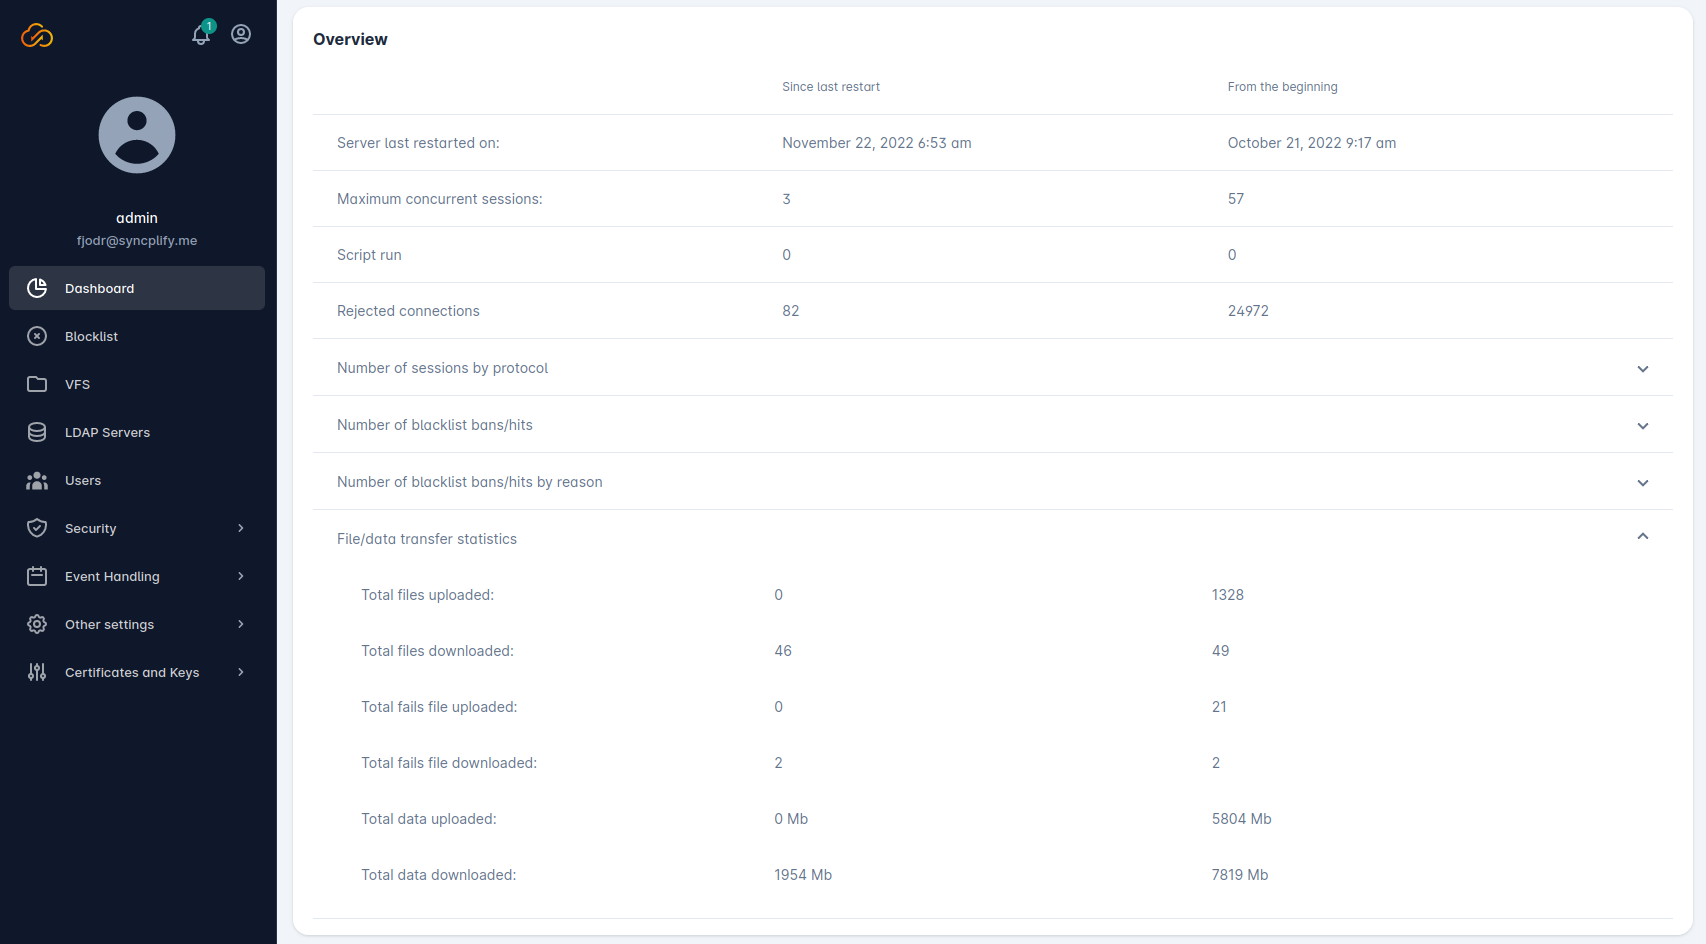
The lower part of the dashboard shows historical data since the last time the service was restarted, and since the time it was first installed.

dashboard2 dashboard2

The blocklist

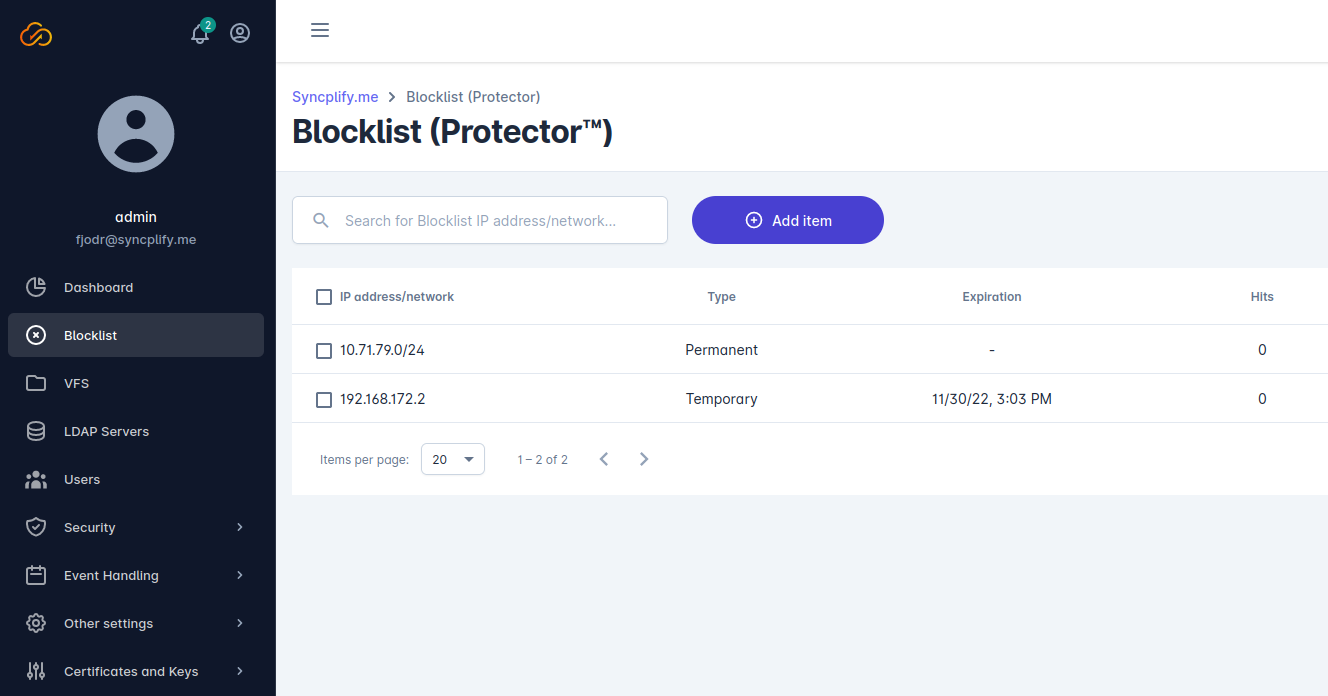
The blocklist (formerly known as blacklist) is a list of IP addresses and networks (CIDR notation) that are blocked by Syncplify Server! and cannot connect to any of its protocol handlers.

Items in this list can be added manually by an administrator, or automatically by Syncplify’s Protector™ subsystem, an intelligent attack detector capable of identifying potentially dangerous situations and auto-block the IP address of the perpetrator’s client.

Note

IP addresses that automatically added by Protector™ are only temporarily blocked. If they keep trying to connect while blocked, though, each attempt will result in the temporary ban to be extended.

blocklist blocklist

The image here above shows a network (class C) manually and permanently added to the blocklist by an administrator, as well as an individual IP address temporarily added (automatically) by Protector™.

Virtual file systems (VFS)

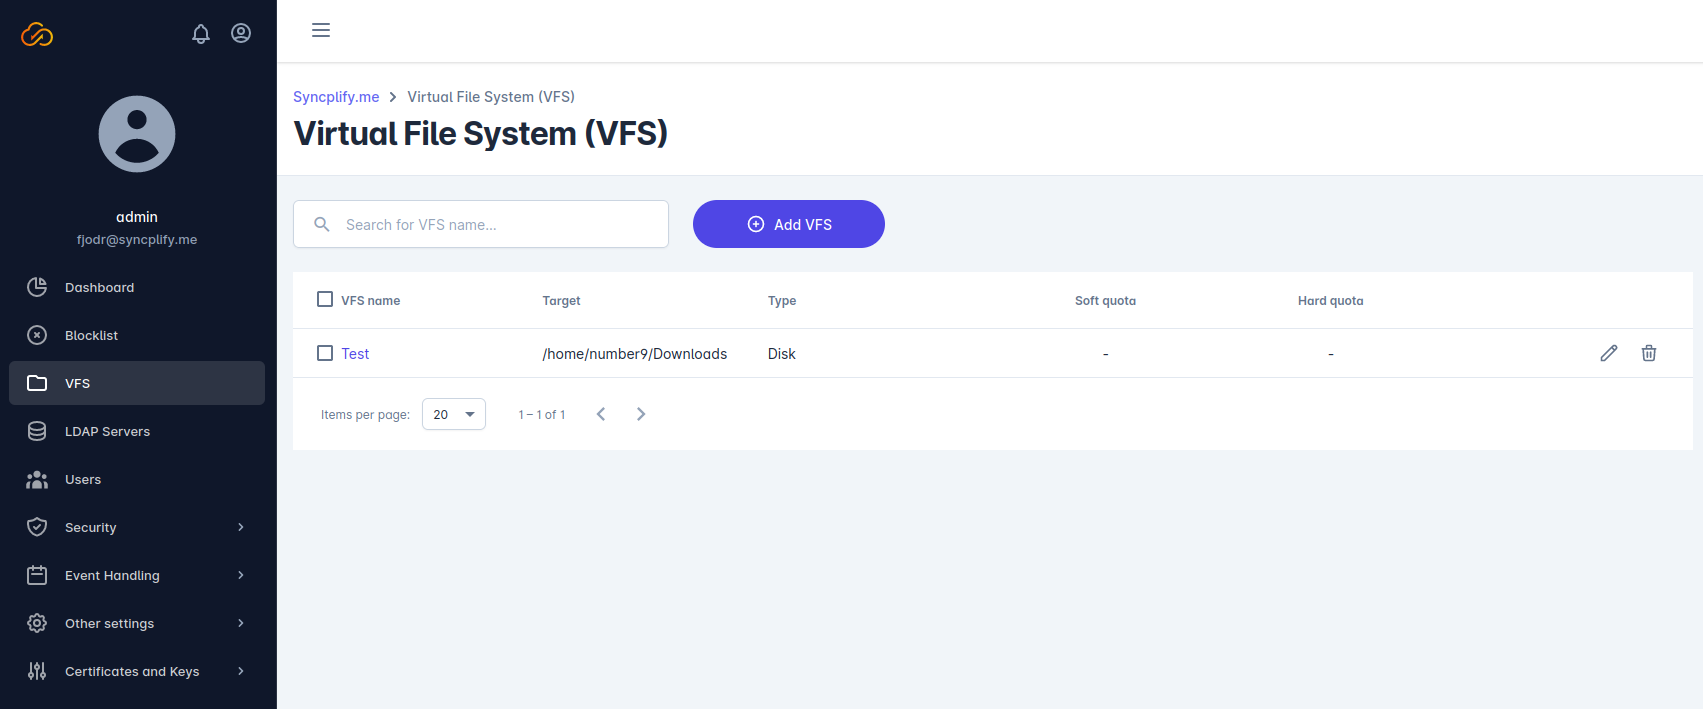
Syncplify Server! virtualizes access to its back-end storage by means of virtual file systems (VFS) to provide a layer or unification and isolation which, ultimately, deliver an increased level of security.

vfs vfs

Depending on the edition (license) of Syncplify Server! you own, you may have access to some or all of the following virtual file system types:

Disk

This is the most common VFS type, and is available in all editions of the software. It saves files to a disk (or disk-like) storage.

SFTP

This VFS can be used effectively as a reverse-proxy to another (remote) SFTP server.

S3

This VFS can be used to store files into Amazon S3 (AWS) cloud object storage back-end.

Azure

This VFS can be used to store files into Microsoft Azure cloud blob storage back-end.

GCP

This VFS can be used to store files into Google Cloud Platform object storage back-end.

LDAP (Active Directory)

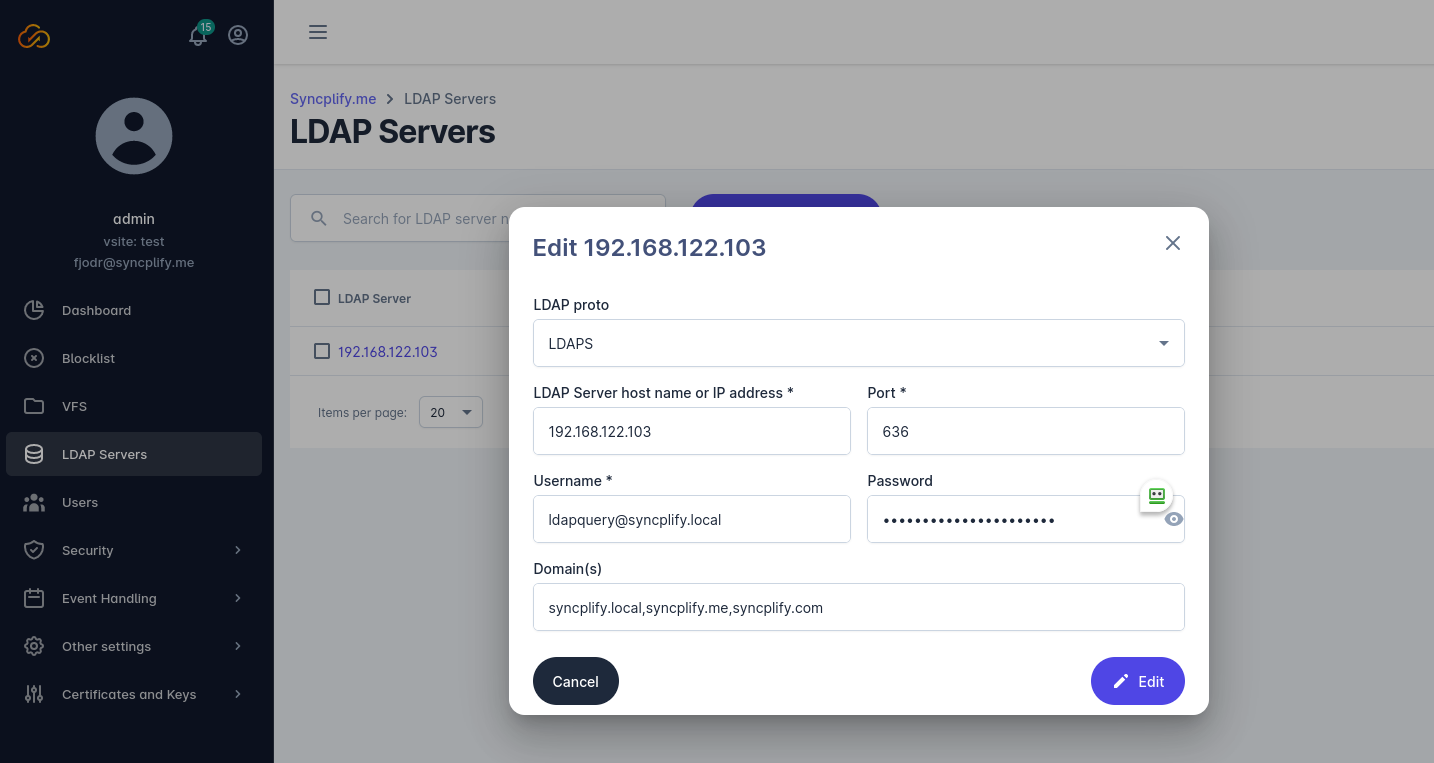
Depending on the edition (license) of Syncplify Server! you own, you may see a section in your Admin UI named LDAP. This section allow you to configure your Syncplify Server!’s connection to one or more LDAP servers, including Active Directory. Later on these connection profiles will be used to authenticate LDAP/AD users/groups.

ldap ldap

A few important details to bear in mind when configuring an LDAP profile:

  • you will need to specify an account that has enough permisssions to query your LDAP (or Active Directory)
  • the account used to query your LDAP/AD must always be specified in its full UPN form and always using your primary domain (ex: ldapquery@syncplify.local)
  • the machine (or VM) running Syncplify Server! must be allowed to connect through your firewalls to your LDAP/AD service on the port specified in this configuration
  • the address of your LDAP/AD service should always be written as an IP address or, when you manage your own DNS as a host name - never, for any reason, use a NetBEUI name here

Managing users

Along with the VFS section, the Users section is probably the most used section in the Admin UI. It allows you to manage all users (and, depending on the edition/license you own, also groups) for your Syncplify Server!

users users

Syncplify Server! allows for very granular user profile configuration. There are many settings through which you can define the user’s home VFS, virtual folders, permissions (and permission override), as well as a plethora of other settings as detailed here below.

These user settings, for each user, are further grouped in sub-sections. When you click on a user’s username in the list, you will access the edit mode for that specific user profile. Here’s what you will find in each sub-section when you edit a user:

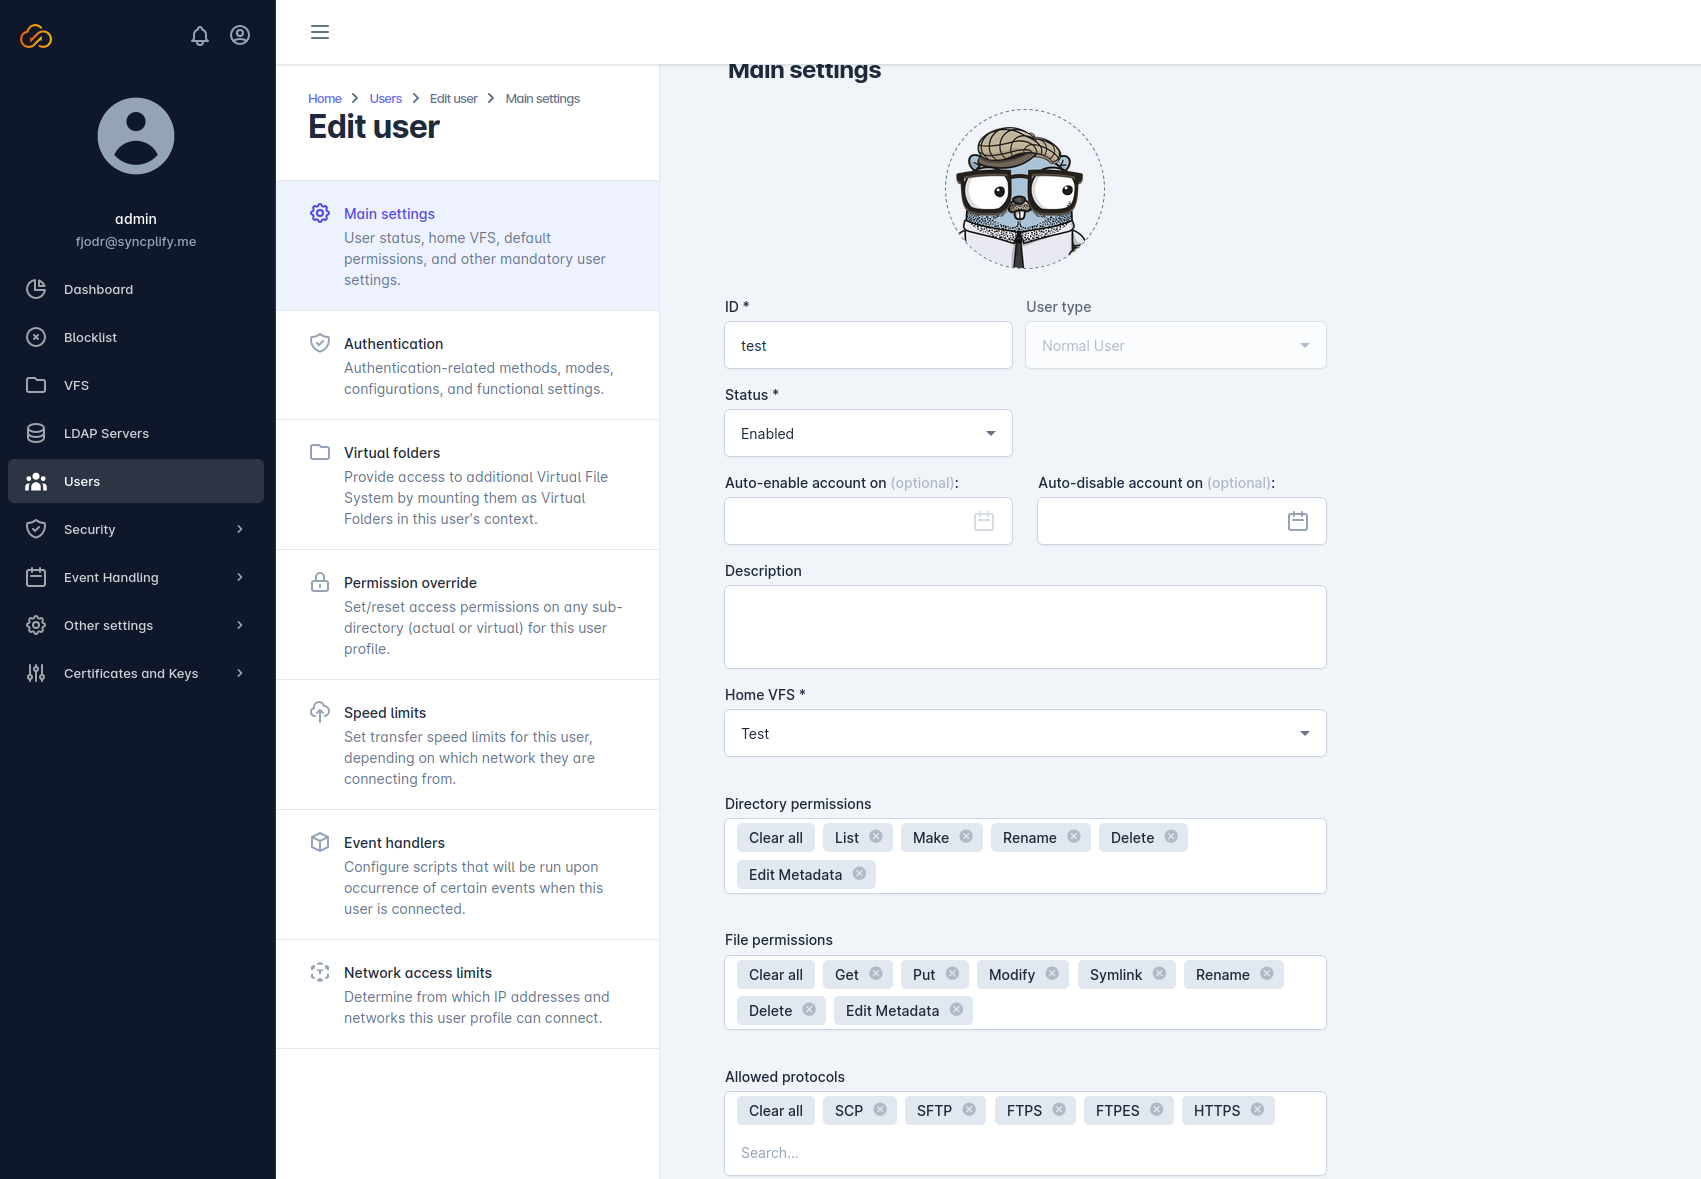
Main settings

This section allows you to configure the account status (along with auto-enable/disable) and - more importantly - the user’s home VFS, which is the virtual file system the user will start in when they connect to the server.

In this same section you can define the base set of permissions that will be applied to the user’s home VFS, as well as the protocol handlers this user is allowed to utilize.

user_main_settings user_main_settings

Here’s a brief explanation of directory and file permissions found in this sub-section:

Permission Explanation
List Permission to list a directory
Make Permission to make/create a directory
Rename Permission to rename a directory or a file
Delete Permission to delete a directory or a file
Edit_Metadata Permission to edit a directory or a file metadata (like ACL, chmod, chown, etc…)
Get Permission to download a file from the server to a client
Put Permission to upload a file from a client to the server
Modify Permission to modify a file (ex: upload a file, or portions of it, from a client to the server, over an existing file)
Symlink Permission to create and resolve symlinks (symbolic links)

And here’s a brief explanation of the protocols:

Protocol Explanation
SSH2_Shell Allows the user to run a remote shell on the server in the context of the system service (or systemd) with unlimited/unrestricted administration privileges
SSH2_Command Similar to SSH2_Shell but allows to run individual commands without opening a full-blown shell
SFTP The official SSH2-based secure file transfer subsystem, allows file transfer and management without giving shell access to the client
SCP Alternative SSH2-based file transfer subsystem, more lightweight and limited than SFTP
FTP Acronym for File Transfer Protocol, probably the most well-known (yet unencrypted/insecure) file transfer protocol
FTPS Same as FTP but implicitly encrypted via SSL/TLS (encryption layer is negotiated upon connection)
FTPES Same as FTP but explicitly encrypted via SSL/TLS (encryption layer is negotiated after a plain connection has already been established, and when the client sends the StartTLS command to the server)
HTTPS Enables the WebClient! subsystem (a full-featured, web-based file transfer and sharing UI) of your Syncplify Server!

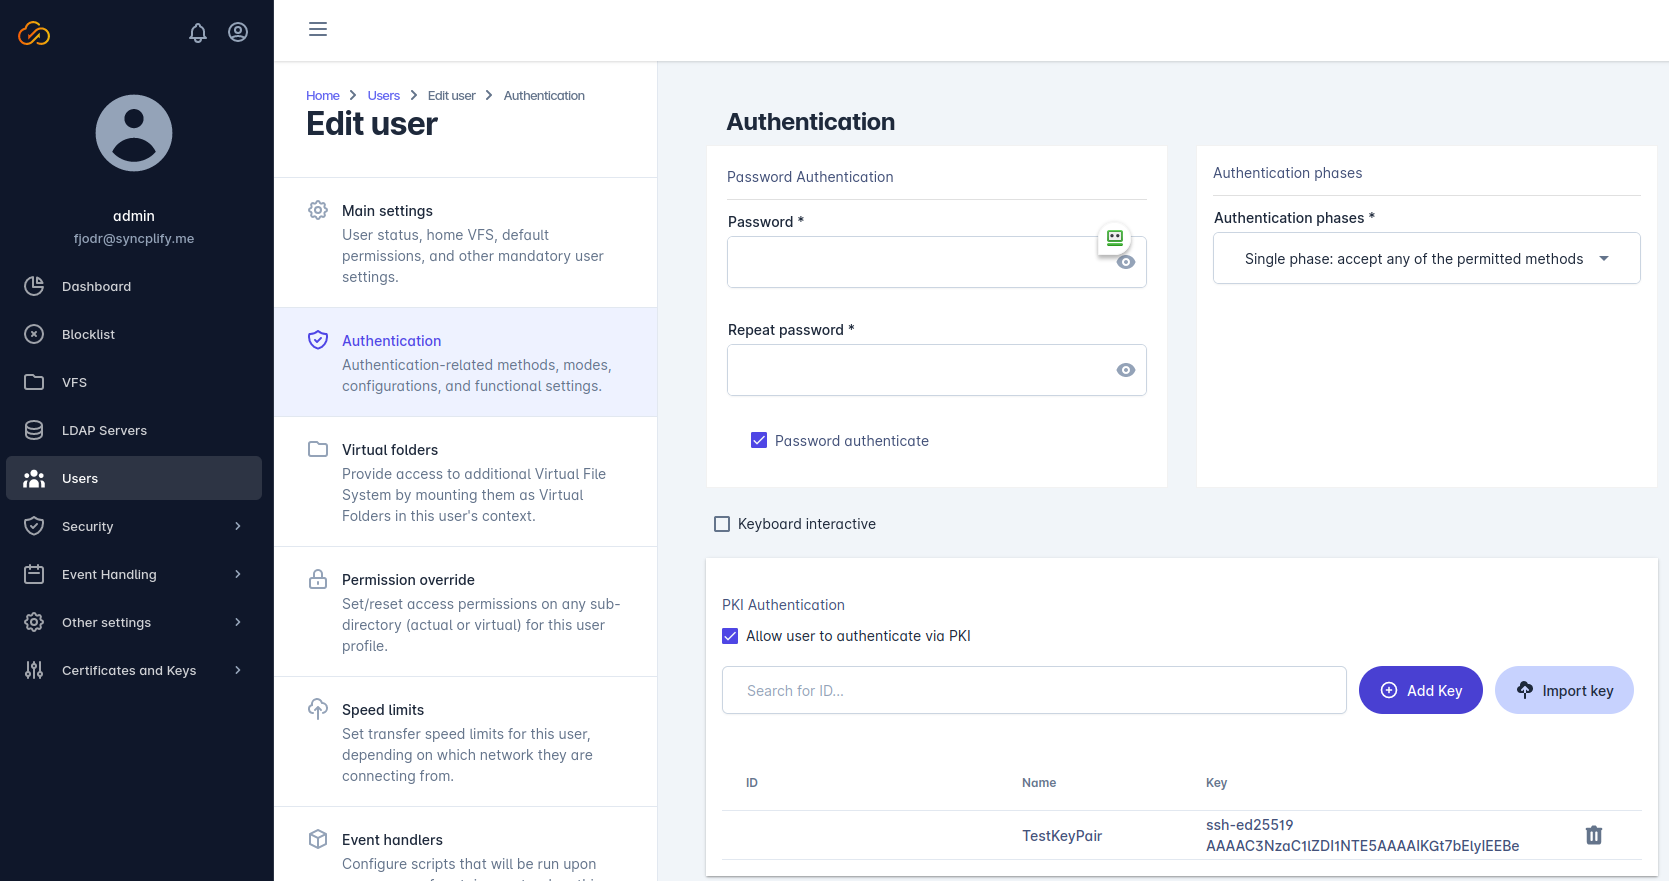
Authentication

This sub-section includes all the settings necessary for user authentication. Please bear in mind that Authentication Phases and PKI Authentication only apply to SSH2 and its subsystems (SFTP, SCP, …) while all other protocol handlers (FTP, HTTPS, …) only support Password authentication.

user_auth user_auth

Virtual folders

This section allows you to mount other virtual file systems (VFS) as virtual folders/directories under a user’s home. Each of these virtual folders can use a different VFS as its back-end, and can define its own permissions and visibility rules on it.

virtual_folders virtual_folders

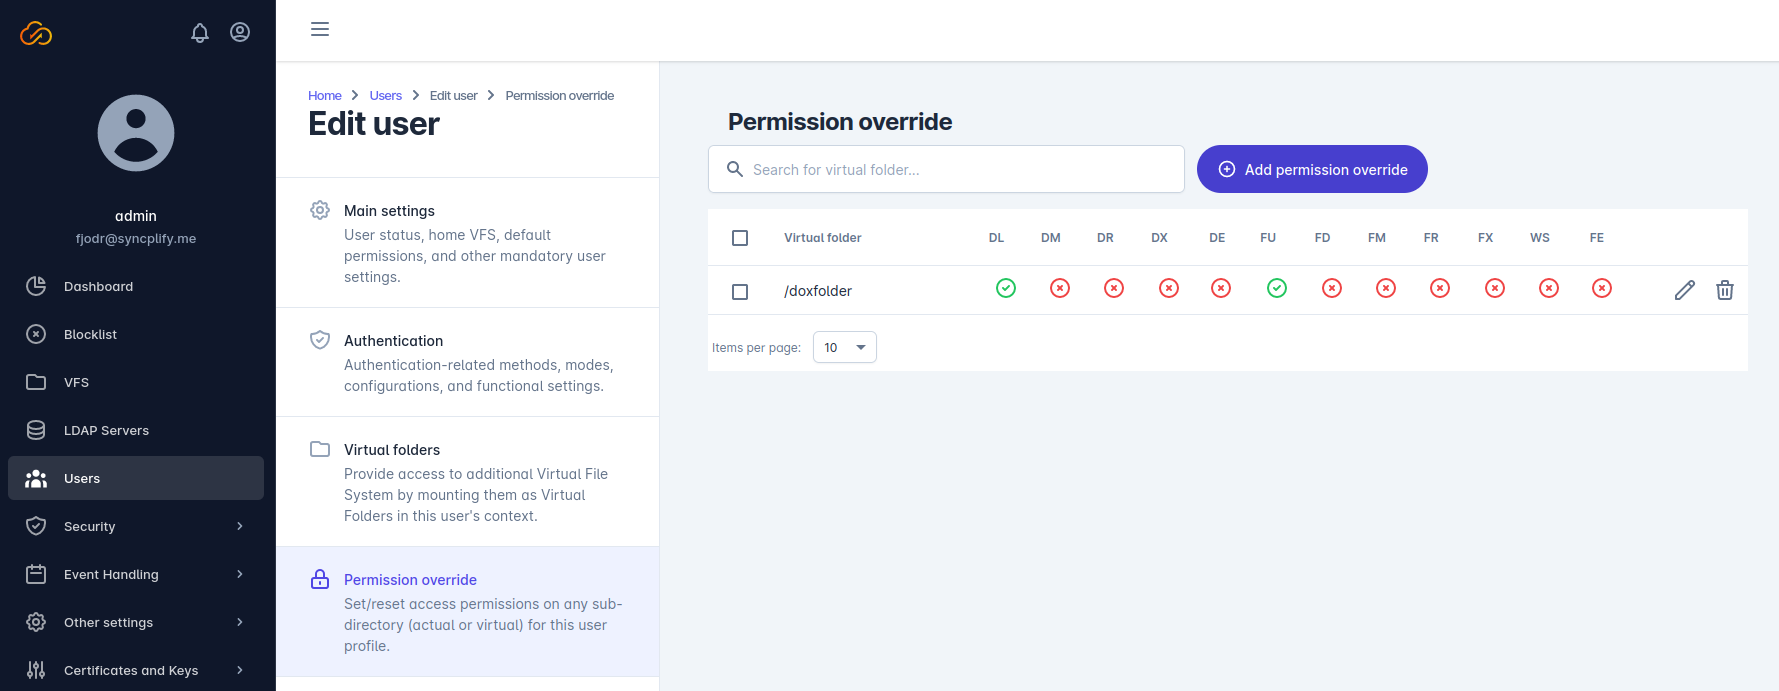
Permission override

This section allows you to configure specific permissions on actual sub-folders (sub-directories) that exist under the user’s home VFS.

Warning

Do not use this section to override permissions on Virtual Folders, as they already come with their own set of permissions. Use this section only to modify permissions on actual folders that exist inside of the home VFS.

permission_override permission_override

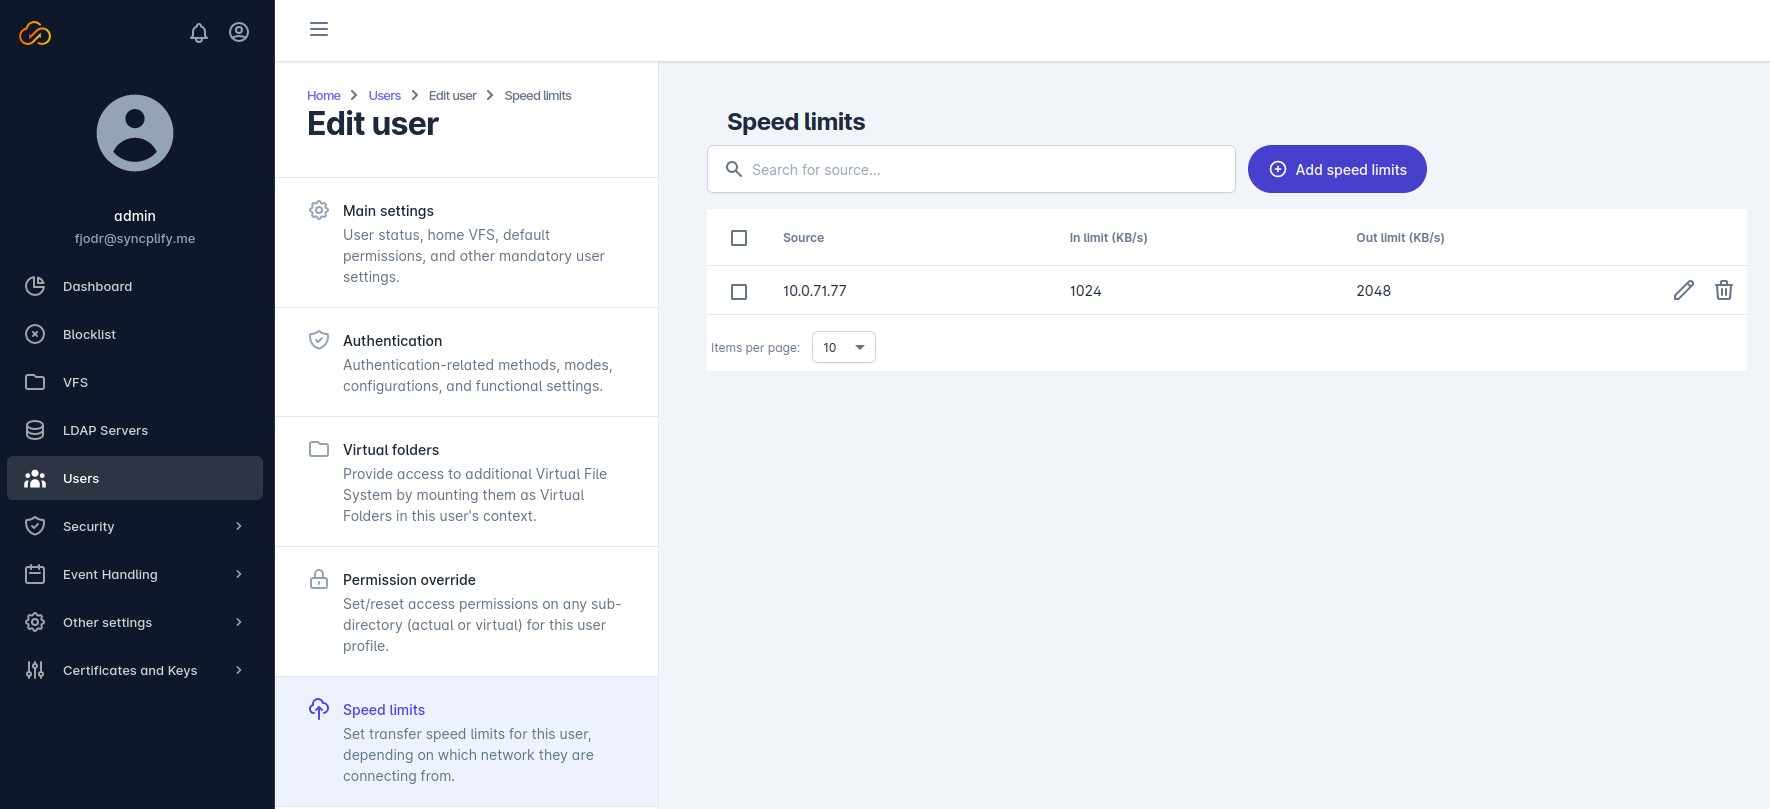
Speed limits

Intuitively, this section allows you to define speed limits that apply when this particular user account connects from certain pre-defined IP addresses or networks (CIDR).

user_speed_limits user_speed_limits

Event handlers

Depending on the edition (license) of Syncplify Server! you’re running, you may or may not have this section. If this section is there, then you can write your own scripts to customize your Server!’s behavior, and trigger them when certain events occur during a session from the individual user account you’re editing.

For example, you can trigger the execution of a script when this user connects, or uploads a file, and such script may then send a notification email to an administrator, or perform more complex operations.

user_event_handlers user_event_handlers

Network access limits

Syncplify Server! allows you to define (optional) specific network access limits for each user account. When defined, these limits only allow this particular user profile to connect to your Syncplify Server! from these specific network sources.

network_access_limits network_access_limits

Subsections of Security

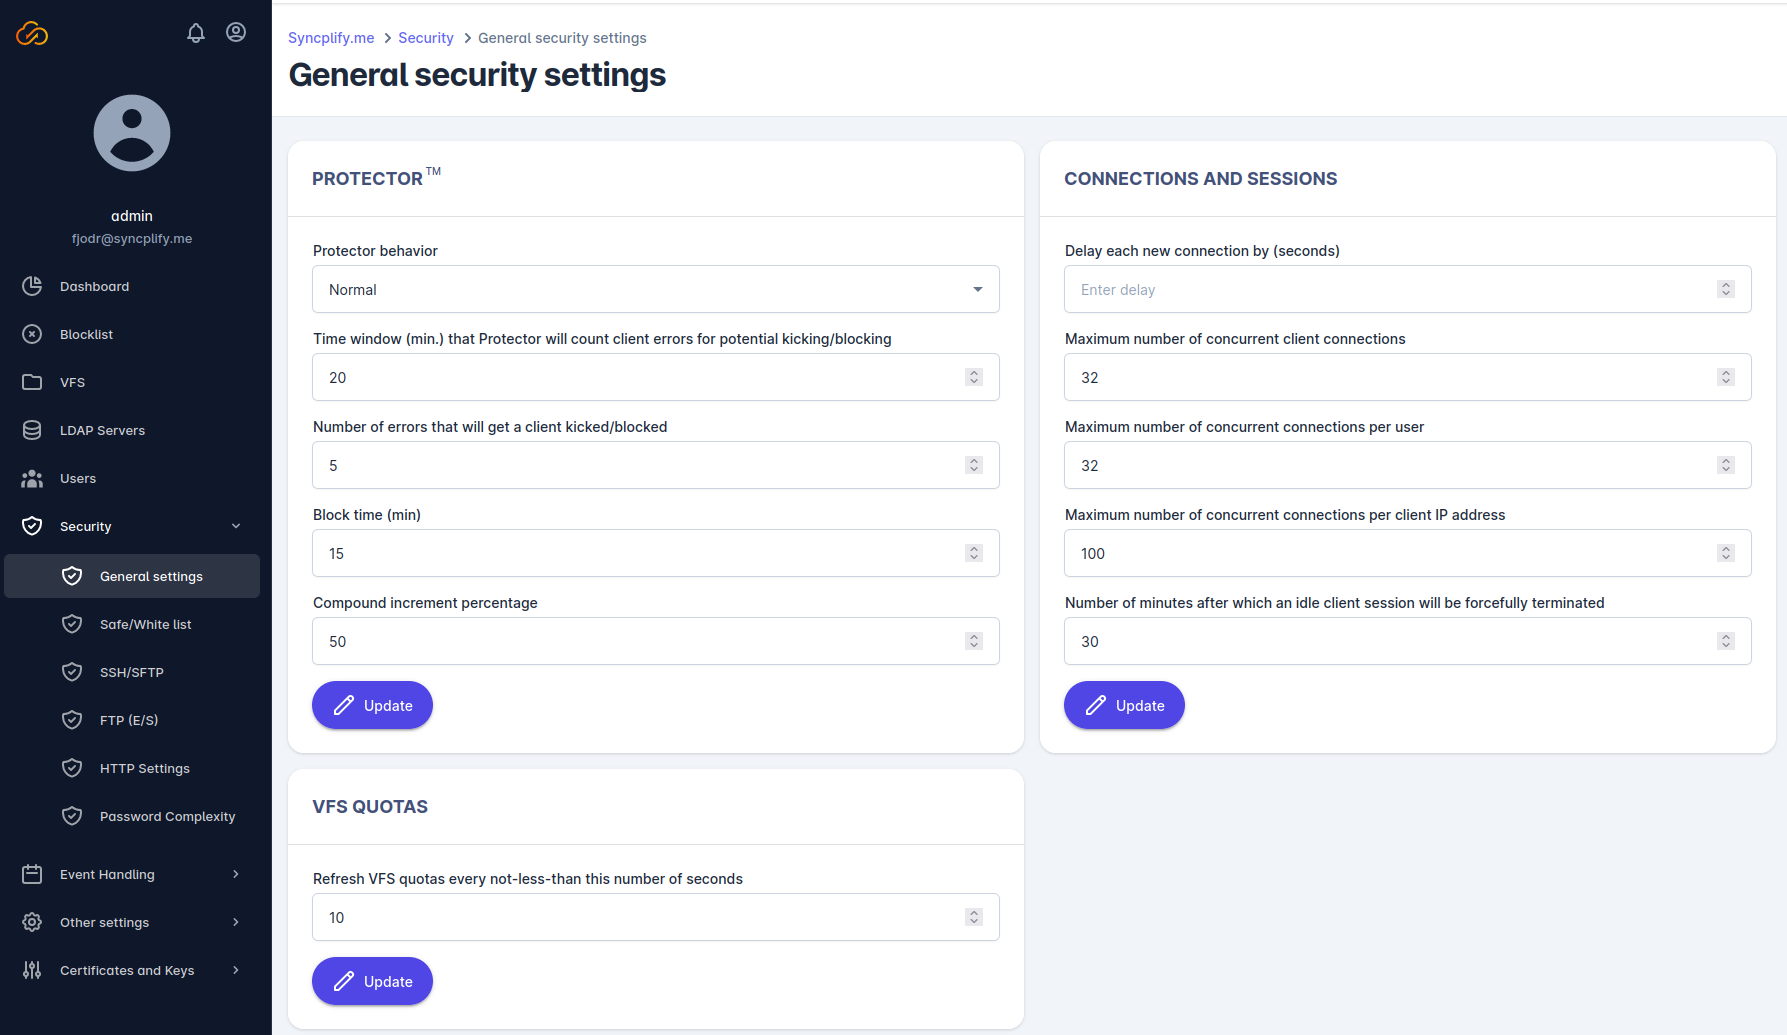
General settings

This sections allows you to configure several general security settings for your Syncplify Server!, grouped into 3 main categories:

  • Protector™: allows you to configure various aspects regarding how the Protector™ subsystem operates, together with its automatic block-listing capabilities
  • Connections and sessions: allows you to define certain settings and limits regarding how your Server! handles incoming client connections and sessions
  • VFS Quotas: allows you to configure the interval between refresh operations to verify (and, if needed, auto-update) the quotas of your virtual file systems (VFS)

general_security_settings general_security_settings

Safe/Allow lists

This section allows you to configure your Server!’s Safe-List and Allow-List. It’s very important, for correct server operation, to understand exactly what these lists are, how they work, and how to correctly configure them.

  • Safe-List: this is a list of IP addresses and networks (CIDR) that can never be blacklisted by Protector™ regardless of whether or not their activity is suspicious. Please bear in mind that if a client acts suspiciously Protector™ will still kick its session and disconnect it, but if that client IP address is Safe-Listed it will not be automatically added to the Block-List.
  • Allow-List: if this list is empty, then no restrictions apply to the source of your client connections; but if there’s even just one IP address or network (CIDR) in this list, then those listed are the only IP addresses and/or networks that clients are allowed to connect to your Server! from. In other words, when not empty this list becomes restrictive and only allows clients to connect from Allow-Listed IP addresses.

safe_allow_lists safe_allow_lists

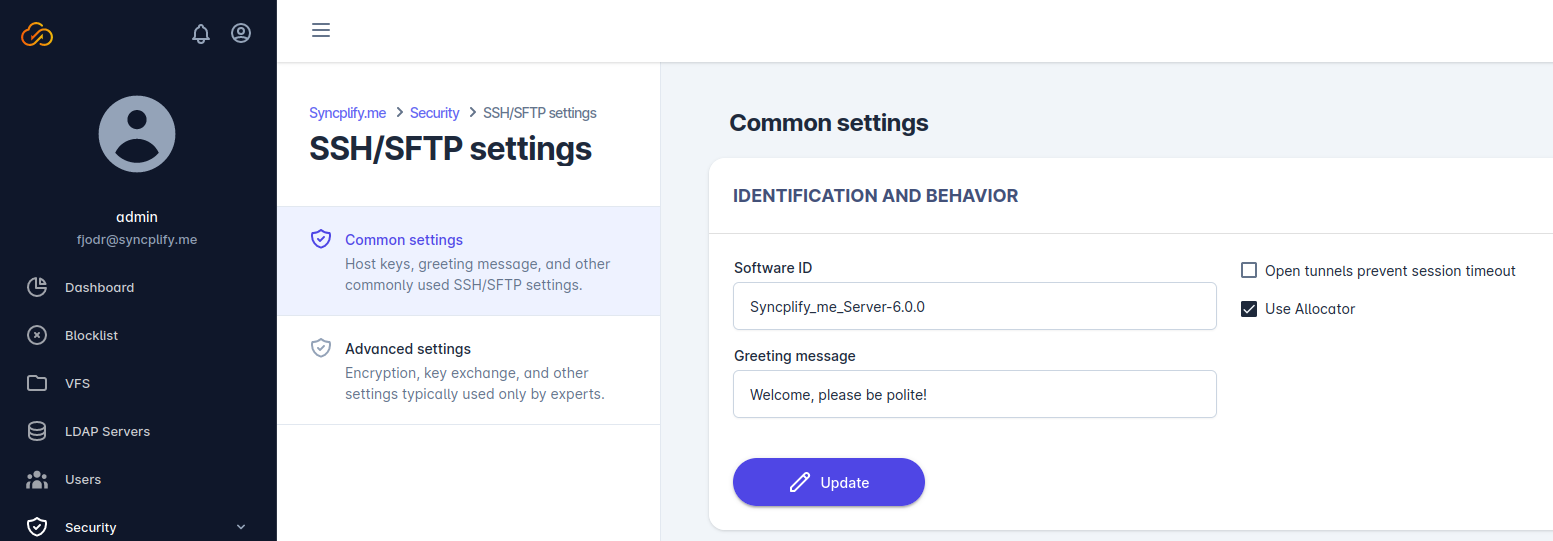
General SSH/SFTP settings

This section allows you to configure some basic/general SSH/SFTP/SCP protocol handler settings; here’s a few things you need to know about them:

  • Software ID: this field must follow the SSH2 protocol standard requirements for the software identification field
  • Welcome message: this is a free text field that will be shown by SSH/SFTP clients that support this functionality (not all of them do); this field supports pre-processor variables
  • Open tunnels prevent session timeout: this setting instruct the server to override and completely bypass the session timeout setting if a client has open SSH2 tunnels with/through this server
  • Use allocator: pre-allocate memory slices, which results in higher memory usage under small server loads, but may help decrease memory consumption under very high server loads

general_ssh_security general_ssh_security

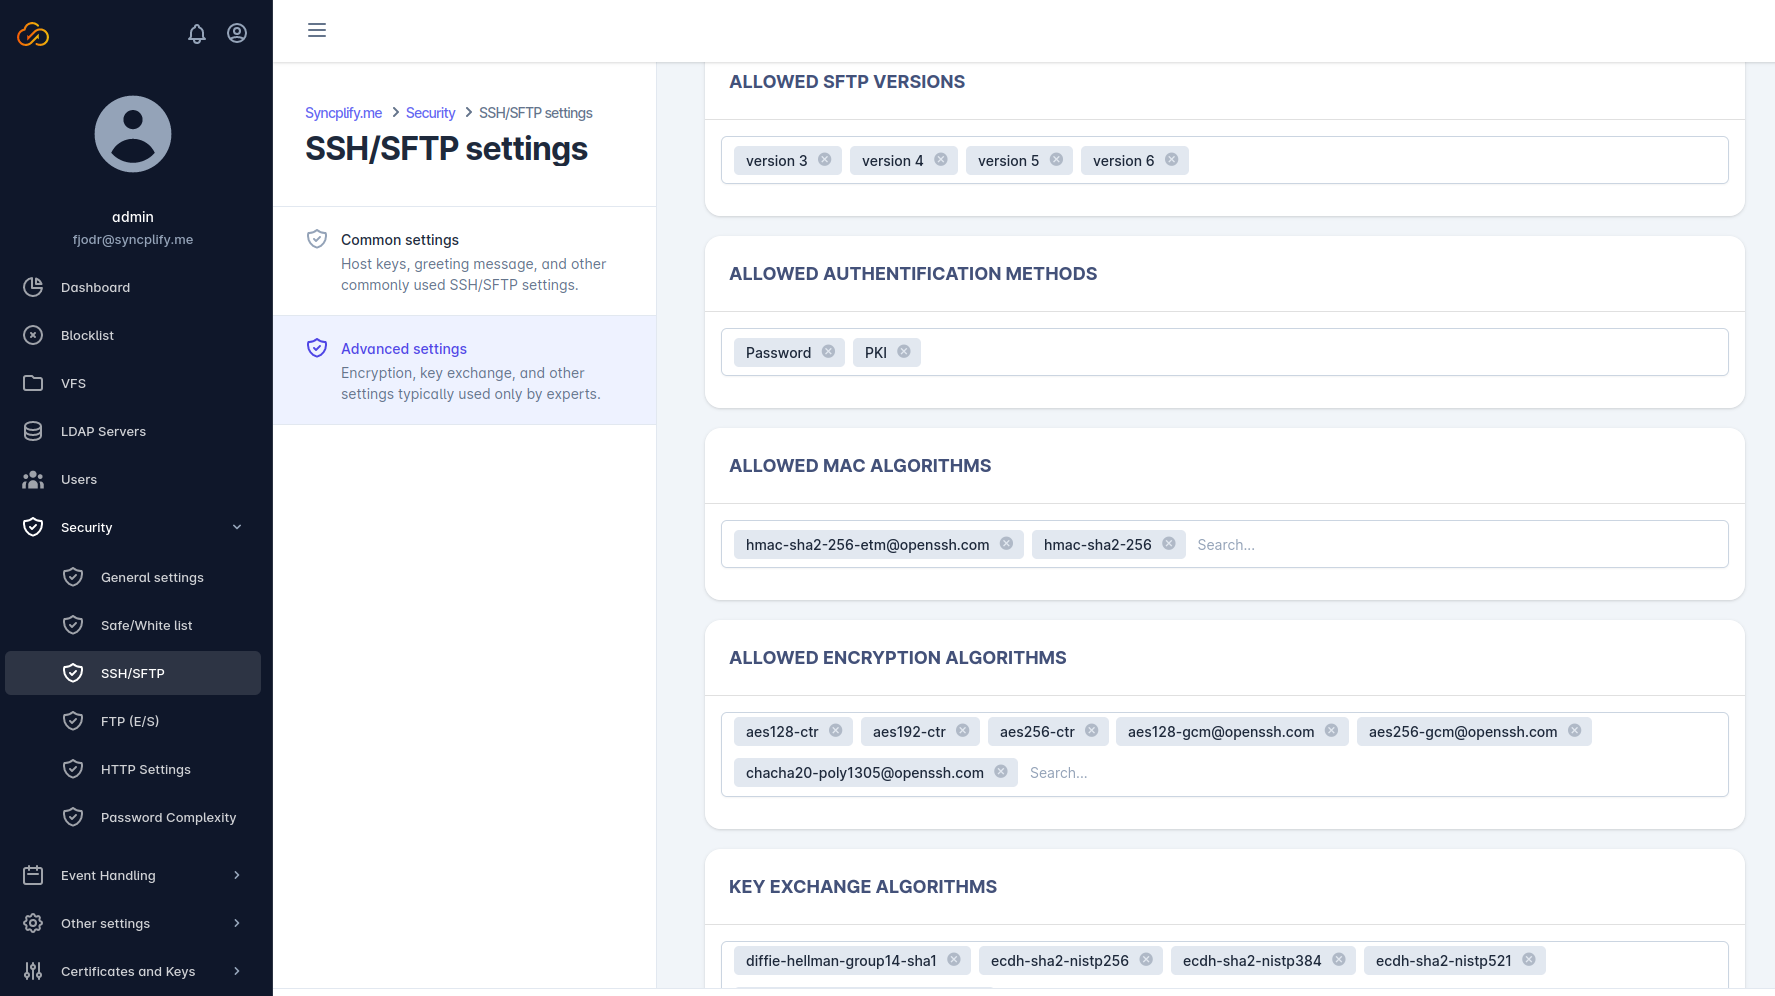
Advanced SSH/SFTP settings

This section is to be considered for expers only as it allows you to configure aspects of your Syncplify Server!’s SSH2 (SFTP/SCP) protocol handler that require a thorough understanding of the SSH2 protocol standard as defined in its various RFCs. Please do not attempt to modify any of this section’s settings unless you are intimately familiar with such RFCs.

advanced_ssh_security advanced_ssh_security

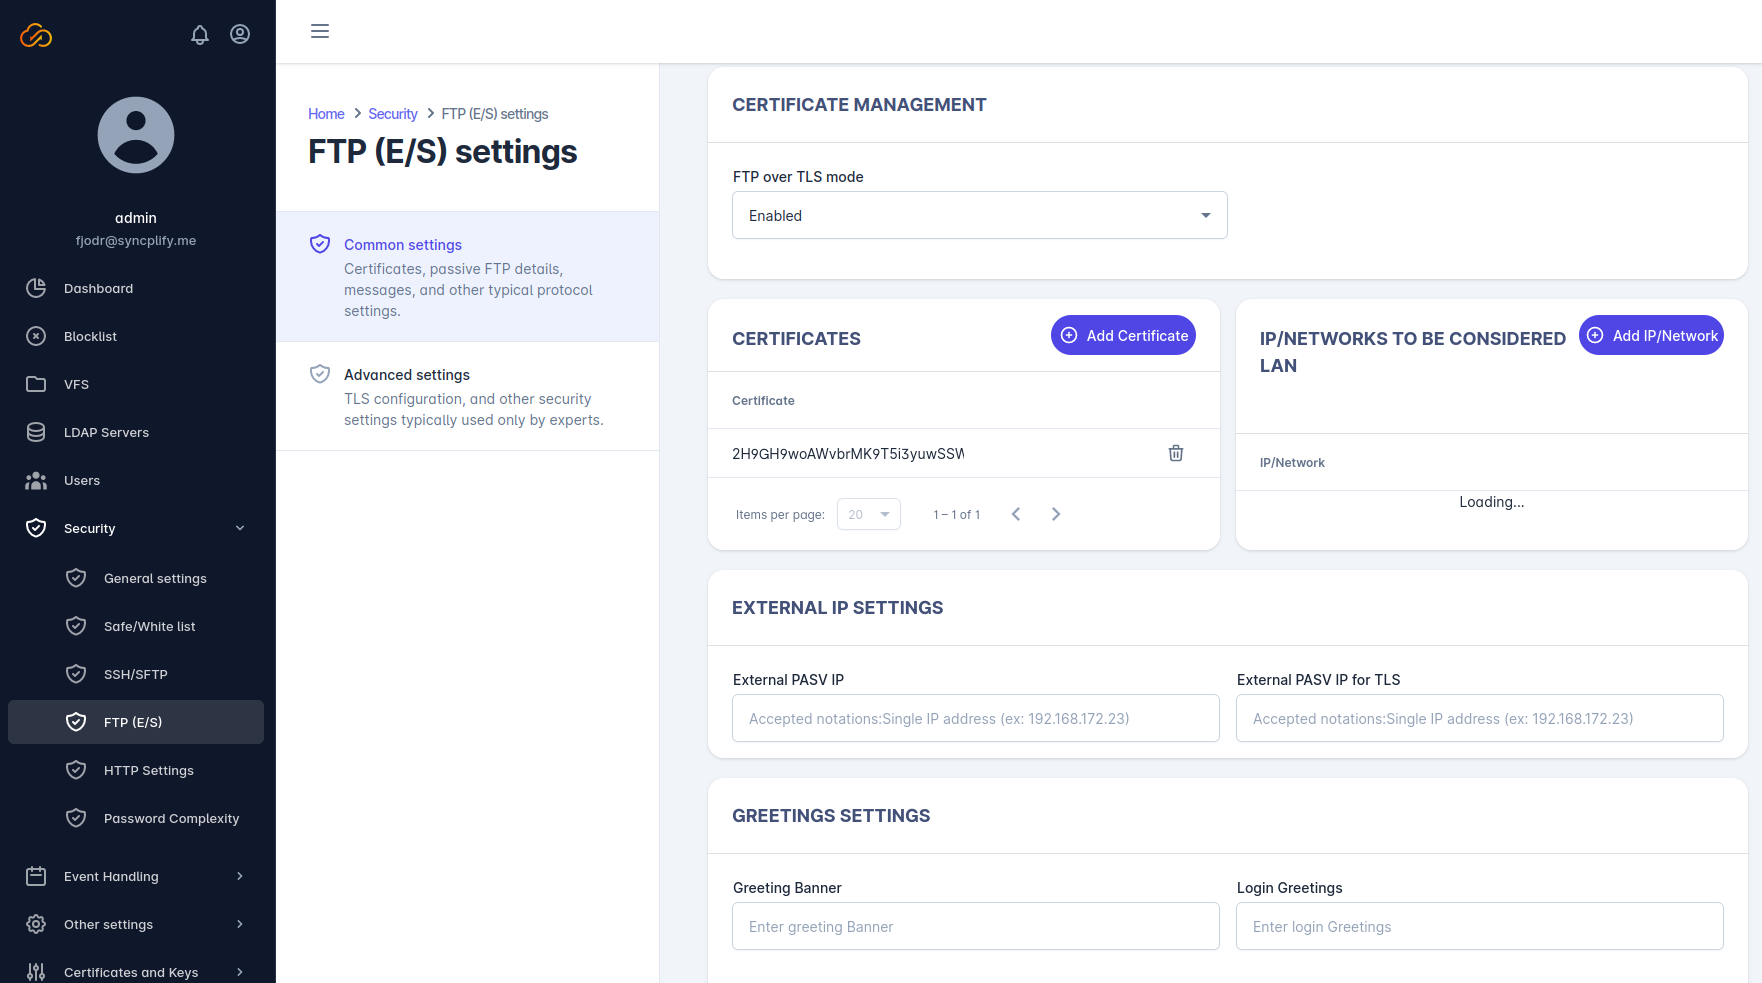
General FTP(E/S) settings

This section allows you to configure various common settings for the FTP(E/S) protocol handler, most of which are fairly intuitive to anyone familiar with the protocol itself.

The settings that might require some clarification are:

  • IPs/Networks to be considered LAN: the FTP protocol (and all of its secure variations, like FTPS and FTPES) operate by establishing multiple client-server connections for each session; these connections occur differently depending on whether client and server are in the same network (LAN) or the client is connecting from outside of the router/firewall via the public Internet. It is therefore essential for the server to be able to tell LAN and WAN connections apart, this can be accomplished by explicitly telling the server which IPs and networks are to be considered part of the server’s LAN.
  • External IP settings: for the same reaons expressed here above, the FTP(E/S) server must also know what piblic IP address it should report to the client when said client is connected from the public Intenet (and not from the LAN). These may be different based on whether the client is using plain unencrypted FTP or the TLS-encrypted versions of the protocol (FTPS/FTPES) as many routers/firewalls handle them differently.
  • Banners: there are 4 banners, one that is sent to the client when it connects, one that is sent upon successful login, one that is sent upon failed login, and one that is sent when the user logs out; all of these fields support pre-processor variables

common_ftpes_security common_ftpes_security

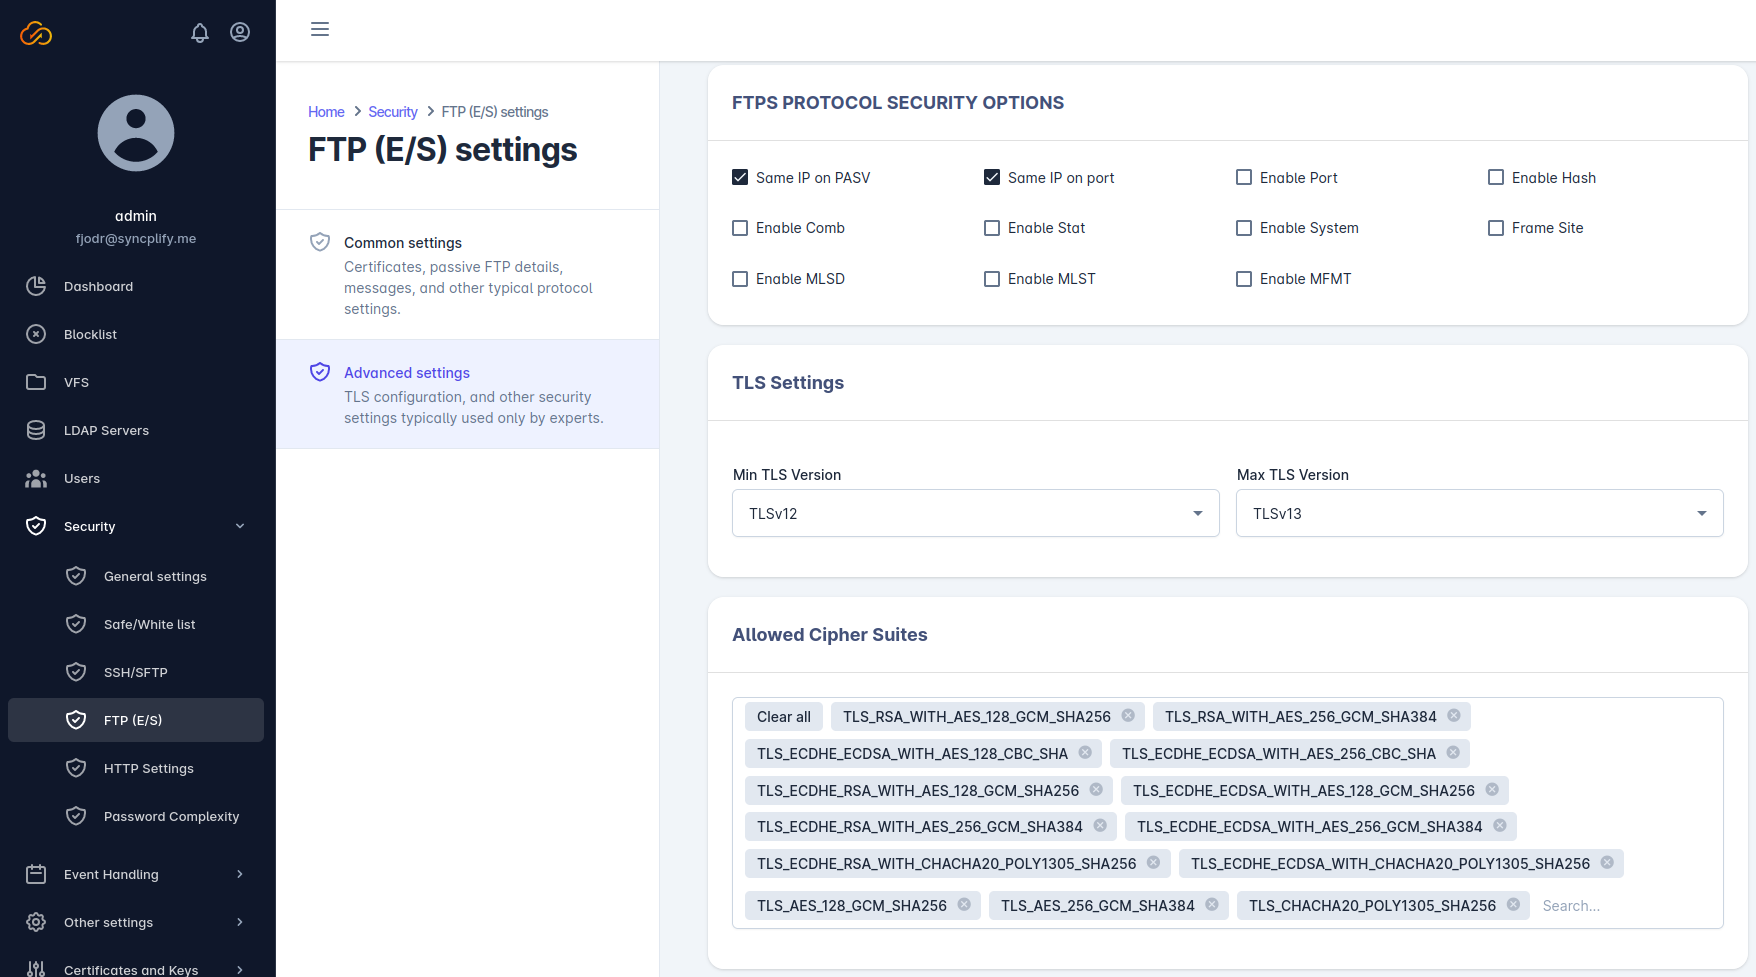
Advanced FTP(E/S) settings

This section is to be considered for expers only as it allows you to configure aspects of your Syncplify Server!’s FTP(E/S) protocol handler that require a thorough understanding of the FTP protocol standard as defined in its various RFCs.

There are many settings in this section, here’s a brief overview of what each of them means:

  • Same IP on PASV: instructs the server to require that each passive (PASV) data connection is performed from the same IP address as its relative control connection
  • Same IP on PORT: instructs the server to require that each active (PORT) data connection is performed towards the same IP address as its relative control connection
  • Enable PORT: enables active FTP(E/S); this can only work in a LAN or non-routed environment, so keep that in mind when toggling this setting
  • Enable HASH: enables the HASH protocol extension, allowing clients to request that the server computes and return a file’s hash code (this can potentially use up a ton of server resources, so be careful with it)
  • Enable COMB: enables the COMB protocol extension, allowing clients to request that the server combines two or more files into one
  • Enable STAT: enables the STAT standard FTP command on the server
  • Enable SYST: enables the SYST standard FTP command on the server
  • Enable SITE: enables the SITE standard FTP command on the server
  • Enable MLSD: enables the MLSD standard FTP command on the server
  • Enable MLST: enables the MLST standard FTP command on the server
  • Enable MFMT: enables the MFMT standard FTP command on the server

In addition to these settings here above, this section also allows to configure several technical aspects of the server’s support for TLS encryption security.

advanced_ftpes_security advanced_ftpes_security

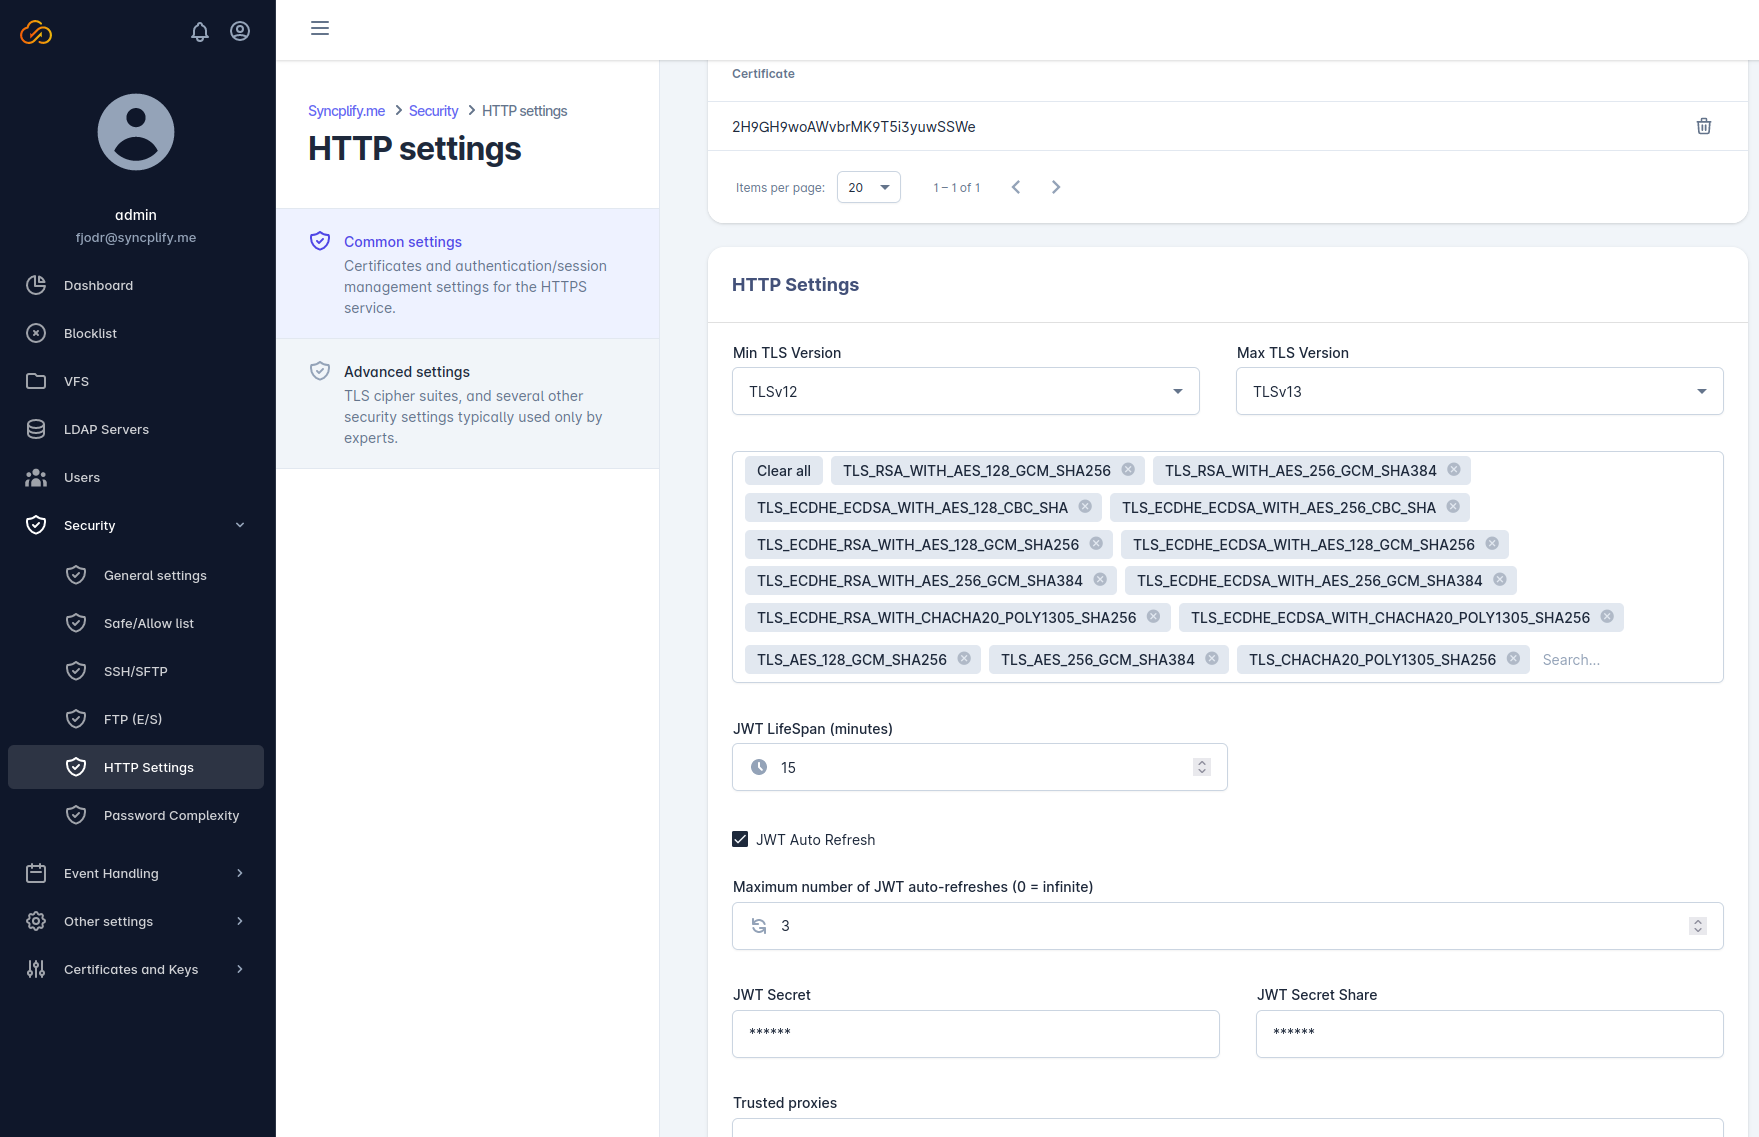
General HTTP(S) settings

This section allows you to specify some essential settings for the HTTPS protocol handler, also known as WebClient! sybsystem.

Since plain unencrypted HTTP is not supported (only secure HTTPS is) you will have to define a certificate, and choose which cipher-suites are allowed; by default only strong ones are enabled, but you can further limit them as you see fit.

Furthermore, this is where you define the parameters (TTL, number of auto-refreshes, etc…) for your JWT authentication, keeping in mind that the secret for the full WebClient! (where users log in) and the secret used for sharing files with external people who don’t have a user account in your Syncplify Server! are different, and must be specified separately.

general_https_settings general_https_settings

Advanced HTTP(S) settings

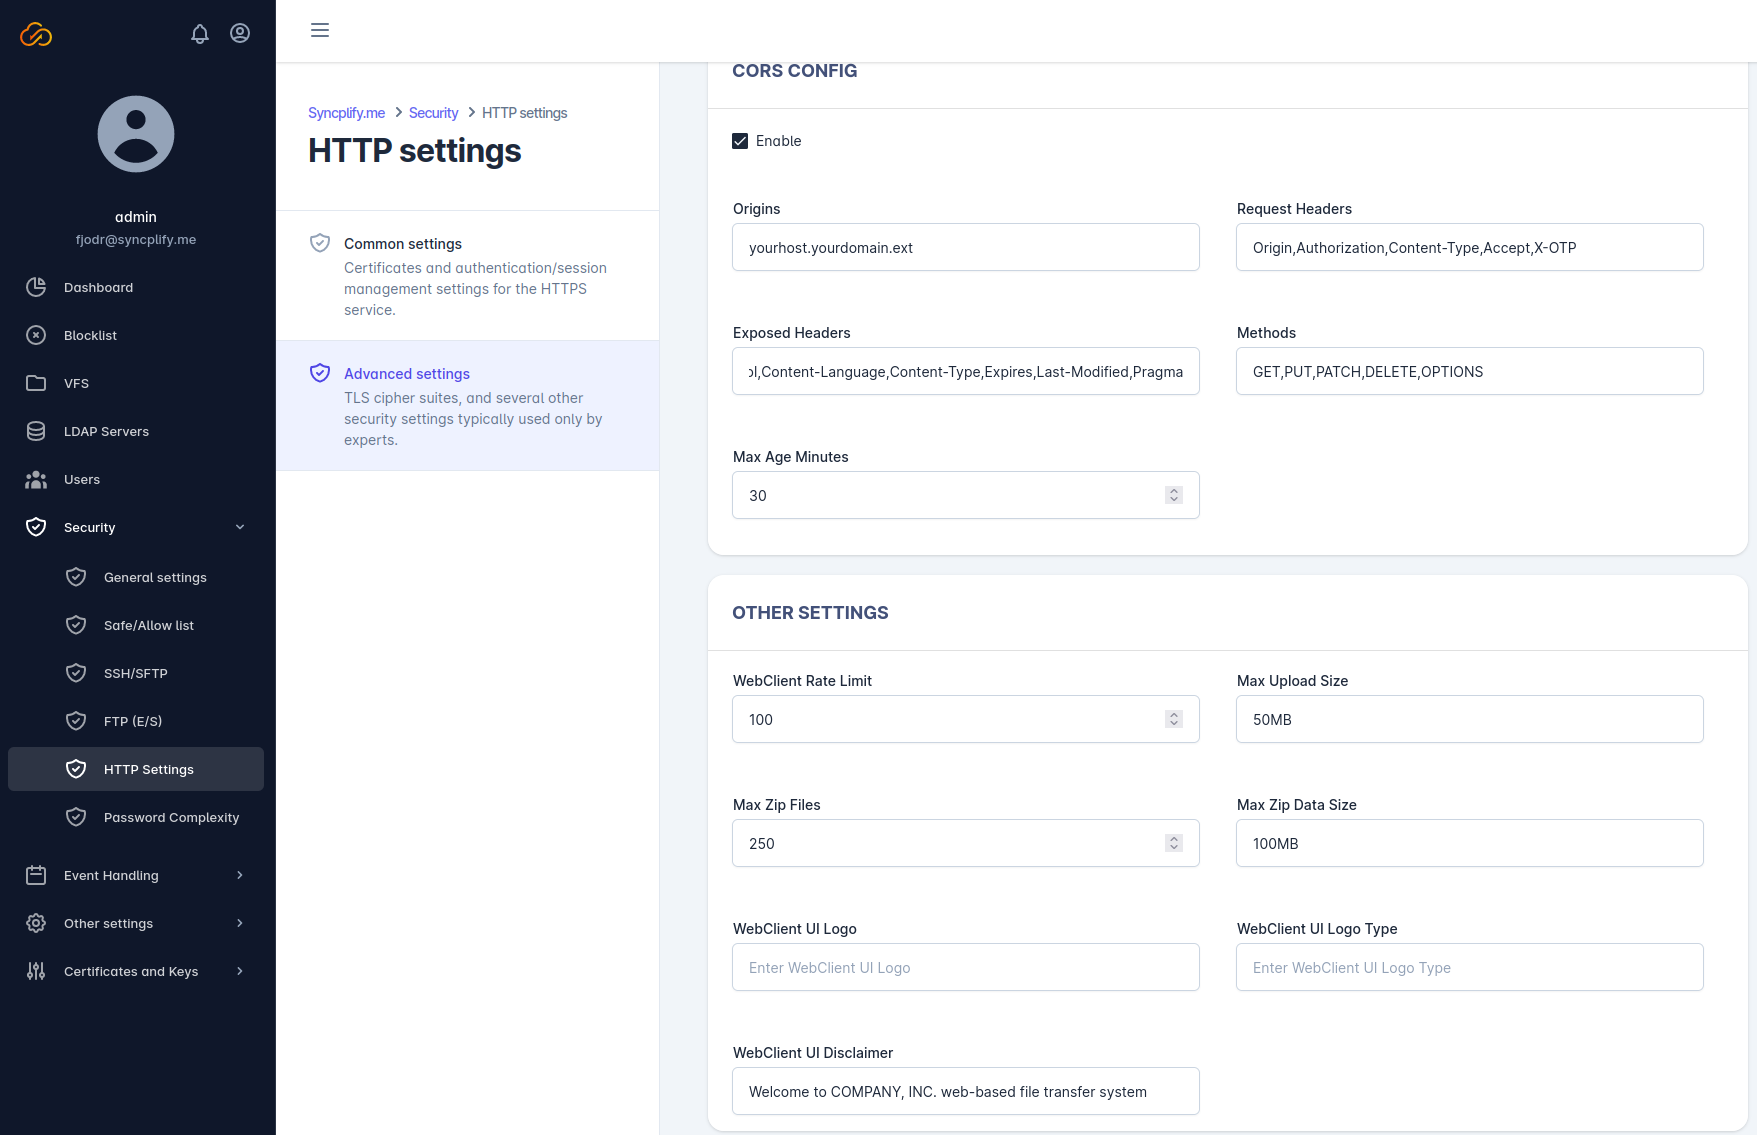
Here is where you configure some advanced settings for the HTTPS protocol handler (aka WebClient!). These settings are for experts only, in most cases the default ones are perfectly fine to operate your Syncplify Server! reliably.

These advanced settings are sub-divided in the following categories:

  • Security: include some very advanced security settings for expert users who are intimately familiar with the HTTP protocol standard.
  • CORS: typical CORS settings that all web servers have, the only one you may want to typically modify is the host name which should correspond to the actual host name your machine is registered with on the DNS.
  • Other settings: this is where you define granular and finely-tuned settings, like the rate-limit, the maximum file upload size, the maximum number of files that can be downloaded in a single ZIP archive, the maximum size of data the server will allow to ZIP at once, and your WebClient!’s custom logo and disclaimer.

advanced_https_settings advanced_https_settings

Password constraints

In this section you can define the minimum length for your users’ passwords, as well as additional (optional) constraints, like - for example - whether or not such password shall include:

  • at least 1 uppercase character
  • at least 1 lowercase character
  • at least 1 numerical digit
  • at least 1 special character

password_constraints password_constraints

Scripting and event-handling

Depending on the edition (license) you own, your Syncplify Server! may have the ability to support SyncJS-based scripting and event-handling.

Subsections of Scripting and event-handling

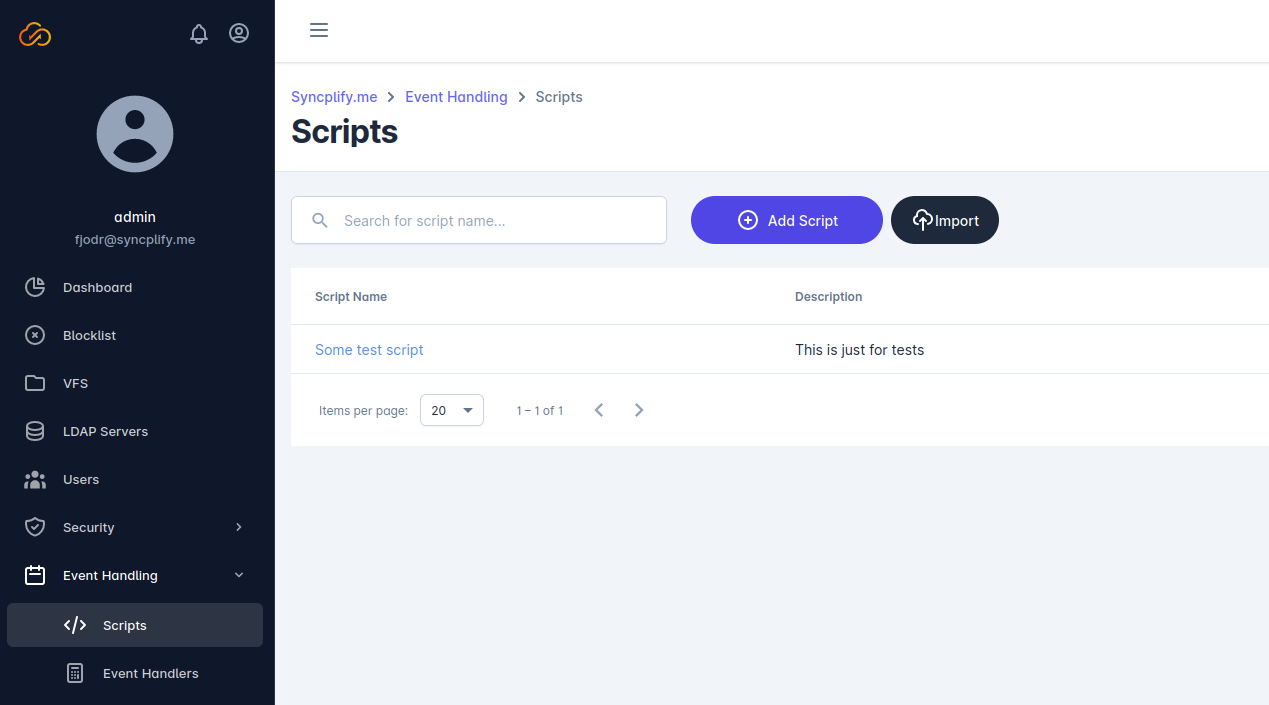
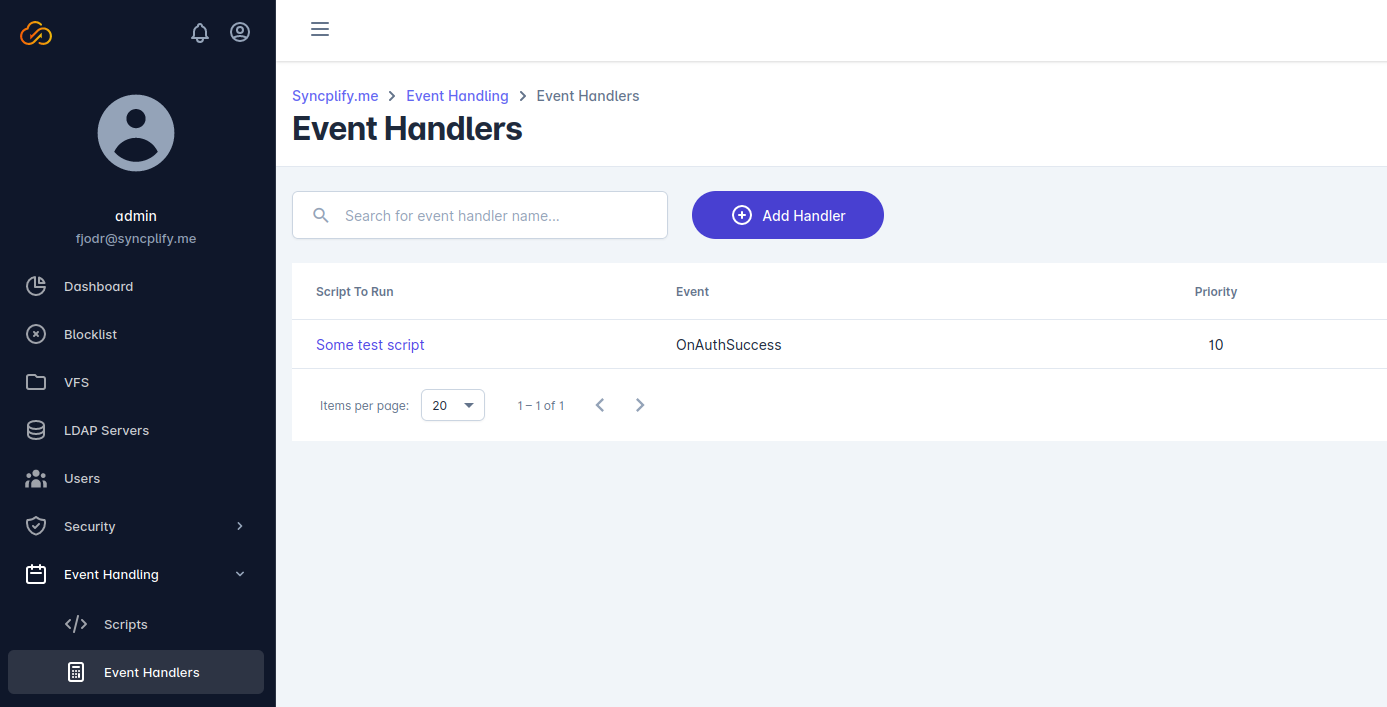
Event handlers

The scripts you wrote will not run automagically, you need to define event-handlers to trigger the execution of specific scripts upon occurrence of specific events during a client-server session.

For example you may want to run a certain script when a client connects, or when a user authenticates, or after a file has been uploaded… and so on.

There are dozens of events defined in Syncplify Server! that you can use to trigger the execution of your custom scripts.

event_handlers event_handlers

Other settings

This sub-section is devoted to grouping together other Server! settings that don’t fit in any other category, like global speed limits, SMTP, and logging.

Subsections of Other settings

Global speed limits

In this sub-section you can defined speed limits that apply globally to your entire Syncplify Server!, regardless of what user is logged in at any given time.

As always, these speed limits can differ based upon the source IP address or network (CIDR) each client connection comes from.

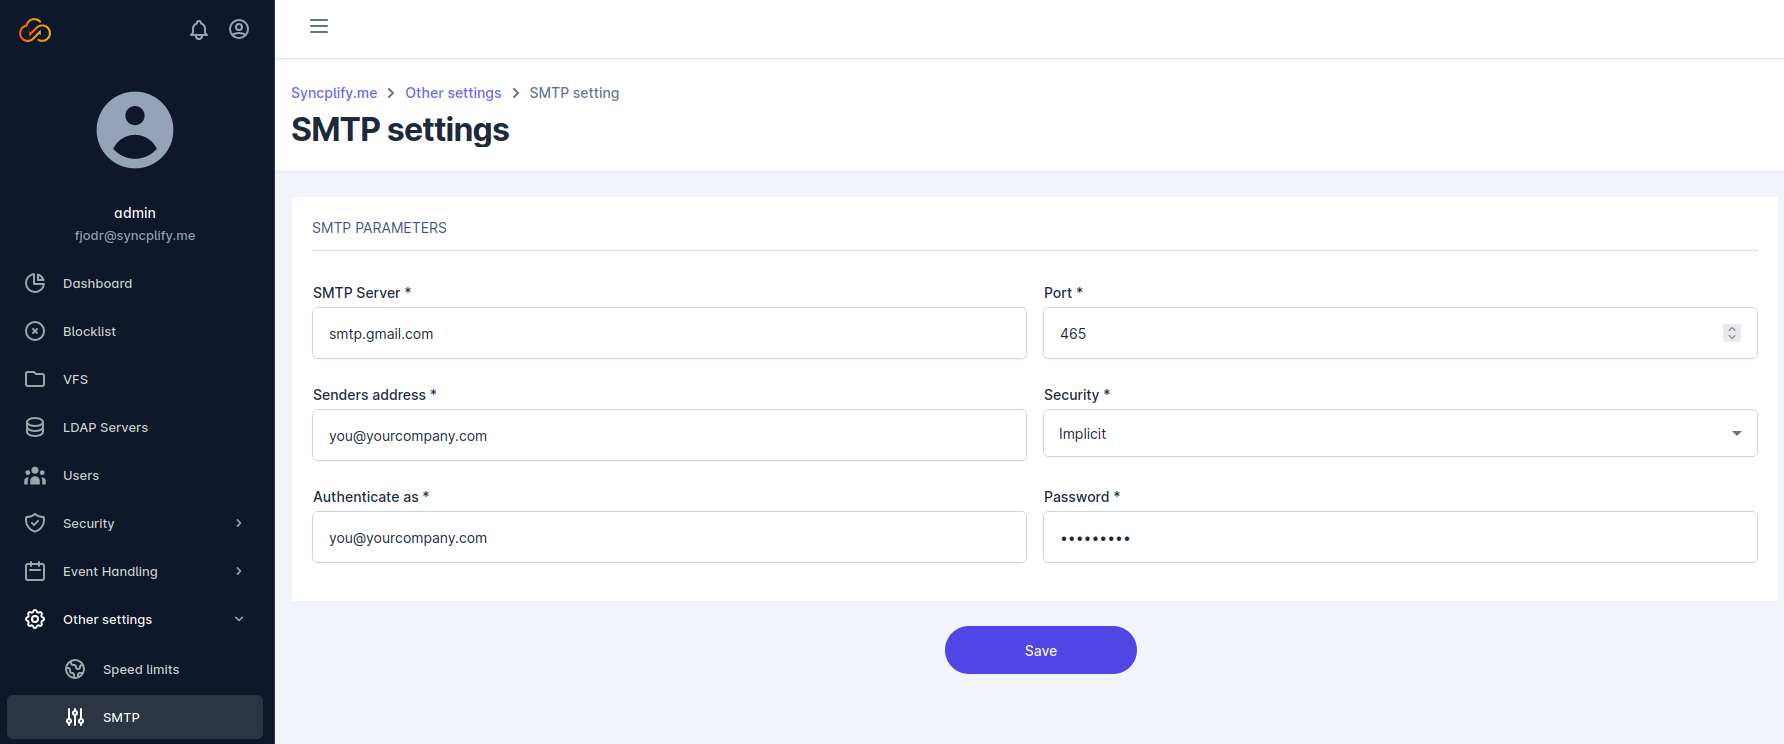
SMTP settings

If your license (software edition) allows scripting and event handling, then you may want your scripts to be able to send out emails. This is where you configure the mail (SMTP) server that your Syncplify Server! will use to send out emails when a script instructs it to do so.

smtp_settings smtp_settings

Logging

Syncplify Server! has a pretty flexible logging subsystem. This sub-section allows you to specify its detailed configuration based on the log output you choose.

In general there are 5 possible levels of log detail, each level includes all the levels above it, plus additional information:

  • Error: only logs errors, doesn’t even log user activity or client sessions
  • Warning: in addition to errors, also logs warnings… but nothing else
  • Information: this is the recommended log detail for normal operation, logs errors, warning, as well as users’ activity
  • Debug: this level logs all of the above, plus some additional information used for troubleshooting dubious operational scenarios
  • Trace: this level logs everything possible, produces a very large output, and should only be used by developers (or when instructed by a Syncplify customer support representative)

Here’s the settings available when you choose to output your logs to stdout:

log_stdout log_stdout

These, instead, are the settings available when you choose to output your logs to file:

log_to_file log_to_file

These are the settings available when you choose to output your logs to database:

log_to_db log_to_db

And these are the settings available when you choose to output your logs to syslog:

log_to_syslog log_to_syslog

Certificates & Keys

Starting from version 6.0, Syncplify Server! has unified the management of X.509 certificates and SSH host-keys into this dedicated section. This makes sense because they are used in many different parts of the software, so instead of having many different (and scattered) configurations, we elected to adopt a “manage once, reference anywhere” approach.

Subsections of Certificates & Keys

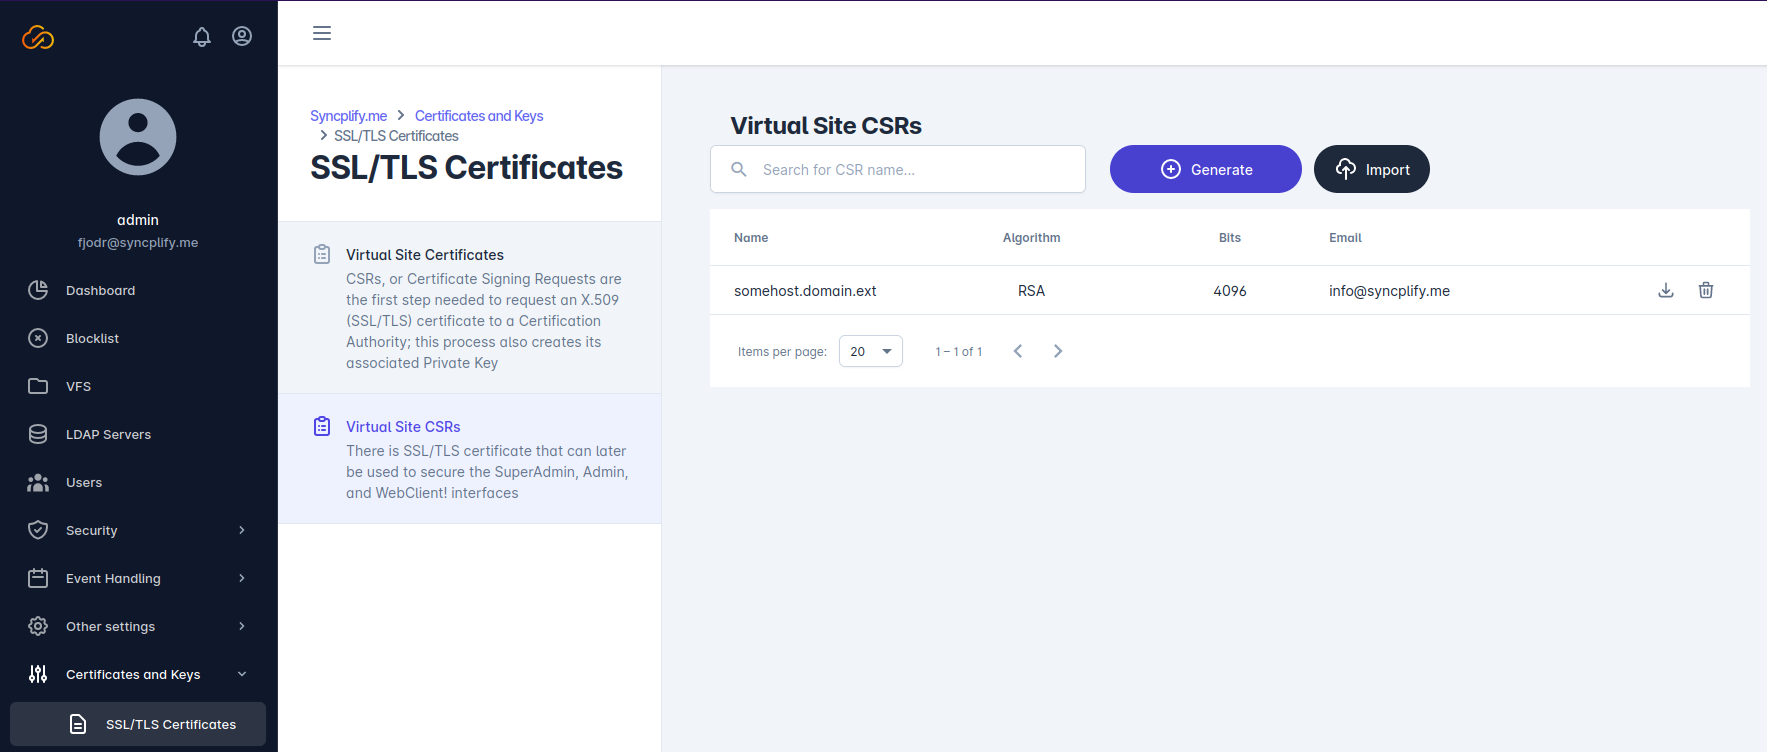
SSL/TLS Certificates

This sub-section allows you to manage, import, create, and request your Server!’s X.509 certificates.

The main sub-section is where you do most of the work: generate self-signed certificates, import self-signed or CA-issued ones, or export any certificate you already have.

certificates certificates

The CSR sub-section is where you can create your CSR (and private key) that you will send to a Certification Authority (CA) so that they can issue an official X.509 certificate for you.

csr csr

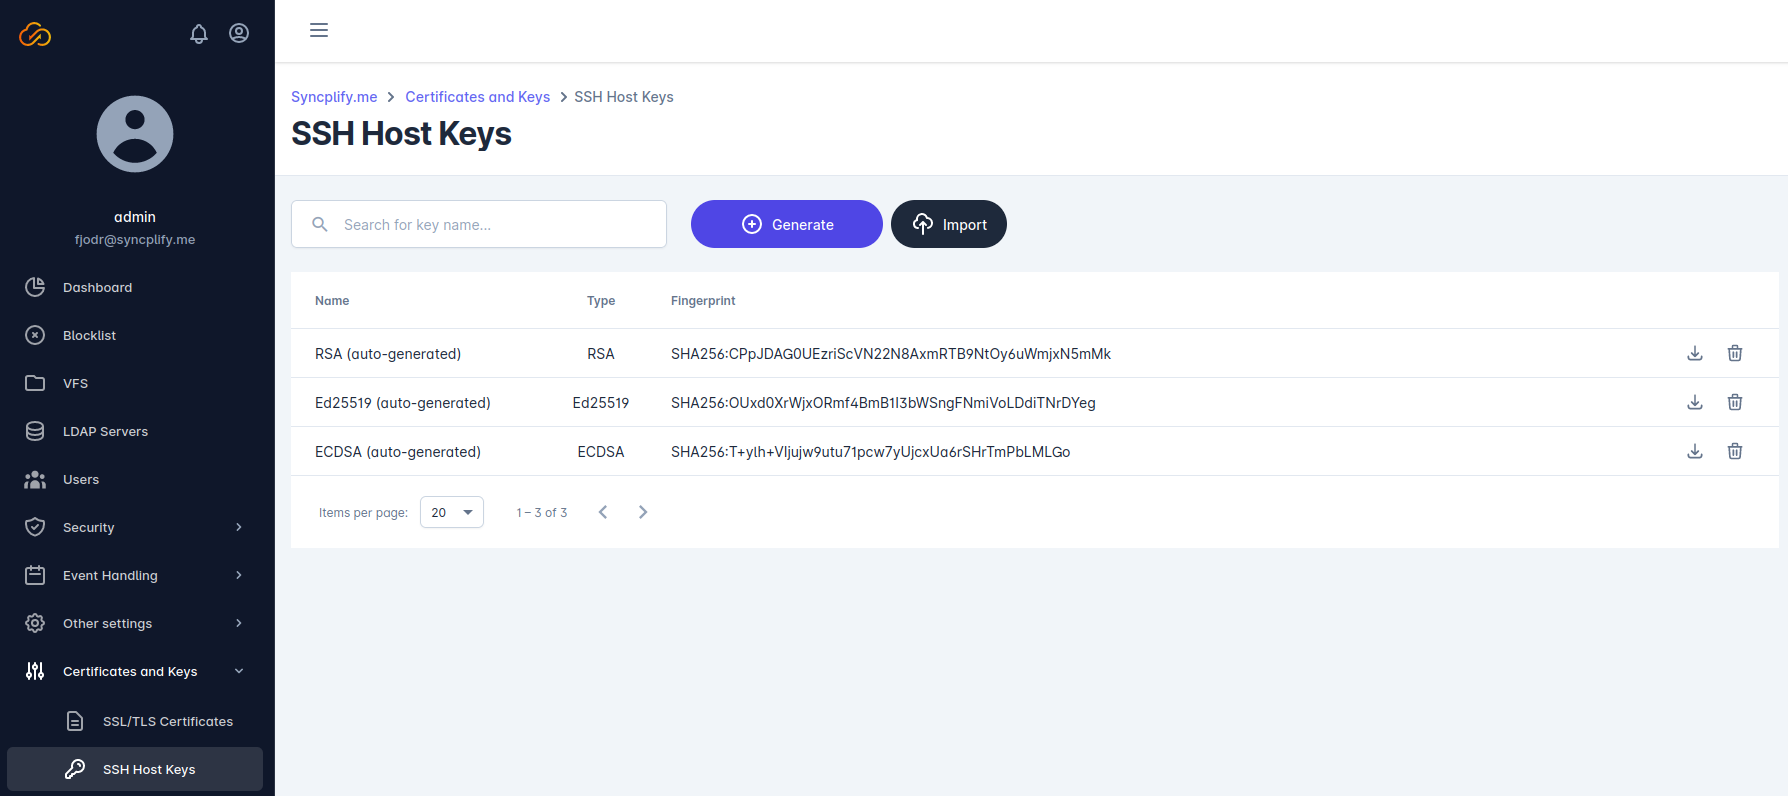
SSH Host Keys

This sub-section allows you to define, create and import/export your SSH2/SFTP/SCP protocol handler’s host keys.

ssh_host_keys ssh_host_keys

Miscellaneous concepts

This section contains information and concepts that do not fit anywhere else, or that are referenced in multiple parts of the manual (for deduplication purposes).

Subsections of Miscellaneous concepts

Dynamic "banners"

Some protocols feature so-called “banners”, which are short pieces of textual information that is sent to the client upon occurrence of certain events.

For example, the SSH2 protocol can send one such banner upon successful user authentication.

The FTP protocol has a richer set of banners: one that can be sent to the client upon connection (before authentication), one upon successful login, once upon failed login, and once when the user logs out.

All of these banners can be crafted by the Syncplify Server! Administrator to be dynamically built at run-time, using certain variables, at the exact time they are sent to each client. All of these variables must be enclosed between double curly braces.

For example, the following banner configured in the Admin UI:

{{software_name}} v{{software_ver}} FTP(E/S) Service Ready

will be sent to the client like this:

Syncplify Server! v6.0.8 FTP(E/S) Service Ready

So, what are the variable names that you can use? And what do they mean?

Variable Name Explanation
{{software_name}} Syncplify Server!
{{process_name}} Syncplify Server! Worker Process
{{software_ver}} Ex: 6.0.8
{{server_time}} Local time on the server machine. Ex: 2022-11-10 14:00:01.6
{{utc_time}} Current UTC time. Ex: 2022-11-10 23:00:01.6
{{cpu_load}} Current average system-wide CPU load. Ex: 3.42%
{{memory}} Memory currently used by the worker process. Ex: 68 MB
{{active_sessions}} Current number of active client sessions being served by the server’s worker process. Ex: 23

Administration (REST API)

Starting from version 6.0 (and with all subsequent minor and major releases) Syncplify Server! features a rich set of 100% OpenAPI-compliant REST API.

There are 3 sets of these API:

  • SuperAdmin API: the SuperAdmin UI is based on and uses this API
  • Admin API: the Admin UI is based on and uses this API
  • WebClient! API: the new WebClient! is based on and uses this API

So, as you can see, all of our web interfaces (UIs) under the hood take advantage of our REST API, making the REST API de-facto the actual low-level method to manage Syncplify Server! configuration, and use its WebClient!’s functions and features.

Subsections of Administration (REST API)

OpenAPI definitions

Syncplify Server! v6.x can be fully set up and managed via REST API.

The most common way to document a REST API is an OpenAPI (aka Swagger) definition. These definitions are hosted in dedicated spaces using a purpose-built interactive UI, the buttons here below can be used to access these dedicated definitions (each button opens a new browser tab).

Server! (SuperAdmin/Admin) OpenAPI Definition WebClient! OpenAPI Definition

Administration (Shell)

Starting from version Syncplify Server! v6.0, we have also elected to create and open-source a PowerShell module that allows for Syncplify Server!’s configuration management via shell (CLI).

The most recent version of PowerShell is cross-platform, so this project should cover both the Windows and the Linux operating systems. This project is open-source, so we rely on the developer community to perfect it and keep it up to date, thus at times it might be slightly behind the two official management tools: the web UI and the REST API.

Subsections of Administration (Shell)

Project repository

The Syncplify Server! Administration PowerShell Module is located here.

If you are a developer, please, consider helping the community by contributing to this open-source project.

Scripting and Event-Handling

This section of the manual explains and documents all of the extensions to the JavaScript language provided by Syncplify’s SyncJS language. Every object, method, function, and data type is documented here.

As of Syncplify Server! v6 and AFT! v4, the SyncJS has been unified and uniformed, to provide a consistent development experience. Most SyncJS scripts, in fact, can run on either software with no modifications.

Obviously, though, there are objects (like Session, User, VFS, for example) that only exist in the context of a Syncplify Server! client session; therefore, this section of the manual also documents those objects, types, and methods that are exclusively available in Server! and are not found in AFT!.

Subsections of Scripting and Event-Handling

Server!-specific SyncJS

This section of the manual documents SyncJS objects, properties, and functions that are only present in Syncplify Server! and not in AFT! because of the inherent differences in the two softwares architectures and purposes.

Subsections of Server!-specific SyncJS

Helper values/functions

At run-time in Syncplify Server!, scripts provide several (immutable) values, accessible via helper functions, which provide information about the script, its execution, and the event-hanlder that triggered it.

This section of the manual documents these special functions.

Subsections of Helper values/functions

EventHandler()

function EventHandler(): string;

This function returns the name of the event-handler that triggered the execution of the script currently being run.

Example

{
  var evth = EventHandler();
  Log(evth); // will log (for example): AfterFileUpload
}

ScriptID()

function ScriptID(): string;

This function returns the ID of the script currently being run.

Example

{
  var sid = ScriptID();
  Log(sid); // will log (for example): 8f56234fwerg425yg873
}

ScriptName()

function ScriptName(): string;

This function returns the name (short description) of the script currently being run.

Example

{
  var snam = ScriptName();
  Log(snam); // will log (for example): Send email notification
}

HandlerPriority()

function HandlerPriority(): number;

This function returns the priority of the event-handler that triggered the execution of the script currently being run.

Example

{
  var hpri = HandlerPriority();
  Log(hpri); // will log (for example): 10
}

ExecutionTimeout()

function ExecutionTimeout(): number;

This function returns the pre-set (by configuration) execution timeout in seconds for the script currently being run.

Please note that if you set the timeout to 0 (zero) which means that the script can run indefinitely, in order to avoid dead-loops the software will still internally force this timeout equal to 9999999 seconds (~115 days).

Example

{
  var hpri = ExecutionTimeout();
  Log(hpri); // will log (for example): 30
}

SecondsLeft()

function SecondsLeft(): number;

This function returns the number of seconds left in the execution loop for the current script; this is a floating point value indicating the number of seconds and fractions of second left.

Example

{
  // let's hypothesize we have roughly just about 29 and a half seconds left to run this script
  var sleft = SecondsLeft();
  Log(sleft); // will log (for example): 29.56437
}

The "Session" object

Almost every script run by Syncplify Server!’s event-handling subsystem exposes a pointer to a built-in object called Session. This object represents the current client session that the server is serving, and to which all script methods will apply.

The Session object is a standardized interface, common to all protocol handlers (so you can count on its consistency), and is defined as follows:

class Session {
  function GetID(): string;   
  function GetUser(): User;
  function GetCurrentVFS(): VFS;
  function GetVirtualSite(): string;
  function GetRemoteAddress(): string;
  function GetClientVersion(): string;
  function GetProtocol(): string;
  function GetStartTime(): Date;
  function GetLastActivity(): Date;
  function BlockOperation(): void;
  function AddCustomData(s: string);
  function GetCustomData(idx: number): string;
  function GetAllCustomData(): string[];
  function AddQuestion(pos: number, q, a: string, echo: boolean): void;
  function AddQuestionPassword(pos: number, q: string): void;
  function AddQuestionTOTP(pos: number, q: string): void;
  function AuthenticateUserFromScript(): void;
  function GetAbsPath(): string;
  function GetAbsTargetPath(): string;
  function GetRelPath(): string;
  function GetRelTargetPath(): string;
  function RemoveFromListDir(value: string);
  function GetLastCommand(): string;
  function GetLastCommandTime(): Date;
  function GetLastError(): string;
  function GetLastErrorTime(): Date;
}

Use the navigation menu here on the left to access specific documentation for each member function of the Session object.

Warning

The Session object is always null (and, therefore, it cannot be used) in scripts run by event-handlers that fire before the actual client session can be created, specifically: OnNewConnection and BeforeSendSoftwareID.

Example

Here’s a short example that logs session ID and username of the logged in user; typically the OnAuthSuccess is the appropriate event-handler to trigger the execution of this script.

{
  var sid = Session.GetID();
  var uname = Session.GetUser().ID;
  Log('User ' + uname + ' connected with session ID ' + sid);
}

Subsections of The "Session" object

GetID()

// in class: Session
function GetID() string;

Retrieves the current session’s ID, which is a unique ID in string format.

Example

{
  var sid = Session.GetID()
  // sid will contain a string like "prDqzL4V5jkauJZP9Nmt2e"
}

GetUser()

// in class: Session
function GetUser() User;

This function returns a pointer to an object that represents the authenticated User, if any, for the current session.

Warning

The returned pointer may be null when the client session has started but no user has been authenticated yet, so this condition must be checked before using the returned object.

Example

{
  var user = Session.GetUser();
  if (user !== null) {
    // we have a valid User object, so we can use it here...
  }
}

Certain event-handlers can only be triggered by conditions that can never happen without an authenticated user. Think about AfterFileUpload for example: it runs a script after a file has been uploaded, and no upload can ever occur unless a user has already authenticated. So, when the script is run by one of these event-handlers, the developer may skip the null-check.

GetCurrentVFS()

// in class: Session
function GetCurrentVFS(): VFS;

This function returns a pointer to an object that represents the current Virtual File System (VFS), if any, for the current session.

Warning

The returned pointer may be null when the client session has started but no VFS has been selected yet, so this condition must be checked before using the returned object.

Example

{
  var vfs = Session.GetCurrentVFS();
  if (vfs !== null) {
    // we have a valid VFS object, so we can use it here...
  }
}

Certain event-handlers can only be triggered by conditions that can never happen without an active/selected VFS. Think about AfterFileUpload for example: it runs a script after a file has been uploaded, and no upload can ever occur unless a VFS has already been selected during a file-transfer session. So, when the script is run by one of these event-handlers, the developer may skip the null-check.

GetVirtualSite()

// in class: Session
function GetVirtualSite(): string;

This function returns the ID of the virtual site in which context the session is running.

Example

{
  var vSiteId = Session.GetVirtualSite();
  Log('Virtual site is: ' + vSiteId);
}

GetRemoteAddress()

// in class: Session
function GetRemoteAddress(): string;

This function returns the remote (client) IP address. In case of a reverse-proxed environment the software will make a best-effort to return the actual client IP address, but when this is not possible the IP address of the reverse-proxy will be returned instead.

Note

This could be an IPv4 or an IPv6 address, depending on how the IP stack of your operating system and your network equipment are set up.

Example

{
  var clientIP = Session.GetRemoteAddress();
  Log('Client IP is: ' + clientIP);  // ex: 192.168.99.10 or fe80::a117:3373:7fa5:177c
}

GetClientVersion()

// in class: Session
function GetClientVersion(): string;

This function returns the client software and version, if available.

Note

Not all client software honors the command(s) required to acquire this information, so this function may return an empty string.

Example

{
  var client = Session.GetClientVersion();
  Log('Client software is: ' + client);  // ex: WinSCP_5.10.12
}

GetProtocol()

// in class: Session
function GetProtocol(): string;

This function returns the current protocol the ongoing client-server communication is using.

Value Protocol being used
ssh_shell SSH2 shell (terminal)
ssh_exec SSH2 command via the exec primitive
ssh_scp SCP file-transfer session over SSH2
ssh_sftp SFTP file-transfer session over SSH2
ftp Plain unencrypted (insecure) FTP
ftpes Encrypted FTPES (via explicit STARTTLS)
ftps Implicitly encrypted FTPS
https HTTPS (WebClient!) session
https_share HTTPS (WebClient!) session on a shared object (file/dir)

Example

{
  var proto = Session.GetProtocol();
  Log('Protocol is: ' + proto);  // ex: ssh_sftp
}

GetStartTime()

// in class: Session
function GetStartTime(): Date;

This function returns the start-time as a JavaScript Date object.

Example

{
  var ts = Session.GetStartTime();
  Log('Session started on: ' + ts.toString());
}

GetLastActivity()

// in class: Session
function GetLastActivity(): Date;

This function returns the timestamp of the last client-server activity (interaction) as a JavaScript Date object.

Example

{
  var ts = Session.GetLastActivity();
  Log('Last activity in this session occurred on: ' + ts.toString());
}

BlockOperation()

// in class: Session
function BlockOperation();

At any point in a script, invoked by any event-hanlder, a call to this Session method will instruct the server (virtual site worker process) to block the next operation, whatever that operation is.

A few examples (but truly this list could go on forever):

  • Block a directory list operation (in the OnDirList event-handler)
  • Block a file upload (in the BeforeFileUpload event-handler)
  • Block a certain type of authentication (in the OnAuthRequest event-hanlder)
  • …and so on

AddCustomData()

// in class: Session
function AddCustomData(s: string);

This function adds a custom piece of information (in string format) to the Session’s custom data storage. This is basically a list of string values that the Session object provides in order for Syncplify’s scripting engine to be able to store temporary information in one event-handler that can later on be retrieved from a different script running within the context of a different event-handler.

In a nutshell it’s a clever way for different scripts and event-handlers to pass data to each other down the chain.

Example

{
  // Store the name of the file being uploaded for later use
  Session.AddCustomData(Session.GetRelPath());
}

GetCustomData()

// in class: Session
function GetCustomData(idx: number): string;

This function retrieves (by index) a piece of custom data information previously stored via the AddCustomData function.

Example

{
  var cd = Session.GetCustomData(9);
  Log(cd);
}

GetAllCustomData()

// in class: Session
function GetAllCustomData(): string[];

This function retrieves all of the custom data information previously stored via the AddCustomData function. The returned custom data is in the form of an array of strings.

Example

{
  var cd = Session.GetAllCustomData();
  for (let i = 0; i < cd.length; i++) {
    Log(cd[i]);
  }
}

AddQuestion()

// in class: Session
function AddQuestion(pos: number, q, a: string, echo: boolean): void;

This function adds a custom question with a precise pre-defined answer to the list of questions that will be asked during keyboard-interactive authentication.

Warning

For obvious reasons this function should always only be used inside of an OnAuthInteractiveSetQuestions event-handler.

The parameters are as follows:

Parameter Type Explanation
pos number The question’s zero-based position; when, in the sequence, this question should be asked
q string The question (should end with a colon :)
a string The pre-defined expected (correct) answer
echo boolean Whether or not the answer should be echoed back to the client (hint: passwords/secrets should not)

Example

{
  // First, ask for the user's password
  Session.AddQuestionPassword(0, 'Type your password:');
  // Next, ask for Google Authenticator OTP (for 2FA/MFA)
  Session.AddQuestionTOTP(1, 'Type your Authenticator OTP:');
  // Then ask for any question we want
  Session.AddQuestion(2, 'Life, the Universe and Everything:', 42, true);
}

AddQuestionPassword()

// in class: Session
function AddQuestionPassword(pos: number, q: string): void;

This function adds a question to the list of questions that will be asked during keyboard-interactive authentication, specifically to ask for the user to provide their account password (the same one defined for password authentication).

Warning

For obvious reasons this function should always only be used inside of an OnAuthInteractiveSetQuestions event-handler.

The parameters are as follows:

Parameter Type Explanation
pos number The question’s zero-based position; when, in the sequence, this question should be asked
q string The question (should end with a colon :)

Example

{
  // First, ask for the user's password
  Session.AddQuestionPassword(0, 'Type your password:');
  // Next, ask for Google Authenticator OTP (for 2FA/MFA)
  Session.AddQuestionTOTP(1, 'Type your Authenticator OTP:');
  // Then ask for any question we want
  Session.AddQuestion(2, 'Life, the Universe and Everything:', 42, true);
}

AddQuestionTOTP()

// in class: Session
function AddQuestionTOTP(pos: number, q: string): void;

This function adds a question to the list of questions that will be asked during keyboard-interactive authentication, specifically to ask for the user TOTP (time-based one time password) generated by Google Authenticator. To be able to provide this TOTP, clearly, the user must already be enrolled in 2FA/MFA via WebClient!

Warning

For obvious reasons this function should always only be used inside of an OnAuthInteractiveSetQuestions event-handler.

The parameters are as follows:

Parameter Type Explanation
pos number The question’s zero-based position; when, in the sequence, this question should be asked
q string The question (should end with a colon :)

Example

{
  // First, ask for the user's password
  Session.AddQuestionPassword(0, 'Type your password:');
  // Next, ask for Google Authenticator OTP (for 2FA/MFA)
  Session.AddQuestionTOTP(1, 'Type your Authenticator OTP:');
  // Then ask for any question we want
  Session.AddQuestion(2, 'Life, the Universe and Everything:', 42, true);
}

AuthenticateUserFromScript()

// in class: Session
function AuthenticateUserFromScript(): void;

This function forcefully authenticates a user from within a script. Even if the user has failed authentication, typed the wrong password, had the wrong key… this function will force a successful authentication.

Warning

For obvious reasons this function should always only be used inside of an OnAuthRequest event-handler.

GetAbsPath()

// in class: Session
function GetAbsPath(): string;

This function returns the absolute path of the last file operation as pointed to by the current VFS.

Example

{
  // Let's say the current VFS is of type `Disk` and has its root in `C:\SFTPData`
  // and the last file operation occurred on file `/docs/resume.pdf`
  var ap = Session.GetAbsPath();
  Log(ap); // Will log `C:\SFTPData\docs\resume.pdf`
}

GetAbsTargetPath()

// in class: Session
function GetAbsTargetPath(): string;

This function returns the absolute path of the target file in the last file operation as pointed to by the current VFS.

So what is a target file? Only copy/rename/move operations have a source and a target path. For example, if you move file /docs/resume.pdf to /archive/oldresume.pdf then the target path is /archive/oldresume.pdf.

Example

{
  // Let's say the current VFS is of type `Disk` and has its root in `C:\SFTPData`
  // and the last file operation was a move of a file from `/docs/resume.pdf`
  // to `/archive/oldresume.pdf`, then...
  var atp = Session.GetAbsTargetPath();
  Log(atp); // Will log `C:\SFTPData\archive\oldresume.pdf`
}

GetRelPath()

// in class: Session
function GetRelPath(): string;

This function returns the relative VFS-root-based path of the last file operation as pointed to by the current VFS.

Example

{
  // Let's say the last file operation occurred on file `/docs/resume.pdf`
  var rp = Session.GetRelPath();
  Log(rp); // Will log `/docs/resume.pdf`
}

GetRelTargetPath()

// in class: Session
function GetRelTargetPath(): string;

This function returns the relative VFS-root-based path of the target file in the last file operation as pointed to by the current VFS.

So what is a target file? Only copy/rename/move operations have a source and a target path. For example, if you move file /docs/resume.pdf to /archive/oldresume.pdf then the target path is /archive/oldresume.pdf.

Example

{
  // Let's say the last file operation was a move of a file from `/docs/resume.pdf`
  // to `/archive/oldresume.pdf`, then...
  var rtp = Session.GetRelTargetPath();
  Log(rtp); // Will log `/archive/oldresume.pdf`
}

RemoveFromDirList()

// in class: Session
function RemoveFromDirList(what: string): string;

This function removes the specified items from a directory list that’s about to be returned to the client.

Warning

For obvious reasons, there’s only one event-handler this functions can be meaningfully used in: BeforeSendDirListToClient.

Example

{
  // Let's remove a specific file from the directory list
  Session.RemoveFromDirList('resume.pdf');
  // Let's also remove all .png files from the directory list
  Session.RemoveFromDirList('*.png');
}

GetLastCommand()

// in class: Session
function GetLastCommand(): string;

This function returns the last command (in full) that was issued by the client and correctly received and handled by the server.

Example

{
  // Let's say the last command the client sent and was successfully carried out
  // by the server was a list of the archive directory (LIST /archive)
  var lc = Session.GetLastCommand();
  Log(lc); // Will log `LIST /archive`
}

GetLastCommandTime()

// in class: Session
function GetLastCommandTime(): Date;

This function returns the timestamp of the last command that was issued by the client and correctly received and handled by the server, as a JavaScript Date object.

Example

{
  var lct = Session.GetLastCommandTime();
  Log(lct.toString()); // Will log something like `Sat Mar 18 2023 06:12:38 GMT-0700`
}

GetLastError()

// in class: Session
function GetLastError(): string;

This function returns the last error encountered by the server during the operation of the current session.

Example

{
  var lc = Session.GetLastCommand();
  var le = Session.GetLastError();
  Log(lc + '-' + le); // Log command and error (ex: `GET /file.zip - Error 5: access denied`)
}

GetLastErrorTime()

// in class: Session
function GetLastErrorTime(): Date;

This function returns the timestamp of the last command that was issued by the client and caused an error in the server, as a JavaScript Date object.

Example

{
  var lerrt = Session.GetLastErrorTime();
  Log(lerrt.toString()); // Will log something like `Sat Mar 18 2023 06:12:38 GMT-0700`
}

The "User" object

In all event-handlers that fire after a user has been authenticated, the following line of code returns a User object:

var user = Session.GetUser();
Warning

The returned pointer may be null when the client session has started but no user has been authenticated yet, so this condition must be checked before using the returned object.

This object’s methods are defined as follows:

class User {
  function GetID(): string;  
  EMail:       string;
  Type:        string;
  Subsystems:  string[];
  Description: string;
}

All of the above methods return read-only property values. It’s not allowed to edit, change, or otherwise modify a user account inside of a script. This object is provided for informational purposes.

Subsections of The "User" object

GetID()

var userId = User.GetID();

This method, defined on the User object, returns the user’s ID, which is its full username.

Warning

The current user object may be null when the client session has started but no user has been authenticated yet, so this condition must be checked before using the returned object or any of its methods/properties (see example below).

Example

{
  var user = Session.GetUser();
  if (user !== null) {
    var id = user.GetID();
    Log(id); // will log the user's ID, which is the full username
  }
}

The "VFS" object

In all event-handlers that fire after a user has successfully logged in and accessed at least its own Home-VFS, the following line of code returns a VFS object:

var vfs = Session.GetCurrentVFS();

This object’s methods are defined as follows:

class VirtualFileSystem {
  function GetID(): string;  
  Name:          string;
  Type:          string;
  Target:        string;
  TargetPayload: string;
  Encrypt:       boolean;
}

All of the above methods return read-only property values. It’s not allowed to edit, change, or otherwise modify a user account inside of a script. This object is provided for informational purposes.

General SyncJS language

This section of the manual documents all objects, properties, and methods of the SyncJS language that are shared between Syncplify Server! and AFT!, and are therefore available in both products.

Subsections of General SyncJS language

SyncJS types

JavaScript was originally designed with the goal of avoiding the need to determine the type of its runtime variables at design time.

Turns out that real programmers love types. Except when they don’t. So, JavaScript has evolved ovcer time to support a hybrid typization strategy, in which base elementary variables are type-less, while objects may have a specific type.

SyncJS takes full advantage of this. Some functions accept type-less parameters, and at the same time SyncJS objects have well-defined and strongly-typed interfaces. This section of the manual explains and documents these specific types and interfaces.

Subsections of SyncJS types

Directory list items

type DirListItem = {
  Name:      string;    // fully qualified path and file name (ex: "/docs/resume.docx")
  Type:      string;    // "FILE" or "DIR"
  Size:      number;    // the file size (integer)
  TimeStamp: time.Time; // timestamp of the item, can be converted to a JS `Date()` object via ToDate()
}

All functions that return directory lists always return an array of DirListItem objects.

Once a resulting array has been obtained, you can use the typical JavaScript ways to iterate over it, and check the various property of each one of its items.

Example 1

One way to iterate over a directory list, using a for cycle:

{
  // ...  
  // Acquire directory list
  var dirList = cli.ListDir('/docs');
  // Log each item in the list
  for (var i = 0; i < dirList.length; i++) {
    Log(dirList[i].Name);
  }
  // ...
}

Example 2

A different way to iterate over a directory list, using forEach:

{
  // ...  
  // Acquire directory list
  var dirList = cli.ListDir('/docs');
  // Log each item in the list
  dirList.forEach(myFunction);
    function myFunction(item, index, array) {
      Log(item.Name + ' [' + item.Size + ' bytes] [' + item.Type + ']');
    }
  }
  // ...
}

Local file-system functions

This section documents various functions that SyncJS provides to interact with the local file-system. Typical operations, like listing a directory, copying a file (etc…) are documented in this section.

Subsections of Local file-system functions

ListDir (list directory)

function ListDir(what, mask: string): DirListItem[];

The ListDir function lists the contents of a directory in the local file system, and returns the results in a JavaScript array of DirListItem objects.

This function accepts either 1 or 2 parameters:

Parameter Type Requirement Explanation
what string required must be a valid and existent directory on a local file system
mask string optional file-mask (example: *.docx) to limit the scope of the returned results only to items matching such mask; if this parameter is not specified, the list will include all files in the directory

Example

{
  // ...  
  // Acquire directory list
  var dirList = cli.ListDir('/docs');
  // Log each item in the list
  for (var i = 0; i < dirList.length; i++) {
    Log(dirList[i].Name);
  }
  // ...
}

Example (with mask parameter)

{
  // ...  
  // Acquire directory list
  var dirList = cli.ListDir('/docs', '*.docx'); // only list *.docx files
  // Log each item in the list
  for (var i = 0; i < dirList.length; i++) {
    Log(dirList[i].Name);
  }
  // ...
}

ListDirR (recursive ListDir)

function ListDirR(what, mask: string): DirListItem[];

The ListDirR function lists the contents of a directory in the local file system, recursively incluiding the contents of all of its subdirectories, and returns the results in a JavaScript array of DirListItem objects.

This function accepts either 1 or 2 parameters:

Parameter Type Requirement Explanation
what string required must be a valid and existent directory on a local file system
mask string optional file-mask (example: *.docx) to limit the scope of the returned results only to items matching such mask; if this parameter is not specified, the list will include all files in the directory and all of its subdirectories

Example

{
  // ...  
  // Acquire directory list
  var dirList = cli.ListDirR('/docs');
  // Log each item in the list
  for (var i = 0; i < dirList.length; i++) {
    Log(dirList[i].Name);
  }
  // ...
}

Example (with mask parameter)

{
  // ...  
  // Acquire directory list
  var dirList = cli.ListDirR('/docs', '*.docx'); // only list *.docx files, including those in subfolders
  // Log each item in the list
  for (var i = 0; i < dirList.length; i++) {
    Log(dirList[i].Name);
  }
  // ...
}

CopyFile (copy a file)

function CopyFile(what, toWhere: string): boolean;

This function copies the what file to the toWhere destination directory in the local file system, and returns true if the copy is successful, or false if the copy fails.

This function accepts the following parameters:

Parameter Type Requirement Explanation
what string required must be a valid and existing file in a local file system
toWhere string required a valid and existing directory in a local file system where you want to copy the file to

Possible return values:

Value Explanation
true the function succeeded: the file was copied to the destination folder
true the function failed: the file was not copied

MoveFile (move/rename a file)

function MoveFile(what, toWhere: string): boolean;

This function moves or renames the what file to the toWhere destination path in the local file system, and returns true if the operation is successful, or false if it fails.

This function accepts the following parameters:

Parameter Type Requirement Explanation
what string required must be a valid and existing file in a local file system
toWhere string required a valid and non-existing fully qualified destination path, including directory and file name

Possible return values:

Value Explanation
true the function succeeded: the file was moved/renamed
false the function failed: the file was not moved/renamed

DelFile (delete a file)

function DelFile(what: string): boolean;

This function tries to delete the what file from a local file system, and returns true if the operation is successful, or false if it fails.

This function accepts the following parameters:

Parameter Type Requirement Explanation
what string required must be a valid and existing file in a local file system

Possible return values:

Value Explanation
true the function succeeded: the file was deleted
false the function failed: the file was not deleted

SecureErase (delete file)

function SecureErase(what: string, passes: number): boolean;

This function tries to delete the what file from the local file-system using a secure erasure algorithm. This means that the file will be overwritten with crypto-secure pseudo-random data before it’s actually deleted from the storage medium, in order to make it unrecoverable. For this reason, depending on the size of the file, this function may take a while to complete.

The second parameter passes is optional, and specifies how many times the file needs to be overwritten with crypto-secure pseudo-random data before the actual deletion occurs. If left unspecified, the file will be overwritten only once and then deleted.

This function accepts the following parameters:

Parameter Type Requirement Explanation
what string required must be a valid and existing file in a local file system
passes number optional the number of times the file should be overwritten with random data before its actual deletion, if this parameter is not specified the file will be overwritten once

Possible return values:

Value Explanation
true the function succeeded: the file was deleted
true the function failed: the file was not deleted

Example (Windows file system, no optional parameter)

{
  if (SecureErase('C:\\Data\\SomeFile.docx')) {
    // ...
  }
}

Example (Linux file system, with optional parameter)

{
  if (SecureErase('/home/someuser/data/SomeFile.pdf')) {
    // ...
  }
}

MakeDir (create a directory)

function MakeDir(what: string): boolean;

This function attempts to create the what directory in the local file-system, and returns true if the creation is successful, or false if the function fails.

This function accepts the following parameters:

Parameter Type Requirement Explanation
what string required must be a valid and non-existing path to the directory you wish to create

Possible return values:

Value Explanation
true the function succeeded: the directory was created
false the function failed: the directory was not created

DelDir (delete a directory)

function DelDir(what: string): boolean;

This function attempts to delete the what directory in the local file-system, and returns true if the deleteion is successful, or false if the function fails.

Warning

This function will fail if the directory you’re trying to delete is not empty. In order to completely and recursively delete a directory and all of its files and subdirectories with a single command, you may want to take a look at the DelTree function.

This function accepts the following parameters:

Parameter Type Requirement Explanation
what string required must be a valid and existing path to an empty directory you wish to delete

Possible return values:

Value Explanation
true the function succeeded: the directory was deleted
false the function failed: the directory was not deleted

DelTree (delete directory-tree)

function DelTree(what: string): boolean;

This function attempts to delete the what directory in the local file-system and all of the files and subdirectories in it, and returns true if the deleteion is successful, or false if the function fails.

This function accepts the following parameters:

Parameter Type Requirement Explanation
what string required must be a valid and existing path to a directory you wish to delete

Possible return values:

Value Explanation
true the function succeeded: the directory was deleted
false the function failed: the directory was not deleted

ReadTextFile (read a text file)

function ReadTextFile(what: string): string;

This function reads the what text file and returns its entire contents as a string. If the file doesn’t exist or if the operating system returns an I/O error, this function returns an empty string.

This function accepts the following parameters:

Parameter Type Requirement Explanation
what string required must be a valid and existing path to a file you wish to read

Return value:

Type Explanation
string the entire contents of the file as a single string (may contain weird/unpredictable characters if you attempt to read a binary file)

ReadFileAsHex (read file bytes)

function ReadFileAsHex(what: string; offset, count: number): string;

This function reads count bytes, starting at offset position, from what file. The read bytes are returned as a hexadecimal (base16-encoded) string.

This function accepts the following parameters:

Parameter Type Requirement Explanation
what string required must be a valid and existing path to a file you wish to read
offset number required the starting byte from which the file should be read
count number required the number of bytes to read

Return value:

Type Explanation
string the base16-encoded (hexadecimal) bytes read from the file

Write text to file (2 ways)

SyncJS actually does offer 2 distinct functions to write text to file:

function AppendTextToFile(filename, text: string): boolean;
function WriteTextToFile(filename, text: string): boolean;

Both of these functions write text to a file and return true if the operation was successful, otherwise they return false. Also, both functions automatically create the file if it doesn’t exist.

The main difference is that the AppendTextToFile function will append text at the end of a file (if it exists) whereas the WriteTextToFile will overwrite whatever contents are already in a file with the specified text, and all pre-existing file content will be lost.

Both functions support escaped strings, so, for example, if you want to write a sentence and then a NEWLINE special control character, you can simply add \n to the text to be written to file. String escaping follows this convention.

This function accepts the following parameters:

Parameter Type Requirement Explanation
filename string required must be a valid and existing path to a file you wish to write into
text string required the text string you want to write to the file

Possible return values:

Value Explanation
true the function succeeded: the text was written into the file
true the function failed: the file was not written/modified

Example

{
  AppendTextFile('/home/someuser/docs/somefile.txt', 'Hello world!\n');
}

Zip (compress files)

function Zip(what, zipArchive, password: string): boolean;

The Zip function creates a compressed (zip) archive with the files that are passed to it in the what argument (supports wildcards). If the destination zip archive already exists it will be overwritten and replaced.

This function accepts the following parameters:

Parameter Type Requirement Explanation
what string required must be a valid and existing path or a wildcard path
zipArchive string required fully qualified path to the zip archive to be created
password string optional if this is not empty the zip archive will be encrypted

Possible return values:

Value Explanation
true the function succeeded: the zip archive was created
true the function failed: the zip archive was not created

Example

{
  Zip('./documents/*.docx', './archives/dox.zip');
}

FileType (identify MIME-type)

function FileType(filename: string): string;

Most file types can be identified regardless of the file name or extension, by simply reading the first 261 bytes (at most) of the file itself. Since there is no need to read the whole file, this process is extremely quick even for very large files, and doesn’t waste any RAM.

This function accepts the following parameters:

Parameter Type Requirement Explanation
filename string required must be a valid and fully qualified path to an existing file

This function returns a string containing the MIME-Type of the file, if it is identified. Here’s a list of file types that this function can identify:

Category Typical extension(s) Returned MIME-Type
Image jpg, jpeg image/jpeg
Image png image/png
Image gif image/gif
Image webp image/webp
Image cr2 image/x-canon-cr2
Image tif, tiff image/tiff
Image bmp, bmp2 image/bmp
Image heif image/heif
Image jxr image/vnd.ms-photo
Image psd image/vnd.adobe.photoshop
Image ico image/x-icon
Image dwg image/vnd.dwg
Video mp4 video/mp4
Video m4v video/x-m4v
Video mkv video/x-matroska
Video webm video/webm
Video mov, qt video/quicktime
Video avi video/x-msvideo
Video wmv video/x-ms-wmv
Video mpg video/mpeg
Video flv video/x-flv
Video 3gp video/3gpp
Audio mid audio/midi
Audio mp3 audio/mpeg
Audio m4a audio/m4a
Audio ogg audio/ogg
Audio flac audio/x-flac
Audio wav audio/x-wav
Audio amr audio/amr
Audio aac audio/aac
Archive epub application/epub+zip
Archive zip application/zip
Archive tar application/x-tar
Archive rar application/x-rar-compressed
Archive gz application/gzip
Archive bz2 application/x-bzip2
Archive 7z application/x-7z-compressed
Archive xz application/x-xz
Archive pdf application/pdf
Archive exe application/x-msdownload
Archive swf application/x-shockwave-flash
Archive rtf application/rtf
Archive iso application/x-iso9660-image
Archive eot application/octet-stream
Archive ps application/postscript
Archive sqlite application/x-sqlite3
Archive nes application/x-nintendo-nes-rom
Archive crx application/x-google-chrome-extension
Archive cab application/vnd.ms-cab-compressed
Archive deb application/x-deb
Archive ar application/x-unix-archive
Archive Z application/x-compress
Archive lz application/x-lzip
Archive rpm application/x-rpm
Archive elf application/x-executable
Archive dcm application/dicom
Document doc application/msword
Document docx application/vnd.openxmlformats-officedocument.wordprocessingml.document
Document xls application/vnd.ms-excel
Document xlsx application/vnd.openxmlformats-officedocument.spreadsheetml.sheet
Document ppt application/vnd.ms-powerpoint
Document pptx application/vnd.openxmlformats-officedocument.presentationml.presentation
Font woff application/font-woff
Font woff2 application/font-woff
Font ttf application/font-sfnt
Font otf application/font-sfnt
Application wasm application/wasm

StatFileSystemObject (file/dir)

function StatFileSystemObject(what: string): DirListItem;

This function returns the stat information for the what file/directory in the local file-system. If the object doesn’t exist the returned information contains an empty/blank DirListItem record.

This function accepts the following parameters:

Parameter Type Requirement Explanation
what string required must be a valid and existing path to a file or directory in a local file system

Example return value:

{
  "Name": "testfile.txt",
  "Type": "FILE",
  "Size": 1777,
  "TimeStamp": 1683729626897 // use ToDate() to convert this to a JS Date() object if needed
}

HashFile (file hashing)

function HashFile(hashType, fileName: string): string;

The HashFile function computes the hash value of a file. The hash value is returned as a string.

This function accepts the following parameters:

Parameter Type Requirement Explanation
hashType string required must be either one of these values: md5, sha1, sha128, sha256, sha384, sha512, sha3128, sha3256, sha3384, sha3512
fileName string required fully qualified path to the file of which you want to compute the hash

Example

{
  var h = HashFile('sha256', './documents/resume.pdf');
  // if the file exists and the hashType is valid, h will contain the hash value of the file
}

Web (HTTP/HTTPS) functions

When JavaScript is run inside of a browser, you can use the (non-ECMA) fetch function to perform http/https operations. The problem with fetch, though, is that it’s designed to run inside of an environment (the web browser) that’s totally asynchronous by definition. You start fetching something, then the browser goes on to do something else, and when (if ever) the fetched content becomes available, the execution cycle of the fetch operation is resumed. This works well in a browser, but would never work inside of a scripting environment where certainty is an absolute requirement when it comes to execution flow.

We have, therefore, added to SyncJS our own native http/https client object, called HttpCli.

It runs fully synchronized with the execution environment, ensuring that all functions that rely on the availability of the results of a web request will be correctly serialized. And, for convenience and ease of use, it is possible to configure it using the “fluent paradigm” (if you so wish).

Here below are three versions of the same example. The first one is more traditional, the second and third versions use the “fluent paradigm”.

First example (old-school, non-fluent)

{
  var hc = new HttpCli();
  hc.Url("https://www.example.com");
  hc.Timeout(30);
  hc.Header("Custom-Header", "My custom header content");
  var res = hc.Get();
}

Second exmaple (fluent)

{
  var hc = new HttpCli();
  var res = hc.Url("https://www.example.com").Timeout(30).Header("Custom-Header", "My custom header content").Get();
}

Third version (fluent and folded)

{
  var hc = new HttpCli();
  var res = hc.Url("https://www.example.com").
               Timeout(30).
               Header("Custom-Header", "My custom header content").
               Get();
}

Subsections of Web (HTTP/HTTPS) functions

Configuration methods

Before you call any of the http/https verbs to actually make the HttpCli do something, you must first create the object and configure it according to what you actually intend it to do. This means, for example, specifying the URL you want to call, or the request body you want to send to such URL, or even a timeout past which you want this call to give up.

The HttpCli object is quite flexible in these regards; let’s assume you’ve created your object like this:

{
  // create HttpCli object, let's call it "hc"
  var hc = new HttpCli();
  // time to configure our "hc" object...
  // ...
  // ...
}

Then, all the configuration methods are as follows:

Url

hc.Url(fullyQualifiedUrl: string): HttpCli;

This configuration is mandatory, every time you want to perform an http/https call, you have to set the URL property, which is the full address of the web resource you’re addressing your call to (ex: hc.Url("https://www.example.com")). Calling this method more than once will substitute the previous URL, so only the most recent call to .Url() will be considered.

Accept

hc.Accept(contentType: string): HttpCli;

You may set this configuration if you want your HttpCli to only accept from the server a response that has a certain MIME-type. Calling with method more than once will substitute the previous value of Accept, so only the most recent call to .Accpet() will be considered.

ApiKey

hc.ApiKey(yourApiKey: string): HttpCli;

If the server requires an API Key to serve a certain resource, you may specify such API Key using this method. Calling with method more than once will substitute the previous value of ApiKey, so only the most recent call to .ApiKey() will be considered.

BasicAuth

hc.BasicAuth(username, password: string): HttpCli;

If the server requires basic authentication to serve a certain resource, you may specify username and password using this method. Calling with method more than once will substitute the previous value of BasicAuth, so only the most recent call to .BasicAuth() will be considered.

Bearer

hc.Bearer(bearerToken: string): HttpCli;

If the server requires a Bearer Token to serve a certain resource, you may specify such Bearer Token using this method. Calling with method more than once will substitute the previous value of the Bearer Token, so only the most recent call to .Bearer() will be considered.

FormField

hc.FormField(fieldName, fieldValue: string): HttpCli;

If you want to send your request body with a multipart/form in it (typical with POST request), you may call this method to add a form field and its value to the request body payload. This call is additive, so you can call .FormField() multiple times to add multiple form fields and values.

hc.Header(headerName, headerValue: string): HttpCli;

If you want to send your http/https request with additional headers in it, you may call this method to add a header and its value to the request itself before it is sent to the server. This call is additive, so you can call .Header() multiple times to add multiple headers to the outgoing http/https call.

InsecureSkipVerify

hc.InsecureSkipVerify(): HttpCli;

Adding .InsecureSkipVerify() to your object configuration instructs the client to accept any server certificate, even self-signed ones, when performing https:// requests.

ReqBody

hc.ReqBody(body: string): HttpCli;

This method allows you to specify the raw body payload to be sent with this request; if the string you pass to it is recognized as a valid JSON structure, the HttpCli object will also automatically add/set the Content-Type header to application/json. Calling with method more than once will substitute the previous body payload, so only the most recent call to .ReqBody() will be considered.

Timeout

hc.Timeout(seconds: number): HttpCli;

This simply sets a timeout past which HttpCli will give up if it hasn’t received a response from the server yet. Calling with method more than once will substitute the previous timeout value, so only the most recent call to .Timeout() will be considered.

UserAgent

hc.UserAgent(softwareId: string): HttpCli;

This method allows you to set a custom User-Agent for your http/https call. Calling with method more than once will substitute the previous user agent value, so only the most recent call to .UserAgent() will be considered.

HTTP/HTTPS verbs

The HTTP(S) protocol defines the following “verbs” (that typically all web servers honor, although restrictions may apply because of security configurations): GET, POST, PUT, PATCH, DELETE, HEAD.

AFT!’s HttpCli object, therefore, has a method for each one of the above verbs, plus one extra method to allow you to send custom verbs to web servers that may be custom-built to support them. Every call to a “verb” method produces a response of type HttpRes.

.Get(): HttpRes
.Post(): HttpRes
.Put(): HttpRes
.Patch(): HttpRes
.Delete(): HttpRes
.Head(): HttpRes
.Do(customVerb: string): HttpRes

In order to make the best use of the HttpCli object, it’s important to understand the structure of its HttpRes response object.

Here’s a few examples of valid usages of HttpCli’s verb methods:

Example #1 (a simple GET)

{
  var hc = new HttpCli();
  var res = hc.Url("https://www.example.com").Timeout(30).Get();
  if (res.IsValid() && (res.StatusCode() == 200)) {
    Log(res.BodyAsString());
  }
}

Example #2 (POST with JSON payload)

{
  var hc = new HttpCli();
  var res = hc.Url("https://www.some.host").Timeout(30).ReqBody('{"name":"John","age":42}').Post();
  if (res.IsValid() && (res.StatusCode() == 201)) {
    Log('Success!');
  }
}

Example #3 (custom verb)

{
  var hc = new HttpCli();
  // Let's pretend your custom web server supports a "HELLO" verb
  var res = hc.Url("https://www.your.host").Timeout(30).Do("HELLO");
  if (res.IsValid() && (res.StatusCode() == 200)) {
    Log(res.BodyAsString());
  }
}

HttpRes response object

Every time an HttpCli verb method is called, it will produce an HttpRes object as a result.

Let’s consider the following simple script as an example:

{
  var hc = new HttpCli();
  var res = hc.Url("https://www.example.com").Timeout(30).Get();
  // "res" here above is an HttpRes object with its own methods
}

Following the example here above, the res object returned by the .Get() call will have the following methods:

IsValid

res.IsValid(): boolean;

This method simply returns true if the http/https call was completed, or false otherwise (for example, if the call times out).

StatusCode

res.StatusCode(): number;

This method returns the status code resulting from the http/https call, for example if everything went well a .Get() request will probably return 200, while a .Post() request will likely return 201. Other common and well-known codes are 403 (unauthorized), 404 (not found), and 500 (internal server error). Learn more about HTTP status codes.

BodyAsString

res.BodyAsString(): string;

This method returns the body of the response as a string (useful when the body is a web page or a JSON object for example).

BodyAsBytes

res.BodyAsBytes(): []number;

This method returns the body of the response as an array of bytes (useful when the body is a binary object, like an image for example).

BodySaveToFile

res.BodySaveToFile(filePath: string): boolean;

This method saves the body of the response to a file which fully-qualified path is passed as an argument (ex: /downloads/budget.csv).

ContentType

res.ContentType(): string;

This method returns a string containing the MIME Content-Type as reported by the server.

ContentLength

res.ContentLength(): number;

This method returns the Content-Length as reported by the server (some servers and CDNs fail to report this).

Encoding

res.Encoding(): string;

This method returns the Content-Transfer-Encoding as reported by the server (this also may be missing in some cases).

Headers

res.Headers(): object;

This method returns a single JSON object in which each property represents one response header. Example:

{
  "Cache-Control": "max-age=604800",
  "Content-Type": "text/html; charset=UTF-8",
  "Date": "Sun, 30 Aug 2020 16:24:06 GMT",
  "X-Cache": "HIT",
  "Age": "512004",
  "Etag": "\"3147526947+gzip\"",
  "Expires": "Sun, 06 Sep 2020 16:24:06 GMT",
  "Server": "ECS (sjc/4E76)",
  "Last-Modified": "Thu, 17 Oct 2019 07:18:26 GMT",
  "Vary": "Accept-Encoding"
}

Cookies

res.Cookies(): []object

This method returns an array of JSON object, in which each object represents a cookie returned by the web server in this response. For example, Google returns an array of cookies like this one:

[
  {
    "Name": "1P_JAR",
    "Value": "2020-08-30-16",
    "Path": "/",
    "Domain": ".google.com",
    "Expires": "2020-09-29T16:32:11Z",
    "RawExpires": "Tue, 29-Sep-2020 16:32:11 GMT",
    "MaxAge": 0,
    "Secure": true,
    "HttpOnly": false,
    "SameSite": 0,
    "Raw": "1P_JAR=2020-08-30-16; expires=Tue, 29-Sep-2020 16:32:11 GMT; path=/; domain=.google.com; Secure",
    "Unparsed": []
  },
  {
    "Name": "NID",
    "Value": "204=EHXBqKVUuskC5fcv3UnbLPB7oN0LU-nTODKDhuvBF5WzonZJToiwoBK12N7gr3Pycq8jCZDNS6PW9SV57GtIeCYw488",
    "Path": "/",
    "Domain": ".google.com",
    "Expires": "2021-03-01T16:32:11Z",
    "RawExpires": "Mon, 01-Mar-2021 16:32:11 GMT",
    "MaxAge": 0,
    "Secure": false,
    "HttpOnly": true,
    "SameSite": 0,
    "Raw": "NID=204=EHXBqKVUuskC5fcv3UnbLPB7oN0LU-nTODKDhuvBF5WzonZJToiwoBK12N7gr3Pycq8jCZDNS6PW9SV57GtIeCYw488; expires=Mon, 01-Mar-2021 16:32:11 GMT; path=/; domain=.google.com; HttpOnly",
    "Unparsed": []
  }
]

SQL database functions

Similarly to what we’ve done for the HTTP(S) protocol support, we have also designed a generalized and fluent client object to interact with SQL databases, called SqlCli.

It supports the following databases (and more will be added in the future):

  • Couchbase
  • FirebirdSQL
  • Google BigQuery
  • MS SQL Server
  • MySQL/MariaDB
  • Oracle
  • Postgres
  • SQLite

As mentioned here above, this client object can also be used via the fluent paradigm. Here’s two versions of the same example. The first one is more traditional, while the second version uses the fluent paradigm.

First example (traditional, non-fluent)

{
  var cli = new SqlCli();
  cli.Driver("sqlite");
  cli.ConnString(":memory:");
  if (cli.Connect()) {
    // Perform SQL tasks....
    cli.Close();
  }
}

Second example (fluent)

{
  var cli = new SqlCli().Driver("sqlite").ConnString(":memory:");
  if (cli.Connect()) {
    // Perform SQL tasks....
    cli.Close();
  }
}

Subsections of SQL database functions

Supported database servers

Here’s a list of database servers supported by the SqlCli object, with their respective driver names next to them:

DB Server SqlCli Driver Name
Couchbase n1ql
FirebirdSQL firebirdsql
Google BigQuery bigquery
MS SQL Server mssql
MySQL/MariaDB mysql
Oracle oracle
Postgres pg
SQLite sqlite
Warning

A driver must always be specified before calling the Connect() method of the SqlCli client object. Failure to do so will result in your script’s execution being interrupted.

Configuring SqlCli

In order for an SqlCli client object to be able to connect and interact with a SQL database, the object needs to be configured first. Essentially, it needs to know two things:

  • A “driver” (to know which database to connect to)
  • A “connection string” (to connect and access the database)

The driver is specified via the Driver() configuration function, while the connection string is configured via the ConnString() configuration function.

A list of drivers is available in this manual. For each one of such drivers, here below we’re going to document how to build a proper/suitable connection string.

Driver: “n1ql” (Couchbase)

When using the n1ql driver, the connection string can either be the host name (or IP address) and port of a standalone Couchbase instance, or the URL of a Couchbase cluster.

Example of standalone Couchbase connection:

{
  var cli = new SqlCli();
  cli.Driver("n1ql");
  cli.ConnString("localhost:8093");
  if (cli.Connect()) {
    // Perform SQL tasks....
    cli.Close();
  }
}

Example of connecting to a Couchbase cluster:

{
  var cli = new SqlCli();
  cli.Driver("n1ql");
  cli.ConnString("http://localhost:9000/");
  if (cli.Connect()) {
    // Perform SQL tasks....
    cli.Close();
  }
}

Driver: “firebirdsql” (FirebirdSQL)

When using the firebirdsql driver, the connection string must be in the following format:

user:password@servername/foo/bar.fdb

Example of standalone FirebirdSQL connection:

{
  var cli = new SqlCli();
  cli.Driver("firebirdsql");
  cli.ConnString("user:password@servername/foo/bar.fdb");
  if (cli.Connect()) {
    // Perform SQL tasks....
    cli.Close();
  }
}

Driver: “bigquery” (Google BigQuery)

When using the bigquery driver, the connection string must be in the following format:

bigquery://projectid/location/dataset

Example of standalone BigQuery connection:

{
  var cli = new SqlCli();
  cli.Driver("bigquery");
  cli.ConnString("bigquery://projectid/location/dataset");
  if (cli.Connect()) {
    // Perform SQL tasks....
    cli.Close();
  }
}

Driver: “mssql” (MS SQL Server)

When using the mssql driver, the general rule to build your connection string is to build it as a URL following this general specification:

sqlserver://username:password@host/instance?param1=valueparam2=value

So, for example, if you’re connecting to a local instance of SQLExpress, you’ll use a connection string that looks like this:

sqlserver://sa@localhost/SQLExpress?database=masterconnection+timeout=30

Whereas if you’re connecting to a SQL server on localhost (but want to specify a non-standard port) you’ll use a connection string like this:

sqlserver://sa:mypass@localhost:1234?database=masterconnection+timeout=30

Remember to URL-encode any and every part of the connection string, because it’s ultimately a URL and must follow the rules of all URLs.

Example of standalone SQL Server connection:

{
  var cli = new SqlCli();
  cli.Driver("mssql");
  cli.ConnString("sqlserver://sa:mypass@localhost?database=master&connection+timeout=30");
  if (cli.Connect()) {
    // Perform SQL tasks....
    cli.Close();
  }
}

Driver: “mysql” (MySQL/MariaDB)

When using the mysql driver, the connection string must be in the following format:

user:password@(hostname_or_ipaddr:port)/dbname

Example of standalone MySQL connection:

{
  var cli = new SqlCli();
  cli.Driver("mysql");
  cli.ConnString("user:pass@(localhost:3306)/testdb");
  if (cli.Connect()) {
    // Perform SQL tasks....
    cli.Close();
  }
}

Driver: “oracle” (Oracle)

When using the oracle driver, the connection string must be in the following format:

user/pass@hostname_or_ipaddr:port/database

Example of standalone Oracle connection:

{
  var cli = new SqlCli();
  cli.Driver("oracle");
  cli.ConnString("user/pass@localhost:1521/mydb");
  if (cli.Connect()) {
    // Perform SQL tasks....
    cli.Close();
  }
}

Driver: “pq” (Postgres)

When using the pg driver, the connection string may contain the following information fields:

  • host: the host name or IP address of the machine/VM running Postgres
  • port: the port your Postgres listens on (default 5432)
  • user: a username to accedd the database
  • password: a password to accedd the database
  • dbname: the name of the database you want to access
  • sslmode: enable || disable

Depending on your database server configuration you may or may not include some of the fields here above in your connection string.

Example of standalone Postgres connection:

{
  var cli = new SqlCli();
  cli.Driver("pq");
  cli.ConnString("host=localhost port=5432 user=your_db_user password=your_db_passwrod dbname=db_name sslmode=disable");
  if (cli.Connect()) {
    // Perform SQL tasks....
    cli.Close();
  }
}

Driver: “sqlite” (SQLite)

When using the sqlite driver, the connection string can either be a fully qualified path to the database data file, or the special keyword :memory: if you wish to use a volatile in-memory DB.

Example of in-memory SQLite DB:

{
  var cli = new SqlCli();
  cli.Driver("sqlite");
  cli.ConnString(":memory:");
  if (cli.Connect()) {
    // Perform SQL tasks....
    cli.Close();
  }
}

Example of file-based SQLite DB:

{
  var cli = new SqlCli();
  cli.Driver("sqlite");
  cli.ConnString("/home/someuser/mydata.sqlite");
  if (cli.Connect()) {
    // Perform SQL tasks....
    cli.Close();
  }
}

Connecting to a DB server

The connection to a database (after having configured the SqlCli object) is performed via the Connect() method which returns true if the connection is successful, or false if the connection fails.

{
  var cli = new SqlCli().Driver("sqlite").ConnString(":memory:");
  if (cli.Connect()) {
    // Perform SQL tasks....
    cli.Close();
  }
}

Querying a dataset

Querying and extracting data from a database you’re connected to is done via the Query function of the SqlCli client object.

This command accepts a query in whichever SQL dialect your database server speaks, and returns the result set as a JSON array of objects, in which each object is a row in the result set.

The query may contain parameters. Each parameter is passed to the query via an array of untyped values, and each value substitutes a ? (question mark placeholder) in the select statement, in order of appearance.

Example

{
  var cli = new SqlCli();
  cli.Driver("sqlite");
  cli.ConnString("/var/sqlitedbs/mydb.sqlite");
  if (cli.Connect()) {
    var res = cli.Query('SELECT * FROM places WHERE code=?', [42]);
    Log(JSON.stringify(res));
    // Output:
    // [{"place":"universe","code":42},{"place":"milky way","code":42}]
    cli.Close();
  }
}

The untyped array of values is optional, and can be skipped when the query doesn’t contain any ? placeholder. For example, the following query is totally valid:

var res = cli.Query('SELECT * FROM places');

And this one with values of different types is valid as well:

var res = cli.Query('SELECT * FROM places WHERE code=? AND place=?', [42, "universe"]);
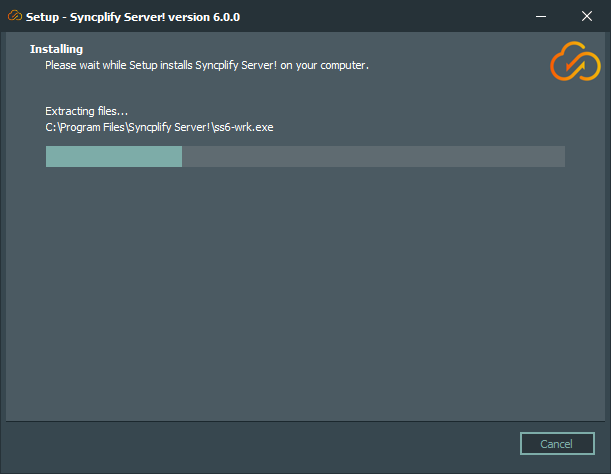
Insert/Update/Delete

Any other database operation except for querying the DB is performed via the Exec() function. This function can also intake parameters via an optional array of untyped values.

This command accepts a query in whichever SQL dialect your database speaks, and returns an object of type SqlResult which is defined as follows:

type SqlResult = {
  LastInsertedId: any; // typically a number or a string
  RowsAffected:   number;
}

Example (inserting data into DB)

{
  var cli = new SqlCli();
  cli.Driver("sqlite");
  cli.ConnString("/var/sqlitedbs/mydb.sqlite");
  if (cli.Connect()) {
    var res = cli.Exec('INSERT INTO places (place, code) VALUES (?,?)', ['universe', 42]);
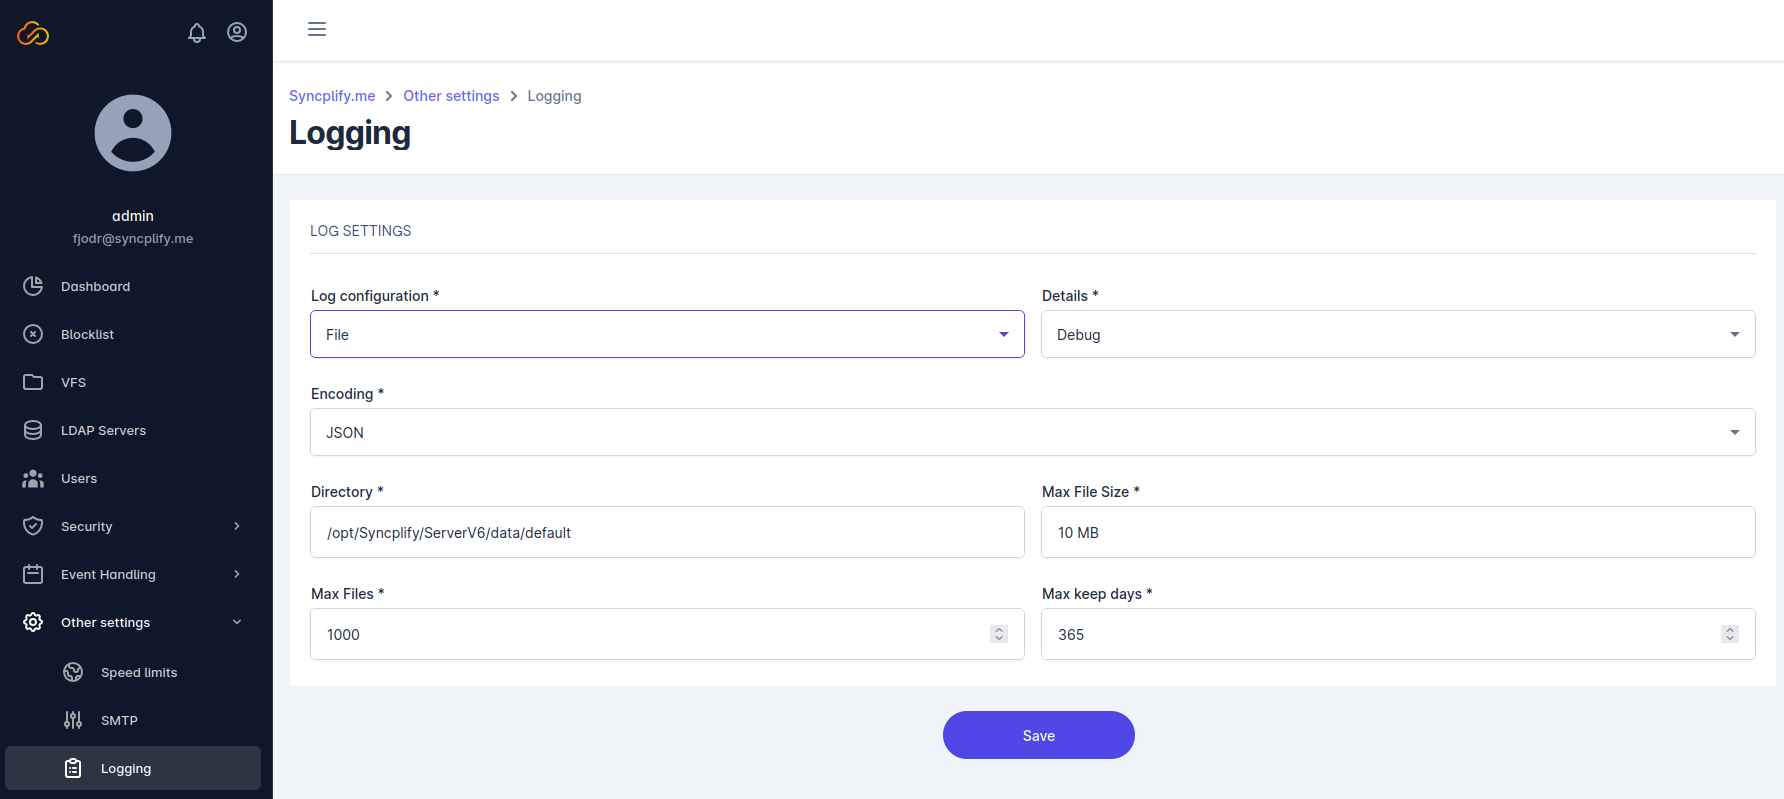
    Log(res.LastInsertedId); // Output: 12345
    Log(res.RowsAffected);   // Output: 1
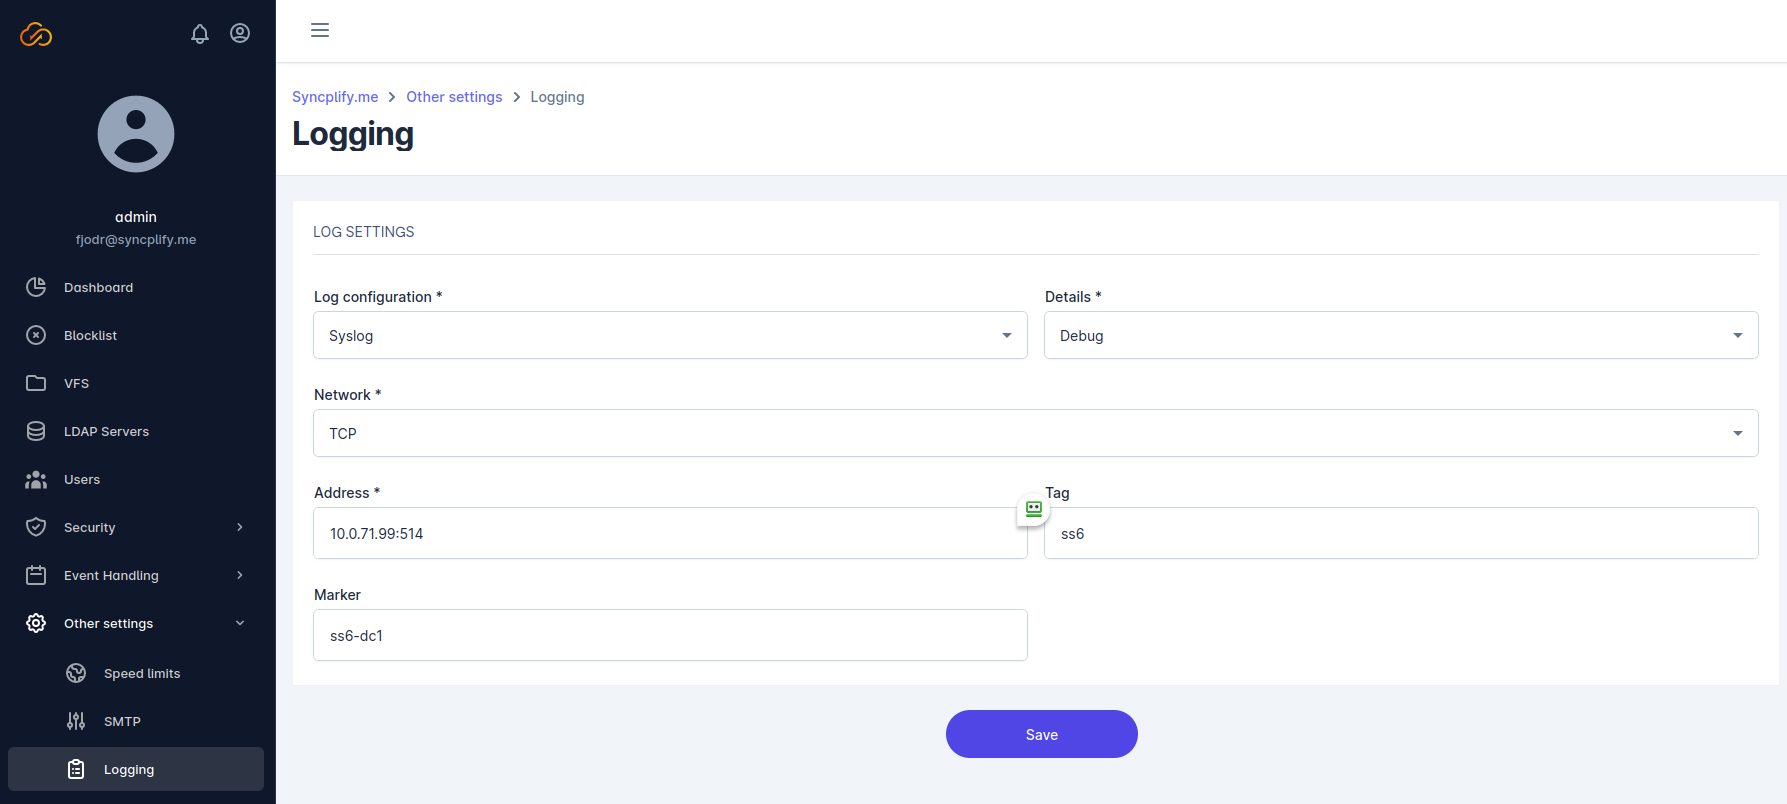
    cli.Close();
  }
}

Example (deleting data from DB)

{
  var cli = new SqlCli();
  cli.Driver("sqlite");
  cli.ConnString("/var/sqlitedbs/mydb.sqlite");
  if (cli.Connect()) {
    var res = cli.Exec('DELETE FROM places WHERE code=?', [42]);
    Log(res.RowsAffected); // Output: 1
    cli.Close();
  }
}

AMQP message queue protocol

Warning

There are two milestone versions of the AMQP message queuing protocol, and they are totally incompatible with each other: AMQP v0.9.1 used by RabbitMQ, StormMQ, Apache Qpid, JORAM, and others, and AMQP v1.0 used by Apache ActiveMQ, Azure Event Hubs, Azure Service Bus, Solace, and others. SyncJS features dedicated objects to handle each one of the above protocols, so - please - make sure you determine the exact protocol your provider uses, and choose the proper object, otherwise you won’t be able to connect to your message queue service.

Here’s the AMQP client object constructors:

AmqpClient091() // for AMQP v0.9.1
AmqpClient10()  // for AMQP v1.0

Both client objects supports both the plain-unencrypted amqp:// and the secure amqps:// protocols.

Only the names of the object creator functions differ. All methods of both objects are absolutely identical. Here’s two examples, so you can see that the only line that differs is the line to create the correct client object, in every other way these 2 scripts are absolutely identical:

Script that connects to an AMQP v0.9.1 (ex: RabbitMQ) and monitors the “myqueue” queue:

{
  ConsoleFeedback = true;
  var cli = new AmqpClient091();
  cli.URL = 'amqp://localhost:5672';
  cli.User = 'guest';
  cli.Pass = 'guest';
  if (cli.Connect()) {
    cli.MonitorQueue('myqueue');
    while (true) {
      Sleep(1000);
      if (HaltSignalReceived()) {
        break;
      }
      var msgs = cli.GetMessages();
      if (msgs.length > 0) {
        Log(JSON.stringify(msgs));
      }
    }
    cli.Close();
  }
  cli = null;
}

Script that connects to an AMQP v1.0 (ex: ActiveMQ) and monitors the “myqueue” queue:

{
  ConsoleFeedback = true;
  var cli = new AmqpClient10();
  cli.URL = 'amqp://localhost:5672';
  cli.User = 'guest';
  cli.Pass = 'guest';
  if (cli.Connect()) {
    cli.MonitorQueue('myqueue');
    while (true) {
      Sleep(1000);
      if (HaltSignalReceived()) {
        break;
      }
      var msgs = cli.GetMessages();
      if (msgs.length > 0) {
        Log(JSON.stringify(msgs));
      }
    }
    cli.Close();
  }
  cli = null;
}

Subsections of AMQP message queue protocol

AMQP object properties

Both the AmqpClient091 and the AmqpClient10 objects have the exact same properties:

URL:            string // ex: amqp://amqp.myhost.com:5672 or amqps://amqp.myhost.com:5672
User:           string // username if session must authenticate
Pass:           string // password (but it's better to use PassFromSecret)
PassFromSecret: string // name of the secret to retrieve the password at runtime

Connecting to an AMQP queue

function Connect(): boolean;

Before calling the Connect() method of any AmqpClinentXX object of your choice it is necessary to populate the object properties.

The Connect() method returns true if the connection to the AMQP message queue is successful, otherwise it returns false.

Example

{
  ConsoleFeedback = true;
  var cli = new AmqpClient091();
  cli.URL = 'amqp://localhost:5672';
  cli.User = 'guest';
  cli.Pass = 'guest';
  if (cli.Connect()) {
    cli.MonitorQueue('myqueue');
    while (true) {
      Sleep(1000);
      if (HaltSignalReceived()) {
        break;
      }
      var msgs = cli.GetMessages();
      if (msgs.length > 0) {
        Log(JSON.stringify(msgs));
      }
    }
    cli.Close();
  }
  cli = null;
}

Monitoring a queue

function MonitorQueue(queueName: string);

The MonitorQueue() function instructs the client object to start monitoring the specified queue for incoming messages.

Example

{
  ConsoleFeedback = true;
  var cli = new AmqpClient091();
  cli.URL = 'amqp://localhost:5672';
  cli.User = 'guest';
  cli.Pass = 'guest';
  if (cli.Connect()) {
    cli.MonitorQueue('myqueue');
    while (true) {
      Sleep(1000);
      if (HaltSignalReceived()) {
        break;
      }
      var msgs = cli.GetMessages();
      if (msgs.length > 0) {
        Log(JSON.stringify(msgs));
      }
    }
    cli.Close();
  }
  cli = null;
}

Processing messages

function GetMessages(): QueueMsg;

type QueueMsg = {
  receivedAt: Date; // JavaScript date object
  queue:      string;
  message:    string;
}

It is recommended, inside the loop in which GetMessages() is called iteratively, to also monitor whether a “halt” request has been issued and the script must terminate.

Example

{
  ConsoleFeedback = true;
  var cli = new AmqpClient091();
  cli.URL = 'amqp://localhost:5672';
  cli.User = 'guest';
  cli.Pass = 'guest';
  if (cli.Connect()) {
    cli.MonitorQueue('myqueue');
    while (true) {
      Sleep(1000);
      if (HaltSignalReceived()) {
        break;
      }
      var msgs = cli.GetMessages();
      if (msgs.length > 0) {
        Log(JSON.stringify(msgs));
      }
    }
    cli.Close();
  }
  cli = null;
}

Cloud and integration functions

SyncJS integrates functions and services from the Cloud. This section of the manual is where the interaction with those services is documented.

Subsections of Cloud and integration functions

Send to Slack (webhook)

function SendToSlackWebHook(
  webhookURL: string, // mandatory
  message:    string, // mandatory
  sender:     string, // optional
  icon:       string  // optional
): boolean;

This function posts a notification to a Slack channel via Slack’s “Incoming WebHooks”.

The webhookURL and message parameters are mandatory. You may, if you wish, also specify a sender (free-text string), and an icon name using the standard emoji icon name format.

This function returns true if the notification was successfully posted to the desired Slack channel, otherwise it returns false.

Example

{
  SendToSlackWebHook('https://hooks.slack.com/services/*****/*******/**************',
    'Some message', 'Syncplify.me AFT!', ':smile:');
}

Send SMS via Twilio

function SendSMSViaTwilio(
  twilioSid:    string,
  twilioToken:  string,
  senderNum:    string,
  recipientNum: string,
  message:      string
): boolean;

This function sends an SMS (text) message to a recipient (cell)phone number via Twilio.

The twilioSid and twilioToken parameters are the SID and AuthToken issued to you by Twilio when you signed up for the service.

The senderNum is one of the Twilio numbers you’ve been assigned; this number will be the phone number of the sender of the SMS.

The recipientNum is the phone number to which you are trying to send the SMS. Both of these numbers shall be in the international phone number standard format (example: +15550005555).

The message parameter is a short string (SMS texts may have a limited length that varies based upon technology and carrier, typically 140 or 280 characters). This is the actual message that Twilio will try to deliver to the intended recipient.

This function returns true if the notification was successfully posted to the desired Slack channel, otherwise it returns false.

Warning

Twilio’s acceptance of a message does not imply that the message will be successfully delivered to the recipient. You can track the delivery through your Twilio management console.

Example

{
  SendSMSViaTwilio('********', '*********', '+12345678901', '+15550005555', 'Hello from AFT!');
}

Email/communication functions

This section of the manual contains the documentation of the functions SyncJS uses to send emails and/or communicate with third parties.

Subsections of Email/communication functions

Send email (from server)

function SendMail(
  from:   string, // sender (in RFC-822 format)
  to:     string, // recipient(s) (in RFC-822 format)
  subj:   string, // subject
  body:   string, // body of the email
  attach: string  // full path to a file to be attached
): boolean;

The SendMail function sends an email using the SMTP configuration from your Server!’s virtual site global settings, so you don’t have to put any sensitive information in plain-text in your scripts. In Syncplify Server! this is the preferred way to send emails from your scripts.

Tip

The to parameter may contain multiple recipients, separated by semi-colon (;) as you can see in the example below.

Example

{
  SendMail('me@me.me', 'you@you.com;it@they.com',
    'NEW BACKUP UPLOADED!', 'A new backup has been uploaded!', '');
}

Process management

SyncJS can run/execute external programs. In this section of the manual you will find the documentation of SyncJS’s process-management functions.

Subsections of Process management

Run (execute a process)

function Run(commandLine: string): boolean;

The Run function spawns a process that executes an external program. The executed program can take command line parameters, as shown in the example below.

This function waits for the spawned process to exit, and then returns true if it ran without errors, or false if errors occurred.

Example

{
  if (Run('cmd /c "/my_shell_scripts/some_script.bat"')) {
    Log('Batch script ran successfully');
  }
}

RunAsync (async execution)

function RunAsync(commandLine: string): boolean;

The RunAsync function spawns a process that executes an external program. The executed program can take command line parameters, as shown in the example below.

This function does not wait for the spawned process to exit, and it immediately returns true if the process was started without errors, or false if errors occurred.

Example

{
  if (RunAsync('cmd /c "/my_shell_scripts/some_script.bat"')) {
    Log('Batch script started successfully');
  }
}

Image processing

This section of the manual covers SyncJS image/picture manipulation and management functions.

Subsections of Image processing

JPEGResample (resize a JPG)

function JPEGResample(
  imgFile:   string,
  maxWidth:  number,
  maxHeight: number,
  quality:   number
): boolean;

The JPEGResample function resizes the imgFile JPEG image/picture using the Lanczos3 resampling method to keep the best possible level of detail.

This function also retains the original image’s aspect-ratio, and chooses between maxWidth and maxHeight (both in pixels) whichever one would result in a smaller image. If you wish one of these two parameters to be ignored, simply set it to 0 (zero).

The last parameter quality is a numeric value, between 1 and 100, that indicates the desired quality of the resulting image inversely proportional to its lossy compression; basically an image saved with quality index of 25 will produce a smaller file but lose a lot more detail than an image saved with quality index of 75.

This function returns true if the image was resized successfully, or false if errors occurred.

Example

{
  JPEGResample('./self_portrait.jpg', 800, 600, 90);
}

PNGResample (resize a PNG)

function PNGResample(
  imgFile:   string,
  maxWidth:  number,
  maxHeight: number
): boolean;

The PNGResample function resizes the imgFile PNG image/picture using the Lanczos3 resampling method to keep the best possible level of detail.

This function also retains the original image’s aspect-ratio, and chooses between maxWidth and maxHeight (both in pixels) whichever one would result in a smaller image. If you wish one of these two parameters to be ignored, simply set it to 0 (zero).

This function returns true if the image was resized successfully, or false if errors occurred.

Example

{
  PNGResample('./self_portrait.png', 800, 600, 90);
}

JPEGMetadata (extract EXIF)

function JPEGMetadata(imgFile: string): boolean;

This function extract various meta-information (including full EXIF data) about a JPEG image from the imgFile file.

Example

{
  mdata = JPEGMetadata('./self_portrait.jpg');
  Log(JSON.stringify(mdata));
}

The example above produces a result similar to this:

{
  "Exif": {
    "ApertureValue": [
      "149/32"
    ],
    "ColorSpace": [
      1
    ],
    "ComponentsConfiguration": "",
    "CompressedBitsPerPixel": [
      "5/1"
    ],
    "CustomRendered": [
      0
    ],
    "DateTime": "2003:12:14 12:01:44",
    "DateTimeDigitized": "2003:12:14 12:01:44",
    "DateTimeOriginal": "2003:12:14 12:01:44",
    "DigitalZoomRatio": [
      "2272/2272"
    ],
    "ExifIFDPointer": [
      196
    ],
    "ExifVersion": "0220",
    "ExposureBiasValue": [
      "0/3"
    ],
    "ExposureMode": [
      0
    ],
    "ExposureTime": [
      "1/500"
    ],
    "FNumber": [
      "49/10"
    ],
    "FileNumber": [
      1171771
    ],
    "FileSource": "",
    "FirmwareVersion": "Firmware Version 1.10",
    "Flash": [
      24
    ],
    "FlashpixVersion": "0100",
    "FocalLength": [
      2,
      682,
      286,
      215
    ],
    "FocalPlaneResolutionUnit": [
      2
    ],
    "FocalPlaneXResolution": [
      "2272000/280"
    ],
    "FocalPlaneYResolution": [
      "1704000/210"
    ],
    "ImageType": "IMG:PowerShot S40 JPEG",
    "InteroperabilityIFDPointer": [
      1416
    ],
    "InteroperabilityIndex": "R98",
    "Make": "Canon",
    "MakerNote": "",
    "MaxApertureValue": [
      "194698/65536"
    ],
    "MeteringMode": [
      2
    ],
    "Model": "Canon PowerShot S40",
    "ModelID": [
      17891328
    ],
    "Orientation": [
      1
    ],
    "PixelXDimension": [
      2272
    ],
    "PixelYDimension": [
      1704
    ],
    "ResolutionUnit": [
      2
    ],
    "SceneCaptureType": [
      0
    ],
    "SensingMethod": [
      2
    ],
    "ShutterSpeedValue": [
      "287/32"
    ],
    "ThumbJPEGInterchangeFormat": [
      2036
    ],
    "ThumbJPEGInterchangeFormatLength": [
      5448
    ],
    "UserComment": "",
    "WhiteBalance": [
      0
    ],
    "XResolution": [
      "180/1"
    ],
    "YCbCrPositioning": [
      1
    ],
    "YResolution": [
      "180/1"
    ]
  },
  "Height": 360,
  "Valid": true,
  "Width": 480
}

PNGMetadata (PNG info)

function PNGMetadata(imgFile: string): boolean;

This function extract various meta-information about a PNG image from the imgFile file.

Example

{
  mdata = PNGMetadata('./self_portrait.png');
  Log(JSON.stringify(mdata));
}

The example above produces a result similar to this:

{
  "Valid": true,
  "Height": 360,  
  "Width": 480
}

Security/encryption functions

This section of the manual covers several additional security (mainly cryptographic) functions that you may want to use in your SyncJS scripts.

Subsections of Security/encryption functions

Generate a PGP key-pair

function GeneratePGPKeys(
  keyPairName: string,
  directory:   string,
  bits:        number  // 512, 1024, 2048, ...
): boolean;

This function generates a PGP key-pair (public and private keys), and saves both keys as files in the specified directory.

The name of both files will be keyPairName; the public key’s file name will be keyPairName.pubkey, while the private key’s file name will be keyPairName.privkey.

The bits parameter is an integer number, and it must be a PGP-compatible key size; typically these are powers of 2, like 512, 1024, or 2048 (for example).

If this function succeeds, it returns true, otherwise it returns false.

Example

{
  if (GeneratePGPKeys('testkey', 'C:\\PGPKeys', 2048)) {
    Log('Key-pair successfully generated');
    // Find testkey.pubkey and testkey.privkey in the C:\\PGPKeys folder
  }
}

PGP encrypt file

function PGPEncryptFile(
  inFile:  string,
  outFile: string,
  pubKey:  string,
  privKey: string
): boolean;

This function encrypts a file using OpenPGP; this function accepts the following parameters:

Parameter Type Requirement Explanation
inFile string required this is the full path and name to the file that you wish to encrypt
outFile string required this is the full path and name of the resulting encrypted file you wish to generate
pubKey string required the full path and name to a file containing the recipient’s PGP public key
privKey string required the full path and name to a file containing the sender’s PGP private key

Possible return values:

Value Explanation
true the function succeeded: the file was encrypted
true the function failed: the file was not encrypted

Example

{
  PGPEncryptFile('C:\\Data\\budget.xlsx', 'C:\\Encrypted\\budget.xlsx.pgp',
    'C:\\PGPKeys\\Bob.pubkey', 'C:\\PGPKeys\\Alice.privkey');
}

PGP decrypt file

function PGPDecryptFile(
  inFile:  string,
  outFile: string,
  pubKey:  string,
  privKey: string
): boolean;

This function decrypts a file using OpenPGP; this function accepts the following parameters:

Parameter Type Requirement Explanation
inFile string required this is the full path and name to the file that you wish to decrypt
outFile string required this is the full path and name of the resulting decrypted file you wish to generate
pubKey string required the full path and name to a file containing the recipient’s PGP public key
privKey string required the full path and name to a file containing the recipient’s PGP private key

Possible return values:

Value Explanation
true the function succeeded: the file was decrypted
true the function failed: the file was not decrypted

Example

{
  PGPDecryptFile('C:\\Data\\budget.xlsx.pgp', 'C:\\Encrypted\\budget.xlsx',
    'C:\\PGPKeys\\Bob.pubkey', 'C:\\PGPKeys\\Bob.privkey');
}

Miscellaneous functions

This is the section of the manual that documents functions that don’t fit in any other category.

Subsections of Miscellaneous functions

Log (custom log line)

function Log(line: any);

This function adds your own custom line to the software’s log. Typically you’d call this function with a string parameter, but truly it will log anything you pass to it.

It’s practically very similar to JavaScirpt’s own log() and it’s used the same way. But SyncJS’ Log() function is to be preferred to JavaScript’s log() because our own function always works, in every context, synchronous or asynchronous, and doesn’t require a console to be available to log to it. Your log line will be added to whatever logging destination you have configured in the software at any point in time.

Example

{
  Log('Hello!!');
  // ...
  Log(JSON.stringify(some_data));
}

Sleep (pause execution)

function Sleep(millisec: number);

Unlike many other programming languages, JavaScript doesn’t really have a native sleep function (although there are several ways to implement it, for those willing to spend a few lines of code on it). This utility function just makes it much easier to pause the execution of a SyncJS script for a certain number of milliseconds, when needed.

Extract file path

function ExtractPath(fullyQualifiedFileName: string): string;

This function takes a fully qualified path name (root-based path including all directories and the file name) and returns the path portion only.

Example

{
  res = ExtractPath('/docs/sheets/budget.xlsx');
  // res will be "/docs/sheets"
}

Extract file name

function ExtractName(fullyQualifiedFileName: string): string;

This function takes a fully qualified path name (root-based path including all directories and the file name) and returns the name portion only.

Example

{
  res = ExtractName('/docs/sheets/budget.xlsx');
  // res will be "budget.xlsx"
}

Extract file extension

function ExtractExt(fileName: string): string;

This function takes any file name (with or without fully qualified path) and returns the extension only.

Example

{
  res = ExtractExt('/docs/sheets/budget.xlsx');
  // res will be ".xlsx"
}

Num-to-string (padded)

function NumToStrPad(num, length: number): string;

This function takes a number num and returns a string representation of that number padded with zeroes to ensure that the resulting string is not shorter than length. Useful, for example, when you want a 2-digit representation of month and day number in a date.

Example

{
  var date = new Date();
  var month = date.getMonth() + 1;
  monthStr = NumToStrPad(month, 2);
  // Ex: in May, monthStr will contain the string "05"
}

Unique IDs (UUID)

SyncJS provides 3 different functions to create unique IDs according to your taste and preferences.

var uid = ShortUID();
// uid will contain a string like Rp68VrvHMNcc5jffKdQaWZ
var uid = LongUID();
// uid will contain a string like oUhCu6wp6DrmyVxVaEHjzRvv3mh3PGNksSUngbX6rd6Q
var uid = UUIDv4();
// uid will contain a string like 0d2b0018-cc08-44b3-bdc1-401b2819cef1

ToDate()

the ToDate function takes a time.Time type variable as parameter, and returns a native JavaScript Date() object. Very useful to turn various timestamps returned by other SyncJS functions into an easier-to-use native JavaScript Date type.

{
  var str = StatFileSystemObject("/home/myself/Documents/brochure.pdf");
  if !(str.Name == "") {
    var ts = ToDate(str.TimeStamp)
    // Use ts as any other native JavaScript Date() object
  }
}

More (cool) stuff

Why adding 3rd party stuff?

JavaScript is a great language, very easy to learn ad use on a daily basis. But by itself it lacks a few features that would make programmers’ lives a lot easier, but in many cases there already are libraries and code out there that do the job. So why reinvent the wheel?

From Node.js module support to pre-included modules, this is where you find all the 3rd party cool stuff.

Subsections of More (cool) stuff

Requiring a Node.js module

Similarly (yet not identically) to Node.js, the SyncJS language supports the require keyword. Requiring a module is necessary in order to use any of its exported functions. Module functions cannot be used if the module containing them hasn’t been required first.

For example, this script will fail/crash at runtime:

{
  // Will **CRASH** because the underscore module hasn't been "required"
  if (_.contains([1, 2, 3], 3)) {
    Log('Yay!');
  }
}

But this script would run flawlessly:

{
  // Require the minified Underscore.js module
  var _ = require("underscore-min");
  // Let's use the "contains" function from the previously required Underscore.js module
  if (_.contains([1, 2, 3], 3)) {
    Log('Yay!');
  }
}

In order to require modules, they have to be installed in the “modules” subdirectory of AFT!’s configuration folder. Typically this folder is located:

  • In Windows: C:\ProgramData\Syncplify.me\AFTv1\modules
  • In Linux (and other Posix OSs): /etc/Syncplify.me/AFTv1/modules
Warning

SyncJS does not use nor integrate Node.js; although we try our best to ensure compatibility with Node.js modules, we cannot guarantee that all Node.js modules will work in the SyncJS runtime environment.

The "underscore.js" library

Underscore is a JavaScript library that provides a whole mess of useful functional programming helpers without extending any built-in objects. It’s the answer to the question: “If I sit down in front of a blank HTML page, and want to start being productive immediately, what do I need?”

Underscore provides over 100 functions that support both your favorite workaday functional helpers: map, filter, invoke — as well as more specialized goodies: function binding, javascript templating, creating quick indexes, deep equality testing, and so on.

Learn more about it on the official Underscore.js web site.

SyncJS comes equipped out-of-the-box with the minified version of the underscore.js module. In order to use it you’ll need to require the module.

Example

{
  // Require the minified Underscore.js module
  var _ = require("underscore-min");
  // Let's use the "contains" function from the previously required Underscore.js module
  if (_.contains([1, 2, 3], 3)) {
    Log('Yay!');
  }
}

WebClient! UI

WebClient! is a web-based UI (User Interface) built into Syncplify Server!; depending on the Server! edition you own, WebClient! may be already available, or you may be able to purchase it as a paid add-on.

WebClient! has most of the functions of a traditional SFTP client (like FileZilla, WinSCP, …) but it runs inside of your web browser, and adds functionalities that are not commonly found in traditional GUI clients, among which:

  • The ability to access your SFTP server from any device with a web browser, without the need to install any dedicated software
  • The ability to create special links to share files and folders with third parties (with optional password-protection, expiration, …)